Restore /refit of my 1988/89 26D

A forum for discussing boat or trailer repairs or modifications that you have made or are considering.
User avatar
kenfyoozed
First Officer
Posts: 234
Joined: Fri Aug 20, 2021 5:19 pm
Sailboat: MacGregor 26D
Location: Mobile, AL

Re: Restore /refit of my 1988/89 26D

Post by kenfyoozed »

WOW. I hate working inside the lazarette. There is not enough room but I got accomplished what I needed. The fuel tank I selected is made by Moeller. Its dimensions are 46.25L x 6W x 11.25H and has an 11gal capacity. My 9.8 Tohatsu Sail Pro is listed at consuming 1gph at WOT, so an 11gal tank should last me a few miles.

Image


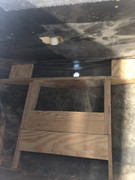
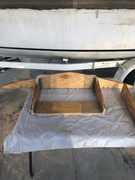
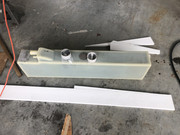
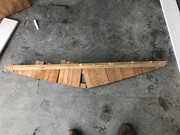
Trying to make a flat floor was an exercise in patience for me. After 3 failed attempts to match the profile of the hull this is what I came up with. I knew what length I wanted across the beam. I cut a 1x4 at 52". Then I cut strips of some old luan I had at 1.5" wide and then cut them in lengths of 2",4', 6"& 8". These strips I hot glued to the 1x4 to give me the profile that I then traced out on some 3/4" plywood. I cut my plywood stringer out and then hopped in the lazarette with a sander and fine tuned the fit until I was happy or lost feeling in my legs from the cramped quarters.

Image


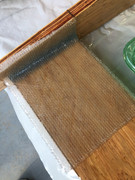
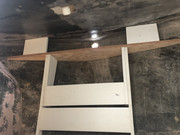
I then screwed 2 pvc board spacers to the fore side of the plywood stringer. One the aft side I also screwed 2 for and aft longitudinal stringers and then squared it off with another board across the beam. The longitudinal stringers were cut short so the unit could fit in through the lazarette opening.

Image


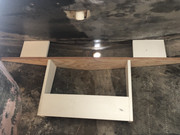
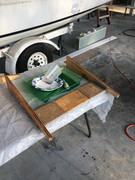
I then made a corresponding unit to fit the rear of the lazarette and mate up with the first.

Image


Here they both are out of the boat....

Image

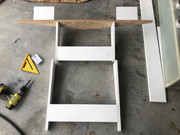
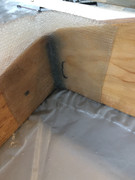
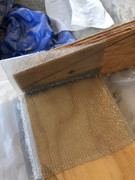
I used stainless screws and counter sunk them. I then added a fillet of the structural repair putty to any of the inside corners that I could. I then used sections of 1708 tape and glassed over them. I also saturated the plywood in resin to give it more water proofing. After it drys I'll clean it up with a good sanding and then gelcoat the entire units. I'll also need to add some limber holes to allow water to transverse to the lowest point for the bilge pump to collect. Once they go in the boat then planks of the PVC boards will go in on top. Should come out looking mighty spiffy!
User avatar
kenfyoozed
First Officer
Posts: 234
Joined: Fri Aug 20, 2021 5:19 pm
Sailboat: MacGregor 26D
Location: Mobile, AL

Re: Restore /refit of my 1988/89 26D

Post by kenfyoozed »

:( Huge failure..... the polyester resin did not adhere to the pvc boards. I was afraid that it wouldn't work, and it didn't. I should have scuffed the surface, which I didn't do because I was rushing. I should have done a test piece first. All the fillets and 1708 glass popped off the pvc boards cleanly. I am going to clean it all up and retry with epoxy instead. After a good sanding the ploy resin may work but I don't want another failure so im going straight for the epoxy. I am suing the slow hardener so it wont be ready for at least 24hrs. Thats ok, I have work this weekend and wont be able to get back on the project until Monday or Tuesday.
OverEasy
Admiral
Posts: 2873
Joined: Mon Sep 28, 2020 11:16 am
Sailboat: MacGregor 26X
Location: NH & SC

Re: Restore /refit of my 1988/89 26D

Post by OverEasy »

Hi Kenfyoozed!

Just a suggestion….PVC boards have a mold release wax on them …. You will want to wipe them down several times lightly with acetone and paper towels letting the surfaces throughly dry between wipes… don’t miss any surfaces to be filleted and glassed with Epoxy Resin… I wouldn’t recommend polyester resin with PVC…..I would also do a test piece BEFORE doing the whole thing as different EPOXY RESINS behave differently.

As PVC Board is rot proof as it is what I’ve personally done is make tabbed-&-slotted joints and simply used SST Screws or bolts and PVC cement after priming with clear Acetone. I’ve thickened PVC cement with silica micro-balloons to make fillet radius bond material.

This has generally worked well for me in a variety of applications.

Just a suggestion….🤔

Best Regards
Over Easy 😎😎🐩🐈
User avatar
kenfyoozed
First Officer
Posts: 234
Joined: Fri Aug 20, 2021 5:19 pm
Sailboat: MacGregor 26D
Location: Mobile, AL

Re: Restore /refit of my 1988/89 26D

Post by kenfyoozed »

I decided to remake all the pvc boards out of plywood after supper. Now I have a 1/8 wobble that I can't figure out where its going from. :evil: So that will be first on the list tomorrow morning as soon as the sun comes out. Then I will add my fillets and tab the inside corners as before and give all the plywood their first coat of poly resin.

I am now debating wether I should bond this stringer system in place? Its going to be a pain to do the work properly. Maybe I will just bed section of it with sikaflex. That would keep things from moving to much and take care of my 1/8" wobble if I can't work it out tomorrow.
User avatar
kenfyoozed
First Officer
Posts: 234
Joined: Fri Aug 20, 2021 5:19 pm
Sailboat: MacGregor 26D
Location: Mobile, AL

Re: Restore /refit of my 1988/89 26D

Post by kenfyoozed »

Got up at 5am and started tweaking the design. Got the wobble out completely. It was due to a couple of not quite square cuts. Then put in a fillet to the corners I could, a couple of inside corners I couldn't add a fillet due to the nesting type design. Added some glass tape and some poly resin to round out the morning. The glassing doesn't look the greatest in the pics because I let the ends run long. After it drys it will get cut off. Then sanded and faired where needed when I have extra putty from other areas. I try not to waste to much. I'll gelcoat it at the same time I gelcoat the lazarette. I need to source some 1/2" marine ply for the floor. All I have been able to find locally is 3/4". Although I could probably go with a good grade box store plywood and glass both sides and it be good enough....more to think about.... :|


Image

Image

Image

Image

Image

Image
User avatar
kenfyoozed
First Officer
Posts: 234
Joined: Fri Aug 20, 2021 5:19 pm
Sailboat: MacGregor 26D
Location: Mobile, AL

Re: Restore /refit of my 1988/89 26D

Post by kenfyoozed »

In planning for the rewire phase, I have been thinking about adding a switch panel to the cockpit. I would place it right under the tiller. This way I have access to a few switches that I would need while at the helm. Plus having a direct vision to the fuel gauge and a few other needed 12v plugs. This panel isn't cheap, and i could cobble the same thing together for about half the price but it would be separate panels. I like the looks of this. Thoughts?

Image
OverEasy
Admiral
Posts: 2873
Joined: Mon Sep 28, 2020 11:16 am
Sailboat: MacGregor 26X
Location: NH & SC

Re: Restore /refit of my 1988/89 26D

Post by OverEasy »

Just make sure it’s weather tight!!! :wink: :wink:

The pedestal isn’t on a Mac26X.
When stripping out the old pedestal mounted gages in preparation for our new engine installation I found a fair degree of oxidation on everything electrical and metallic including the actual gauges.

A sealing back box and sealing front over cover would be my recommendation.

It’s what we debated about when upgrading our DC electrical systems last year.
We chose to keep our switches in-cabin and readily accessed from the companionway entry.
That way they are protected from the elements, avoided the need for three way switch wiring, and avoided the “get wet” issue.

Best Regards
Over Easy 😎😎🐩🐈
User avatar
kenfyoozed
First Officer
Posts: 234
Joined: Fri Aug 20, 2021 5:19 pm
Sailboat: MacGregor 26D
Location: Mobile, AL

Re: Restore /refit of my 1988/89 26D

Post by kenfyoozed »

Weather tight is the goal and I think i can make it work.

Tonight we took the starboard side rail off. To access the starboard side we had to remove the interior walls. How structural are these interior walls? They are going back in place but I wanted to leave them out while I finish the refit. Can the deck be walked on while they are out?

More "glorious sanding" coming for tomorrow. :cry:
User avatar
kenfyoozed
First Officer
Posts: 234
Joined: Fri Aug 20, 2021 5:19 pm
Sailboat: MacGregor 26D
Location: Mobile, AL

Re: Restore /refit of my 1988/89 26D

Post by kenfyoozed »

I was able to fiberglass the starboard seam a week ago. Today I pulled the peel ply off the port side and sanded down all the runs. A few spots the peel ply tore and would not peel off. I had to sand it way. I went ahead and sanded the entire area even though peel ply was used. After a thorough sanding and a wipe down I applied a coat of fairing compound. I used the SM fairing compound mixture from US composites. It went on thick in a few places but a good sanding will knock it all back down. I figure i have a few rounds of sanding and fairing with these compound curves on the this rail. All is starting to come together,
Image

Image

Image

Image

Image
User avatar
Jimmyt
Admiral
Posts: 3402
Joined: Sat Jul 18, 2015 9:52 am
Sailboat: MacGregor 26M
Location: Mobile AL 2013 26M, 60 Etec

Re: Restore /refit of my 1988/89 26D

Post by Jimmyt »

That looks amazing! You’re really making good headway.
Jimmyt
P-Cub-Boo
2013 26M, Etec 60, roller Genoa, roller main
Cruising Waters: Mobile Bay, Western Shore, Fowl River
OverEasy
Admiral
Posts: 2873
Joined: Mon Sep 28, 2020 11:16 am
Sailboat: MacGregor 26X
Location: NH & SC

Re: Restore /refit of my 1988/89 26D

Post by OverEasy »

👍👍!!!Ditto!!!👍👍
User avatar
kenfyoozed
First Officer
Posts: 234
Joined: Fri Aug 20, 2021 5:19 pm
Sailboat: MacGregor 26D
Location: Mobile, AL

Re: Restore /refit of my 1988/89 26D

Post by kenfyoozed »

Jimmyt wrote: Sun Aug 21, 2022 12:46 pm That looks amazing! You’re really making good headway.
Thanks for the encouragement. I feel like I am way behind where I want to be, but I have no timeline. This rain everyday has got me slowed down more than I wanted. Im using slow hardener for the epoxy which is taking like 24hrs to cure. I wanted to be conservative with the sea and humidity we have been having but I probably should have used the medium hardener. All in all I'm happy with the direction its going.
User avatar
Jimmyt
Admiral
Posts: 3402
Joined: Sat Jul 18, 2015 9:52 am
Sailboat: MacGregor 26M
Location: Mobile AL 2013 26M, 60 Etec

Re: Restore /refit of my 1988/89 26D

Post by Jimmyt »

You aren’t kidding about rain. I keep expecting Noah to come floating down the street rounding up animals.

I’m impressed with what you’ve gotten done, and the quality you’ve achieved, especially given this whack weather we’ve had.

Quality work takes time. You wouldn’t want to be out sailing in this mess anyway.
Jimmyt
P-Cub-Boo
2013 26M, Etec 60, roller Genoa, roller main
Cruising Waters: Mobile Bay, Western Shore, Fowl River
OverEasy
Admiral
Posts: 2873
Joined: Mon Sep 28, 2020 11:16 am
Sailboat: MacGregor 26X
Location: NH & SC

Re: Restore /refit of my 1988/89 26D

Post by OverEasy »

Hi Kenfyoozed

Nothing wastes more time than fast hardener (IMO based upon personal experience). :? :cry: :|
Having the longer cure time helps avoid the need to grind the day’s work into dust and starting over ( yet again…tomorrow…)

I really haven’t had a slow cure backfire on me but I have had fast setting end up as disasters.
Recently I was attempting to make a ‘quick fix’ using long fiber resin epoxy….but the hardener kicked off a third of the was into filling the void…a total waste of prep and material… :| :| …and then having to re-prep the whole thing all over again… the fast hardener is now residing in the cabinet with a note “Think REALLY HARD before using!”. :D :D

You’re doing great!!

Best Regards
Over Easy 😎😎🐩🐈
User avatar
kenfyoozed
First Officer
Posts: 234
Joined: Fri Aug 20, 2021 5:19 pm
Sailboat: MacGregor 26D
Location: Mobile, AL

Re: Restore /refit of my 1988/89 26D

Post by kenfyoozed »

Another reason I went with the slow hardener is it had no amine blush. I knew with our humidity and rainy days the blush could be a problem. Im trying to get all the epoxy work done before the cooler weather starts in. The slow harder make take a few days to cure once we start getting cooler. But i figure i have a couple more months of decent warm weather. I think I am at least 1/3 of the way done with the epoxy work.
Post Reply