Hi All!

It has been a busy 2 weeks!

But LOTS OF PROGRESS!!!

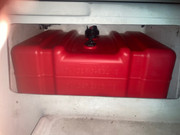
Already posted on the new set of 12 gallon fuel tanks and the fuel locker cubby modifications.
That that great to get out of the way!
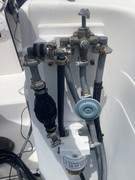
Still need to do the external filter/water separator and true 4 position ( Tank1/Tank2/Both Tanks/Off) selector valve though......

Where to begin...... BILGE PUMPS OF COURSE!
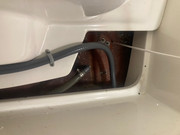
We opt’d to start with 3 automatic/manual bilge pumps.
#1 is on Port, #2 is Center & #3 is Starboard amidships.
Discharge is also amidships above the chines on both sides.
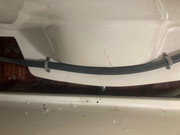
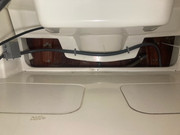
Minimal discharge runs with smooth surface marine grade bilge hose.
No check valves per current manufacturer recommendations.
Taking into account the EXCELLENT advice from several more experienced forum contributors with regard to potential heeling issues we’ve added easily accessed 1/4 turn discharge isolation valves.
We’re not planning on sailing that aggressively but better to put them in now than wish we had later!
Also added a separate high bilge water alarm in the center section as a back stop failsafe.
We plan in adding an additional two bilge pumps in the aft berth port & starboard at a later date.
Used marine grade bilge wire for all pumps and switch.
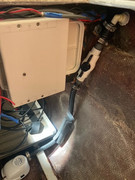
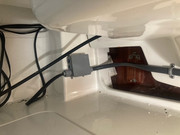
For the high water switch, starboard & center pumps as well we high mounted plastic junction box with a protected terminal strip under the aft dinette bench. That way if any replacements are needed it should be relatively easy to access.
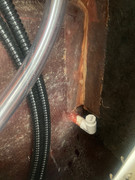
The Port pump wire route to the new junction box fabricated into the aft galley wall.
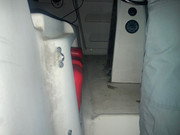
Removed and capped the galley and head sink drains.
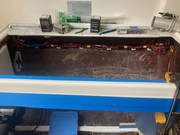
Here are some pictures:


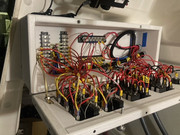
Now onto the NEW INTERMEDIATE DC ELECTRICAL JUNCTION BOX & NEW ELECTRICAL CONTROL PANEL.
While the existing DC electrical was adequate and functional we wanted to upgrade Over Easy to a DUAL BATTERY SYSTEM, upgrade some of the wiring, the addition of the 3 initial (and 2 future) bilge pumps, the high water switch, DC outlets, an independent battery charge & use system, upgrading of the Engine start cables into a water protected conduit, conversion from fuses to resettable circuit breakers and space for future expansion all drove us to make the leap to fabricating a new ELECTRICAL CONTROL PANEL & NEW INTERMEDIATE JUNCTION BOX.
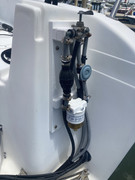
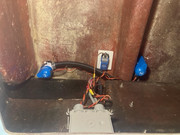
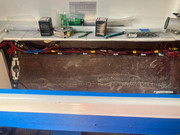
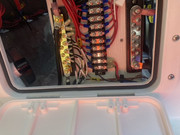
Let’s make a start with the engine starter cables. The prior existing ones simply ran along the Port side under floor bilge subject to potential water and chafing. The cables were clamped to the old original engine cables with a screw and nut and wrapped in old electricians tape. The splices weren’t staggered and had evidence that they had been wearing against each other. So we pulled and inspected the cables which did not appear to be marine grade. In general the cables appeared ok otherwise. (Note: Marine grade wire insulation is designed for wet environments. Non-Marine grade wire insulation should not be in wet environments as it will eventually become permeated, rot and eventually fail.) What to do? Well we went and got some Titeflex conduit to protect the wires, added a plastic junction box and a proper isolated 3/8 stud panel with SST studs, washers and self locking nuts.
Photos below:
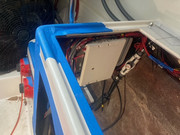
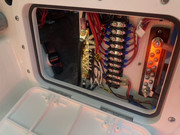
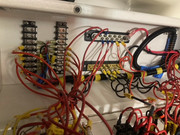
Then there is the custom Intermediate DC Junction Panel which also allows access to the #1 Bilge discharge shut off valve ( mentioned previously) to the aft side bulkhead of the galley. This allowed gathering all the negative wire leads, control panel ground and batteries to a valid negative buss bar. Same for the primary positive leads for the batteries and and control panel positive to a valid positive bus bar. The individual use circuits positive leads route to a terminal strip for connection to the control panel. ( The existing leads had been nicely replaced and labeled by the PO with marine grade wire.

but were too short to route up to the new control box.) We also gathered and secured the distributed wires to the hull above the chine so they won’t flop around anymore!
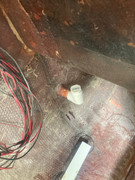
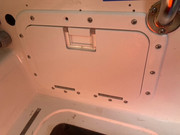
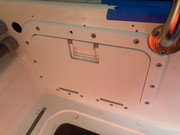
We first added a nice sized rectangular access hatch (same as we used for the fuel tank through bench access) which was the largest that would fit and absorb the old cutouts that were in the side of the galley. Then using 3/4 thick PVC exterior all weather board we fabricated the biggest panel back we could fit and still have rapid easy unobstructed access to the #1 Bilge discharge isolation valve.
Here’s some photos:
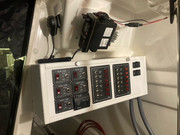
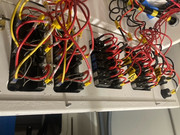
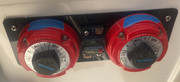
Finally onto the custom CONTROL PANEL.
So original panel was 4 switches and fused. The fuses were difficult to access and many distributed circuits were doubled up. After pulling is out we found there was evidence of mild corrosion and we suspect it was an original from the factory. (Not sure what we are going to do with it but it’s not going back in

).
We went with 5 bilge control switch sub panels from SeaDog as they have separate indicated Automatic and Manual selections. The SeaDog Manual selection also stays ON when selected whereas other brands only have a Monetary-ON option. We kind of like that so that if we had to (if the automatic aspect failed for some reason or other) we can turn on a particular pump and it stays on while we deal with other mitigations (such as finding where to water is coming from!

).
We also added a SeaDog High Water Alarm subpanel Incas all else fails. ( Like we forgot to turn on the automatic bilge pumps and/or the batteries run low.) The sub panel will work quite loudly with even as little as 5 Volts!
We chose to go with TWO six switch sub panels with resettable circuit breakers from SeaDog. We changed out several of the higher amperage circuit breakers that came with the panels for more reasonable lower values.
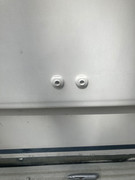
We added TWO 12VDC outlets for in cabin use. We have a couple of phone charge adapters and a nice 12 foot 12Volt extension cord so we can be just about anywhere in or on the boat if desired.
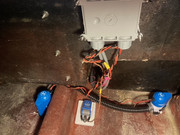
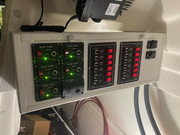
The NEW CUSTOM CONTROL PANEL fits under the Port side recess as one enters the cabin area. We fabricated it from all weather exterior 3/4 thick PVC board, SST bottom mounted piano hinge, a brass hold open support slide and a pair of fabricated thumb screw closure locks. The top also makes a nice shelf under the VHF radio. Wire transfer from the aft bulkhead of the galley INTERMEDIATE PANEL is through a pair of 3/4 diameter TiteFlex conduits. One conduit for the Bilge positive control #14 AWG leads and the other conduit for #14 AWG the distributed circuits, 5 preloaded spare wires and the common negative #8 lead and positive #8 leads. Inside are a valid Positive and Negative bus bars and two terminal strips to organize the transfer leads to the switches.
While busy the interior is actually quite organized and roomier than many of the system control panels I’ve used in commercial and residential control boxes.
Here are some photos:

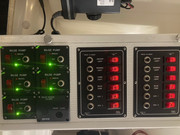
Then finally to the NEW DUAL BATTERY ISOLATED CHARGE/USE CONTROLS!
This allows us to selectively charge one battery at a time or both at the sametime.
It also allows us to use just one battery at a time or both together.
So we can select to charge Battery #1 while using Battery #2 or vice versa while we are on shore power (or when we eventually get a generator). Any Outborad Engine charging will go to-the current use battery selected. We currently have the previously existing START Marine battery and have added a second Dual Use START/STORAGE MARINE battery. The batteries are in side the seat aft of the galley on a reinforced Trex Deck with individual battery buckets and a common hold down strap. Whew!!!
A photo of the battery control switches is below:


Well that covers the past two weeks.
Tomorrow we assault the galley modifications!!! CHARGE!!!!?


Update July 28,2021
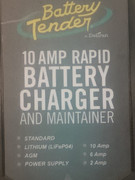
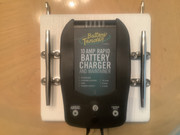
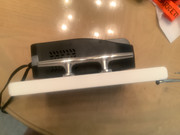
A somewhat recent addition to our DC Electrical System Mod is this compact digital Battery Charger to replace our older “Godzilla” Start/Charger which is great and all but is 8x the volume!
Yes there may be smaller ones out there but this suited the bill for variable battery types (including LEFePO4 should the need arise).
It has a rapid charge rate of up to 10 Amps, multiple lower charge rates and a nice automatic maintainer feature.Did I mention that it is WiFi enabled so we check on our phones to see Battery and Charger condition/status via the home or Marina modem.
this not only allows us to check but also to remotely change settings if desired.


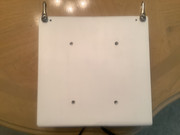
It slips under the interior top side molding over the battery compartment seat next to the galley and is secured with two SST clip hooks that started life as swivel snaps which we trimmed the swivels off and removed the spring bail.
These are held to the back of an edge routered PVC Board with SST screws.
The Charger itself is held onto the PVC Board by replacing the 4 existing back casing screws with longer SST screws in recessed holes to minimize wall scratches.
On either side of the Charger on the front are a pair of SST Yacth cleats to neatly gather up the AC and Battery leads.
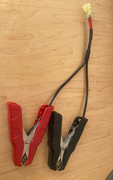
We modified the Battery leads with unique protected polarized slip connectors to allow for removal from the permanent boat leads that go to the Battery Charge Select Switch so one or the other or both of the batteries can be charged and automatically maintained from shore power.
We modified a 12 VDC automotive electrical socket so that we can take advantage of the charger’s built in regulated power supply feature. This adapter is also with protected polarized connectors. This comes in handy when on shore power to run 12 VDC devices such as fans without needing to use the batteries. It also allows us to remove the Charger from Over Easy and bring it home so we can power up ur GPS Chart Plotter to pre-program waypoints and trip tracks at home at our convenience. This is a lot more pleasant than doing it in the slip or in the car.

It is a great title addition and we really enjoy the features and flexibility it provides us!
Best Regards,
Over Easy


 ( I gotta start somewhere and this allows for almost unlimited upward mobility.) Noticed that pulling OverEasy out with a front wheel drive Dodge Caravan can be a bit problematic in gravel too. Fortunately the ramp wasn’t to busy and a nice guy (who was launching his own design homemade 25 foot fiberglas powerboat) was kind enough to get us a pull to get up the ramp and clear of the gravel. Hopefully next time this ramp will be paved. Onward and upward....
 Given the age of the motor and the peculiarities of 2-strokes one has to expect these sort of things when just starting out.
 ) with a little bit of help we did manage to straighten things out but not before narrowing the opening between the guide posts and a fair bit of wading into an October Lake Winnie. It’s true, after a while you really don’t feel the cold (or much of anything else for that matter
 ).
).


 🌬
🌬
 , wind and rain so it was a good choice. A little cold
  but pretty comfortable ( compared to a refrigerator).
 inside in short order. Actually had to throttle it back several notches! Stopping at the KFC on the road in made for a good supper. (Note: The KFC was Boat, Trailer and Motor home friendly with a big parking lot to maneuver around in too!)
 . Again the little space heater made it more that comfortable in short order.


 at our home in Beaufort, SC about 3 PM.
  and had hoped to get one more trip out of them.)