

Painting on trailer
-
yukonbob

- Admiral
- Posts: 1918
- Joined: Mon Feb 14, 2011 6:54 pm
- Sailboat: Other
- Location: Whitehorse Yukon
Painting on trailer
Anyone have any pics of how they applied a new bottom coat while on the trailer? I've been searching old threads for the last hour and can't find a picture that works (must have been removed at some point?) and something other than completely turtling the boat in my back yard you crazy bastard  . I know the whole raise the front ect ect, just need some ideas on blocking and aft support.
-
Wayne nicol
- Captain
- Posts: 645
- Joined: Thu Feb 14, 2013 9:21 am
- Sailboat: MacGregor 26M
- Location: Queen CHarlotte Islands,B.C.---------------- lightning white 2012 26M "Merrylegs"
-
seacatcapt

- Chief Steward
- Posts: 66
- Joined: Mon May 04, 2009 7:51 pm
- Sailboat: MacGregor 26M
- Location: Richland, WA; 2005 26M 70HP Suzuki
Re: Painting on trailer
I did a post in 2010. Painted her while on the trailer.
http://www.macgregorsailors.com/forum/v ... =8&t=15753
http://www.macgregorsailors.com/forum/v ... =8&t=15753
-
seahouse

- Admiral
- Posts: 2182
- Joined: Sun Dec 07, 2008 9:17 pm
- Sailboat: MacGregor 26M
- Location: Niagara at Lake Erie, Ontario. 2011 MacM, 60 hp E-Tec
- Contact:
Re: Painting on trailer
From a previous post, I have added the photos above and below...I would not recommend this to a person who does not clearly understand the mechanics of how it works (you should have no problem, Bob  ). However, it's completely safe for someone who does, and is a time saver as you don't need to stop painting (it's really a race if you want a good job) and move the trailer.
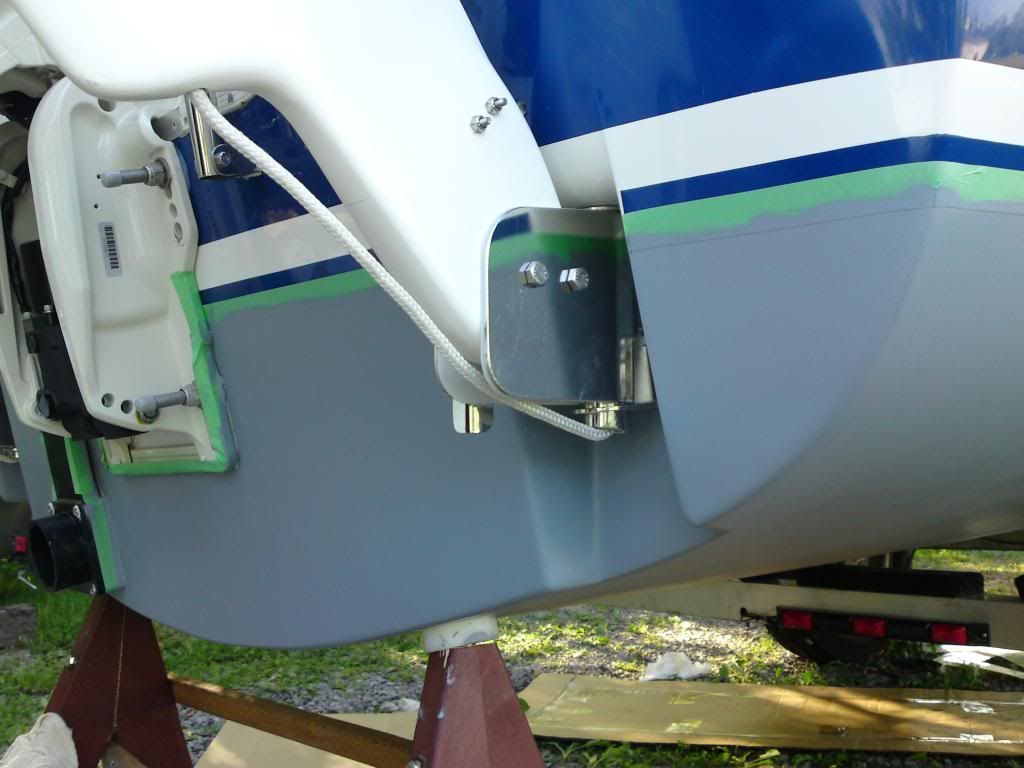
For sanding, painting barrier coat and anti-foul on the hull, I made a single stand to support the rear of the hull just inside the edge of the transom (by about an inch or two), and supported the front by the “U” bolt in the bow.
I wanted to paint the entire hull without interruption and maintain the "wet edge", so I did not want to have to move anything and risk allowing the trailing edge of the paint to dry as I moved along. Working with epoxy also imposes some time restraints of its own.
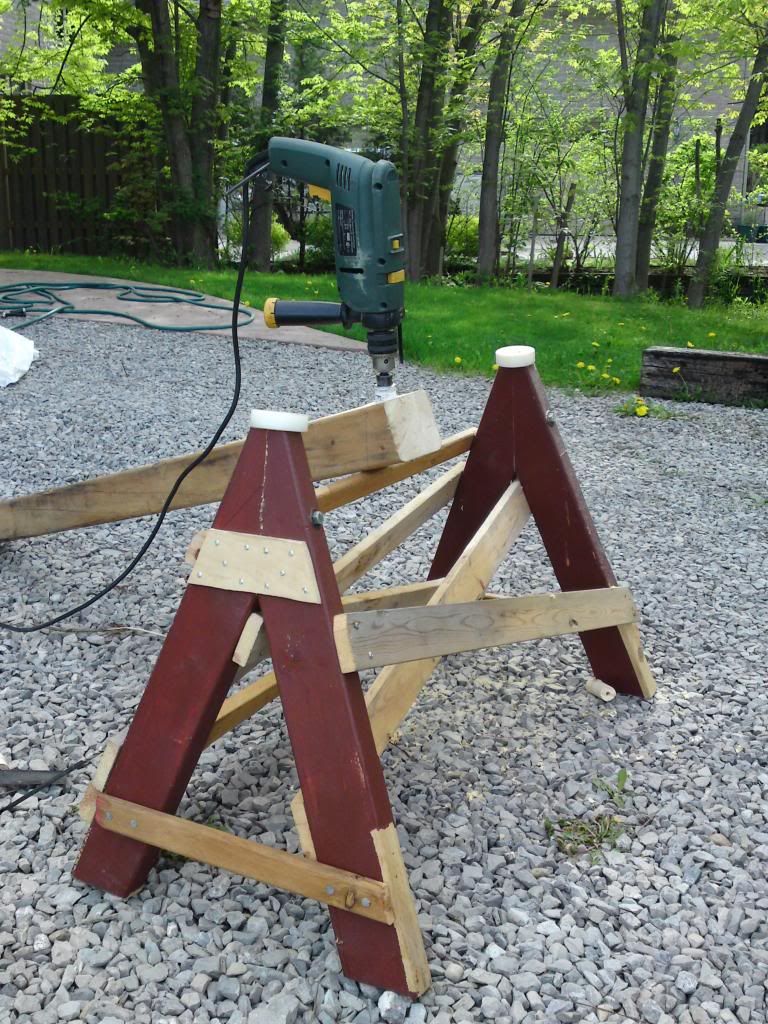
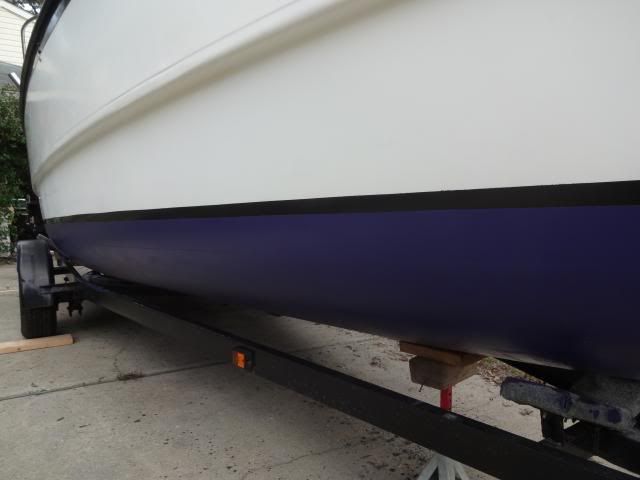
The stern was supported by a sawhorse-type contraption simply made from 2X4’s, but heavily crossbraced by 1X2 strapping for strength, using scraps materials I had on hand. I made it sturdy both for safety, and because it was being used on a crushed stone driveway.
The actual contact points with the hull were two small 2” diameter “pucks” of ¾” thick polyethylene (paint won’t stick to it) spaced about 36” apart, mounted on the top ends of the “sawhorse”. These were the only two points that could not be painted at the same time as the rest of the hull.
But since I was using epoxy, you can “catch up” on your coats by applying fewer very thick coats because with epoxy it’s the overall thickness of the coating, and not the number of coats, that is the deciding factor in the effectiveness of the job.
I did that on these two small spots. Once for sanding, once for a thick dollop of barrier coat, once for thick dollop of black anti-foul paint, and once for a dollop of blue anti-foul paint. I believe 9 coats got me to the correct mil thickness on the rest of the hull. (That’s easy to precisely determine by simple measurement of the masking tape and paint with a micrometer). After 3 seasons, these points are still invisible.
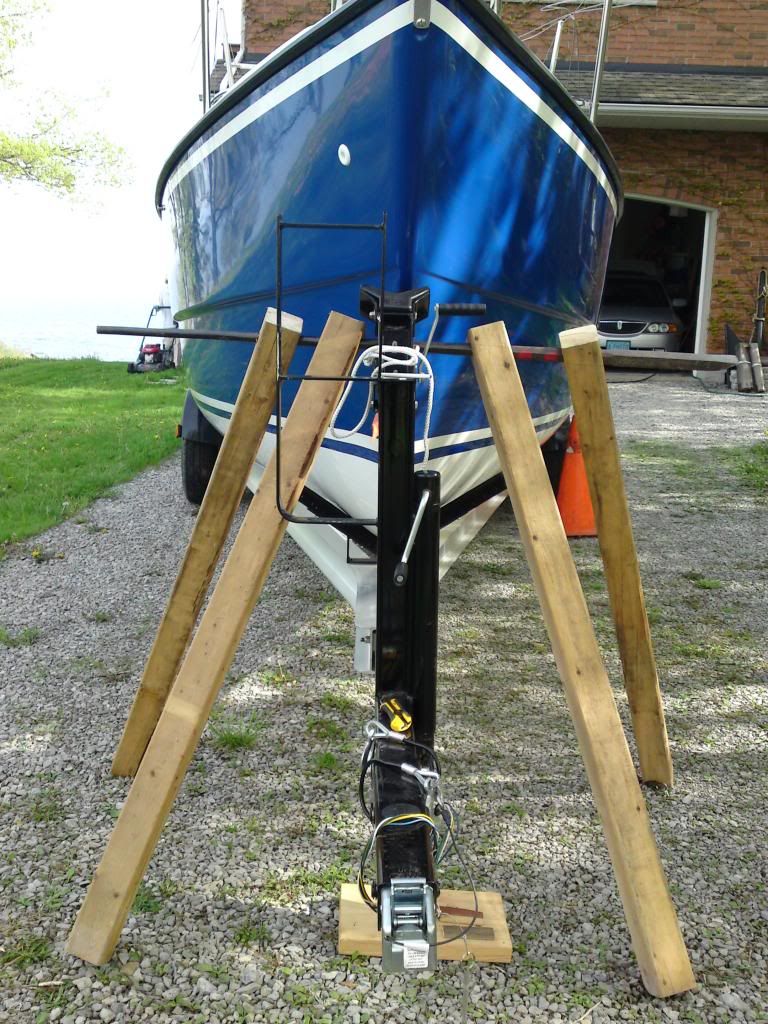
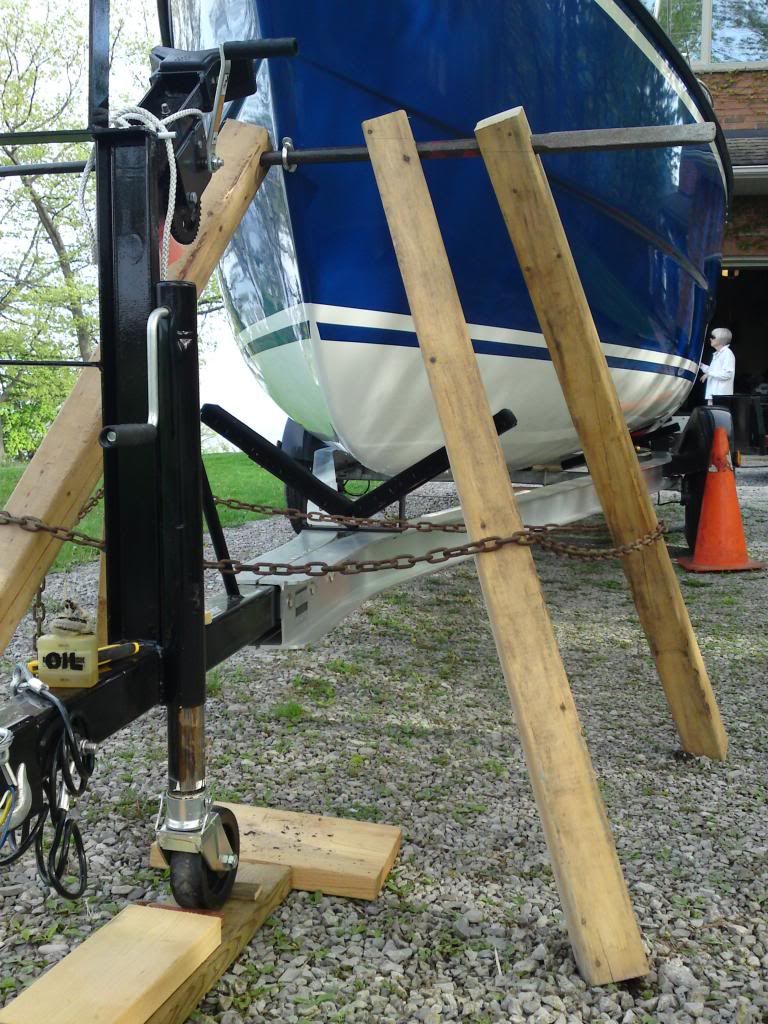
The bow was supported by a pylon made from a tapered, hardened pinch bar slid through the loop to take up any slack. Four 4X4’s about 5 feet long each support this bar, like a tripod, but with four legs, and a chain around them for safety against spreading. Of course, this is all above the area where painting is done.
The factory jack on the trailer (use stepped blocks in place of the caster) is all that was used to bring the boat into the air and be supported by these, so their measurements (height) are a bit critical and should be established first before you start to make them.
This raised the boat several inches off the trailer, which is lots of clearance for a sander, a paint roller, or a brush if you’re “tipping off” the paint. While I didn’t do it (it’s safer to leave the trailer under it), as I recall, I could have pulled the trailer out from under the boat (back and forth a coupla’ times) if I had needed to.
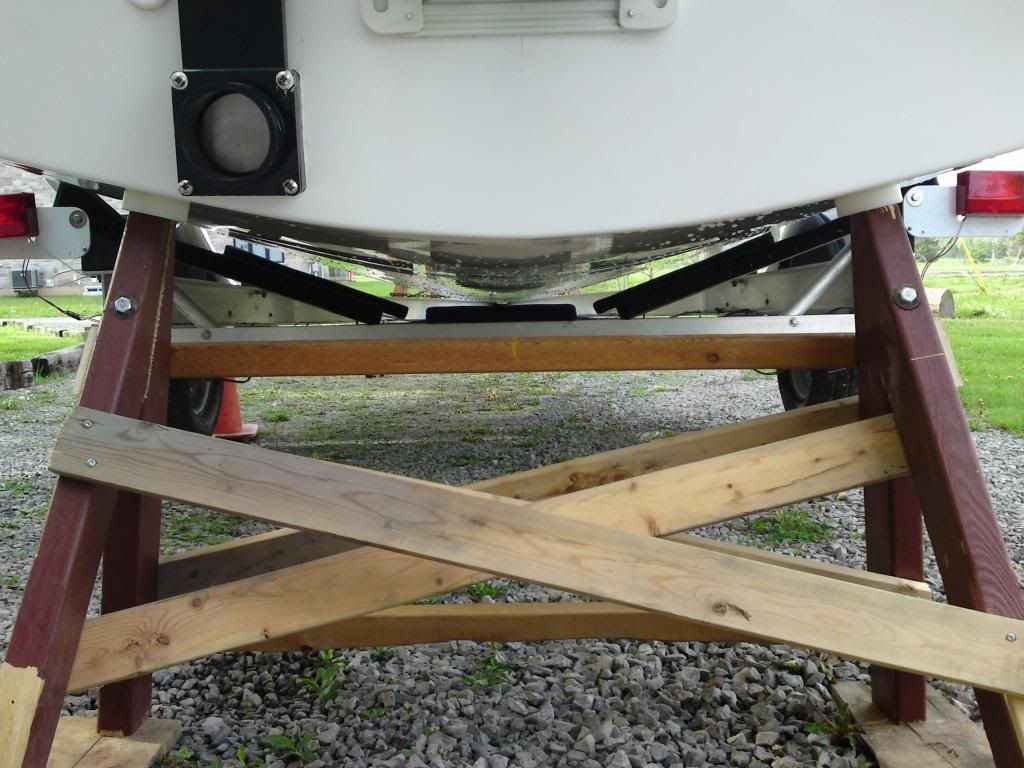
Think it might be a bad idea to support the entire weight of the boat on these three points? Au contraire. These three points are at the strongest part of the boat, and the hull/ deck/ daggerboard trunk unibody construction makes a rigid structure between.
I watched for movement at each point of support on the boat as the weight was lowered onto them, there was zero deflection, and the boat was dead silent.
The components are stored high in the garage for future use. Next time I do it I will have to be more careful and put a tarp down, the driveway was finished after this job was done.
But this is just one of numerous ways to support your Mac for painting.
http://i1180.photobucket.com/albums/x40 ... 1395810252Weight off trailer
http://i1180.photobucket.com/albums/x40 ... 1395809803Stern barrier coats
http://i1180.photobucket.com/albums/x40 ... 1395809758 Job done.
- Brian .
.
For sanding, painting barrier coat and anti-foul on the hull, I made a single stand to support the rear of the hull just inside the edge of the transom (by about an inch or two), and supported the front by the “U” bolt in the bow.
I wanted to paint the entire hull without interruption and maintain the "wet edge", so I did not want to have to move anything and risk allowing the trailing edge of the paint to dry as I moved along. Working with epoxy also imposes some time restraints of its own.
The stern was supported by a sawhorse-type contraption simply made from 2X4’s, but heavily crossbraced by 1X2 strapping for strength, using scraps materials I had on hand. I made it sturdy both for safety, and because it was being used on a crushed stone driveway.
The actual contact points with the hull were two small 2” diameter “pucks” of ¾” thick polyethylene (paint won’t stick to it) spaced about 36” apart, mounted on the top ends of the “sawhorse”. These were the only two points that could not be painted at the same time as the rest of the hull.
But since I was using epoxy, you can “catch up” on your coats by applying fewer very thick coats because with epoxy it’s the overall thickness of the coating, and not the number of coats, that is the deciding factor in the effectiveness of the job.
I did that on these two small spots. Once for sanding, once for a thick dollop of barrier coat, once for thick dollop of black anti-foul paint, and once for a dollop of blue anti-foul paint. I believe 9 coats got me to the correct mil thickness on the rest of the hull. (That’s easy to precisely determine by simple measurement of the masking tape and paint with a micrometer). After 3 seasons, these points are still invisible.
The bow was supported by a pylon made from a tapered, hardened pinch bar slid through the loop to take up any slack. Four 4X4’s about 5 feet long each support this bar, like a tripod, but with four legs, and a chain around them for safety against spreading. Of course, this is all above the area where painting is done.
The factory jack on the trailer (use stepped blocks in place of the caster) is all that was used to bring the boat into the air and be supported by these, so their measurements (height) are a bit critical and should be established first before you start to make them.
This raised the boat several inches off the trailer, which is lots of clearance for a sander, a paint roller, or a brush if you’re “tipping off” the paint. While I didn’t do it (it’s safer to leave the trailer under it), as I recall, I could have pulled the trailer out from under the boat (back and forth a coupla’ times) if I had needed to.
Think it might be a bad idea to support the entire weight of the boat on these three points? Au contraire. These three points are at the strongest part of the boat, and the hull/ deck/ daggerboard trunk unibody construction makes a rigid structure between.
I watched for movement at each point of support on the boat as the weight was lowered onto them, there was zero deflection, and the boat was dead silent.
The components are stored high in the garage for future use. Next time I do it I will have to be more careful and put a tarp down, the driveway was finished after this job was done.
But this is just one of numerous ways to support your Mac for painting.
http://i1180.photobucket.com/albums/x40 ... 1395810252Weight off trailer
http://i1180.photobucket.com/albums/x40 ... 1395809803Stern barrier coats
http://i1180.photobucket.com/albums/x40 ... 1395809758 Job done.
- Brian
-
yukonbob
- Admiral
- Posts: 1918
- Joined: Mon Feb 14, 2011 6:54 pm
- Sailboat: Other
- Location: Whitehorse Yukon
Re: Painting on trailer
Never thought of supporting form the bow eye. Poly pucks is another great idea. Thanks Seahouse the pics sure help too.
-
seahouse
- Admiral
- Posts: 2182
- Joined: Sun Dec 07, 2008 9:17 pm
- Sailboat: MacGregor 26M
- Location: Niagara at Lake Erie, Ontario. 2011 MacM, 60 hp E-Tec
- Contact:
Re: Painting on trailer
It would be easier to see how it works in a video, but…
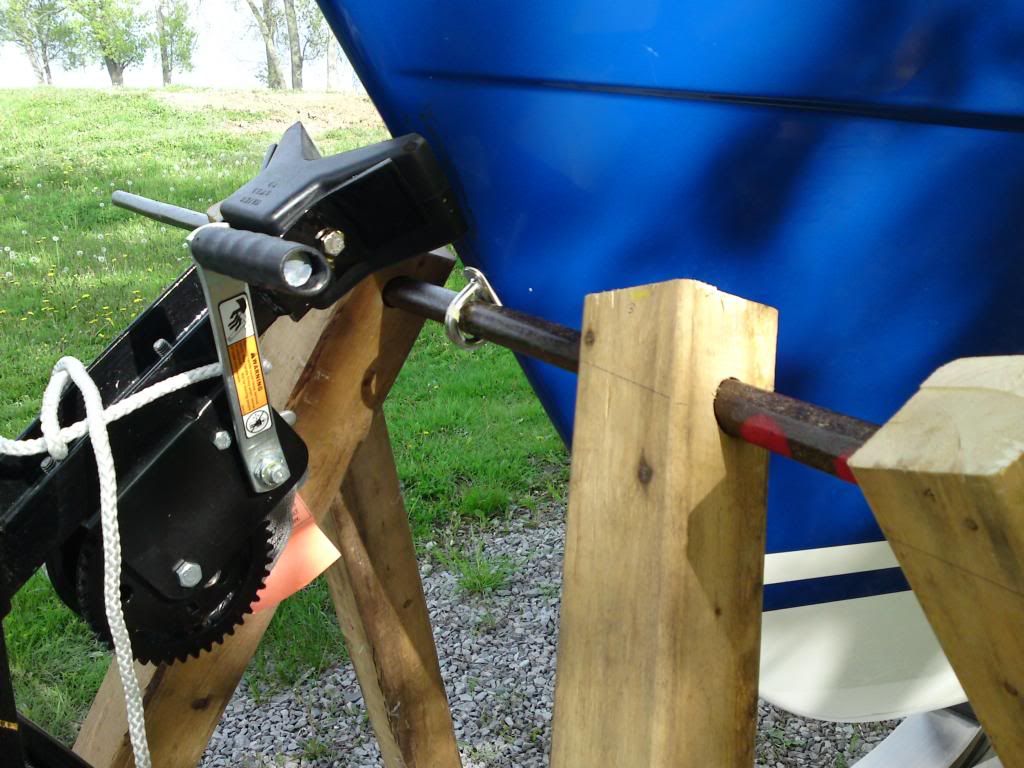
The 4 4X4's are drilled so that they pivot (snugly, so the holes vary in size because of the pinch bar taper) at an angle on the pinch bar to suit their position there. Two pivot forward, two pivot rearward. As the bow is jacked up they act like pawls on a ratchet, moving inward on the ground by gravity alone. You can stop at any height, reverse the jack, and they will support the weight of the boat. To lower the bow, you jack up slightly to relieve the weight, then hold all four outward as the jack is lowered.
For extra safety (as it turned out it wasn't really needed on the stone driveway) the chain gets snugged down tight against the 4X4's once you are at the height you want to stop the legs from spreading, or accidentally getting knocked outwards.
I thought an important detail was that the pinch bar must be slid tight on its taper against the bow eye to take out any play there. That prevents any distortion there, but it appeared strong enough that if that detail were missed it might not be a problem. That may or may not be the case- I didn't want to find out - but if someone else does, let us know by posting here. If I've left anything else out, just ask.
If someone nearby would like to make the trip to borrow these components I would be happy to lend them out. I'm hoping to go another year (the hull looked great when I stored it this fall- no sign of the black layer) before I have to use it again. I like to hold back a small amount of paint at the end of a project for future touch-ups, which is all I've needed so far… entering season four.
-B.

Re: Painting on trailer
I have painted my bottom a few times. The first few I set up some elaborate cribbing and rolled the trailer around, the last time just used two jack stands and the tongue jack and was done in an evening after work.
Stands under the stern then raise the tongue for clearance over the rear two bunk sets.

One stand under front and lower tongue for clearance over the front bunk.
Stands under the stern then raise the tongue for clearance over the rear two bunk sets.

One stand under front and lower tongue for clearance over the front bunk.

-
yukonbob
- Admiral
- Posts: 1918
- Joined: Mon Feb 14, 2011 6:54 pm
- Sailboat: Other
- Location: Whitehorse Yukon
Re: Painting on trailer
Seapup: How did you end up attaching blocks to the jack stands? This is more what I had in mind, just concerned about the attachment points. I didn’t want to drill the stands as it may reduce their structural integrity, but at the same time don’t want to just set them on top. I was considering creating a matching pocket for the end to fit in…?
-
jbgibbs99
- Deckhand
- Posts: 34
- Joined: Sat Feb 13, 2010 12:59 am
- Sailboat: MacGregor 26X
- Location: Scotland
Re: Painting on trailer
I do almost the same as Seapup.
I use a trolly jack under the rear of the trailer to lift up the back, then put the jack stands with a length of fence post between them under the rear of the boat. Lower the trolly jack and the boat sits on the fence post - the weight keeps everything in place.
Then put a block of wood on the trolly jack and lift up the bow - again weight keeps it all in place.
The boat is now far enough above the bunks to get a roller in.
Normally I'm just applying a coat of anti fouling (Cruiser Uno) with a long handled roller - if I was going to spend much time underneath I might get more stands and hold the bow up properly. Although if the system failed it would only fall to the trailer (so shouldn't squash me too much!).
Re: Painting on trailer
Blocks were just sittiing on the jackstands, was solid enough for my comfort. When the front is up the trailer hold the rear solid and vice versa. As jbgibbs said you just need about 2-3" to get a roller in. A quick recess with a router is a good idea though, I may try that with some 4x6 blocks next fall.Seapup: How did you end up attaching blocks to the jack stands?