

Since you are on the subject...
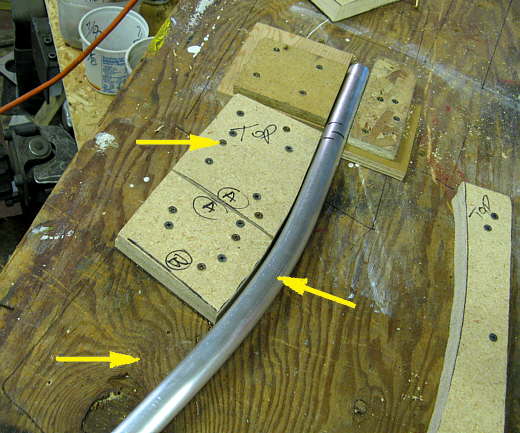
I have been "playing" with electrical conduit and a "cheap" hand bender.. Started by making a metal frame for Vertical Square Foot gardening - and then getting a bit more creative with building an add on for fence posts - for a gardening expansion... It works really, really well... the metal is really cheap too.. so you can prototype without a lot of "pain".
It's easy to bend this metal - and it's not that great when compared to other metals.. but it is cheap, simple, and works.. I can build frame mock ups in just a few minutes after planning them out..
For making a dodger or similar - it might be useful to test out the metal frame design before building with Stainless or Al. I am coming to a much greater appreciation of paper mock ups - as well !!!!
Sumner's Toilet mod still gives me a bad case of envy! ---- So Multi-functional and useful!! I think making a mod do more than one function really has a touch of elegance. Applying the idea to a dodger or whole enclosure is just an attractive idea....
In Texas, you do need the No-See-Um netting - and also some rain protection... Hanging stuff from the Bimini is also a good idea... it's an opportunity for something multifunctional on a dodger or full enclosure... .....
--jerry
DIY Full Enclosure
-
Sumner

- Admiral
- Posts: 2375
- Joined: Sun Jan 04, 2009 3:20 pm
- Sailboat: MacGregor 26S
- Location: SE Utah
- Contact:
Re: DIY Full Enclosure - mockups...
Thanks, but as far as I know we only use it for number 1 and number 2, two thingsdvideohd wrote:......Sumner's Toilet mod still gives me a bad case of envy! ---- So Multi-functional and useful!! I think making a mod do more than one function really has a touch of elegance. .......jerry
Mocking up with the conduit is a good idea and I use paper patterns more and more and actually draw out what I'm trying to do more and more.
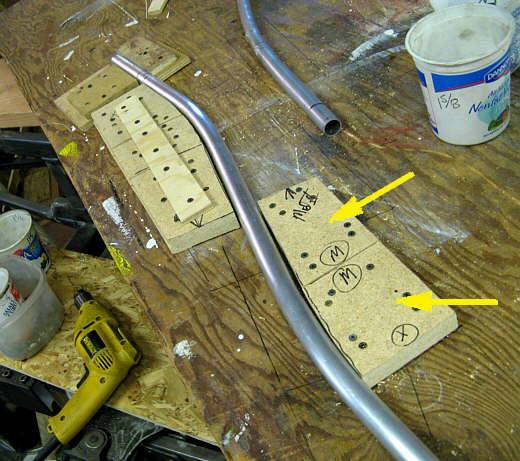
I've had pretty good luck putting mild bends into....
http://purplesagetradingpost.com/sumner ... ide-5.html
...aluminum tubing with out kinking it with the above method.
Ruth is about ready to start making a stack pack for the main and after that new cabin and cockpit cushions and before Florida a full cockpit no-see-um net enclosure. She is going to be busy and I have a number of things to get done also.
c ya,
Sum
Our Trips to ..
Our Mac Pages
Mac Links
-
Hamin' X

- Site Admin
- Posts: 3464
- Joined: Sat Aug 27, 2005 6:02 pm
- Sailboat: MacGregor 26X
- Location: Hermiston, OR-----------2001 26X DF-50 Suz---------------(Now Sold)
- Contact:
Re: DIY Full Enclosure
If you want to make sharper bends in aluminum tubing, tamp damp sand into the straight tube first. It will be much harder to kink it then. Just go slow. Flush the sand out with water, when done. Old antenna building trick.
~Rich
~Rich
-
dvideohd

- First Officer
- Posts: 206
- Joined: Tue Jul 01, 2008 9:16 pm
- Location: Richardson, TX; Galveston, TX; Dana Point, CA
Re: DIY Full Enclosure
Damp Sand is a good one.. I had heard about using sand - but it makes more sense for it to be damp.
Alum. tubing is a good idea.. I been looking into sections of 1" or 7/8" stainless as well... I don't see much advantage in using Stainless - except that is compatible with the stanchion mounts. For a doger - or related support tubing.. Al is a really good idea. If you are looking to make a stern rail (ie, a key difference between the 26S and 26D....) - and a related Stern Rail Seat, then the Stainless can make a difference..
I can't weld - so mocking it up and getting some help to tack it in place is one plan. Then haul it to a shop for finish welds.
In DFW - I can find a lot of tubing.. for some things you need to go to Houston.
--jerry
-
Sumner
- Admiral
- Posts: 2375
- Joined: Sun Jan 04, 2009 3:20 pm
- Sailboat: MacGregor 26S
- Location: SE Utah
- Contact:
Re: DIY Full Enclosure
I've know about the sand, but still haven't tried it. One day I'll want tighter radius bends and will give it a try.dvideohd wrote:Damp Sand is a good one.. ................ I don't see much advantage in using Stainless - except that is compatible with the stanchion mounts. ......--jerry
Our aluminum looks good still after being out on inland lakes, but I worry about what it is going to look like after being out for a couple months in Florida. I have some stuff that is suppose to protect it, so I guess I'll see how well it works. Also for the anchor rollers I want to build i think I'll order some 5086 aluminum as it is suppose to be the most corrosion resistant.
If I had the money for and the availability to do stainless I would, but I've got a fair amount of scrap aluminum and can also get it at the local hardware store pretty resonable and it is so easy to machine and weld.
Good luck,
Sum
Our Trips to...
Our Mac Pages
Mac Links
-
Hamin' X
- Site Admin
- Posts: 3464
- Joined: Sat Aug 27, 2005 6:02 pm
- Sailboat: MacGregor 26X
- Location: Hermiston, OR-----------2001 26X DF-50 Suz---------------(Now Sold)
- Contact:
Re: DIY Full Enclosure
Try Texas Towers in Plano. I know, ham radio stuff again.dvideohd wrote:In DFW - I can find a lot of tubing.. for some things you need to go to Houston.
--jerry
~Rich
-
dvideohd
- First Officer
- Posts: 206
- Joined: Tue Jul 01, 2008 9:16 pm
- Location: Richardson, TX; Galveston, TX; Dana Point, CA
Re: DIY Full Enclosure
what about the stanchions? that was a "matching" part of the design... likely - the big part to mix and match...
pricing is really, really good.... and CLOSE!!!!
thanks...
---jerry
pricing is really, really good.... and CLOSE!!!!
thanks...
---jerry
-
bubba

- Captain
- Posts: 896
- Joined: Fri Mar 21, 2008 11:04 am
- Sailboat: MacGregor 26M
- Location: Richland,WA Columbia River Lake Wallula "INSPIRATION" w/70 suz. 9' Merc dingy
- Contact:
Re: DIY Full Enclosure
Reading this I can see a use for SS tubing on the dodger to make it strong enough for some hand support when going on deck. I was in a metals shop last week that stocks SS tubing for the numerious wineries around here and they have several grades of tubing not cheep but stronger than alumium. Does the wet sand work on SS tubing ?

Re: DIY Full Enclosure
I updated pictures of my full enclosure on the mod section. First stage or canvas part of my full enclosure is finished. Now this winter project is to cut the windows and sew the clear plastic. I am planning to use cut out umbrella and use it for the windows covers for the UV protection and shade in the summer. Pictures are not that clear but the top is made of dodger, side wings, factory bimmini (modified), and connection piece. Sides are 3 pieces at the back, 2 pieces on each side and 3 small triangles where the boom is connected to the side stanchion. Amount of space inside the cockpit with enclosure up is amazing. It is achieved by 3 contributing factors, repositioning of the back stay over the arch and creation of standing height, moving the bimmini up (1.5 feet and back almost 2 feet) and by creating connection piece to go around the dodger, over the winches and on top of the side wings. This way I have every square inch of the cockpit completely usable. I am so happy with it. And I did it by myself, from scratch.
As son as I have windows cut I will post the pictures of the finished enclosure.
Zoran
As son as I have windows cut I will post the pictures of the finished enclosure.
Zoran
-
Phil M

- Captain
- Posts: 807
- Joined: Sun Jun 08, 2008 9:29 am
- Sailboat: Other
- Location: 44' Jeanneau, Saskatoon, SK, Canada
Re: DIY Full Enclosure
Zoran did not leave a link for his mod. Not sure if this one is it or not:
http://www.macgregorsailors.com/modt/in ... ?view=1314
Phil M
http://www.macgregorsailors.com/modt/in ... ?view=1314
Phil M
Re: DIY Full Enclosure
That was the arch, this one is for the enclosure
http://www.macgregorsailors.com/modt/in ... ?view=1352
Sorry about that, I should post the link
http://www.macgregorsailors.com/modt/in ... ?view=1352
Sorry about that, I should post the link
-
Phil M
- Captain
- Posts: 807
- Joined: Sun Jun 08, 2008 9:29 am
- Sailboat: Other
- Location: 44' Jeanneau, Saskatoon, SK, Canada
Re: DIY Full Enclosure
Please post your finished pictures in the spring, along with details of how you accomplished your full enclosure. I want to know how much work is involved in working with the window material. My sewing skills are not that good. 
Phil M
Phil M
Re: DIY Full Enclosure
As previously said the canvas work is completed and I started cutting and sewing windows and run in some difficulties (as expected). The machine was pulling the canvas faster than vinyl and the result was a very bad workmanship. Fortunately I decided to sew the window first and then cut the canvas. So I search the web again for more info and tips and found this lifesaver which is double sided acrylic tape specifically used for this type of work (see link http://www.sailrite.com/Seamstick-3-8-for-Canvas-60-Yds ). Thanks to this I successfully made windows on the connection piece between bimmini and dodger. First window took me few hours and second one 45 minutes. This is the biggest piece and measures 8' by 5' and have two large windows. I expect that the rest of windows will not take me more then 20-30 minutes each now when I know how to do it and specially because the rest of the pieces are much smaller and more manageable. In one more weekend I should complete the work and I will post the pictures. It prove that the right way go is
; tape the window for the canvas sew outside (further away from the center of the window) stitch, then cut the canvas, tape the canvas and fold it and stick to vinyl and then sew the final (inside) stitch.
Tip to all that are going to attempt this work is to buy this tape and a lot of it. It does not make material almost any thicker, it is easy to sew through and it makes the work so much cleaner and professional look like. I wish I knew for it from the beginning, the work would be at least half of the time and effort that I put in so far. For the next window I will try to take some photos of the process and post them.
Zoran
-
The Mutt

- Captain
- Posts: 611
- Joined: Thu Nov 29, 2007 12:28 pm
- Sailboat: MacGregor 26X
- Location: Springwood, NSW, devinetemptations.com/macgregor26x.htm
- Contact:
Re: DIY Full Enclosure
I'm lucky, I have a few mates who are Automotive trimmers, while I can sew they will do a better job on all the seams than I could. I'll be doing all the frame work.
Glenn
Glenn