Crunch!!!

A forum for discussing topics relating to MacGregor Powersailor Sailboats
Post Reply
User avatar
Neo
Admiral
Posts: 1093
Joined: Fri Jan 30, 2015 4:29 pm
Sailboat: MacGregor 26M
Location: Central Coast, NSW, Australia

Crunch!!!

Post by Neo »

Ok so I'm tied to a swing mooring buoy and there's lots of other boats (on swing moorings) all around me. I'm down below making a cup of tea and one of the crew call down "Another boat is going to crash into us!". I dash up to the helm and off starboard side I see and BIG motor cruiser (Fly bridge thing) rapidly heading straight towards us, with it's big galvanised anchor pointing straight off it's bow. For a second or two I stared at its smoked glass flydeck (above me) wondering "Why would anyone be so stupid to motor into another boat like this". Then at 3 feet to impact I grab it's bow rail and push-off like crazy :evil: ... But it wasn't enough and before the boat turned its anchor blade crunched into the side of my deck. As the boat turned away I noticed that it was still tied to its swing mooring. That boat wasn't heading toward us, we were heading towards it (sideways!) :?
I ran to my bow and sure enough the mooring rope had come off the cleat. I look for the mooring boy we were on and it was about 70 meters away from us.
So like an elephant in a china shop we had been dancing around narrowly missing all the other boats .... Hmmm... I think I got off quite lightly :P

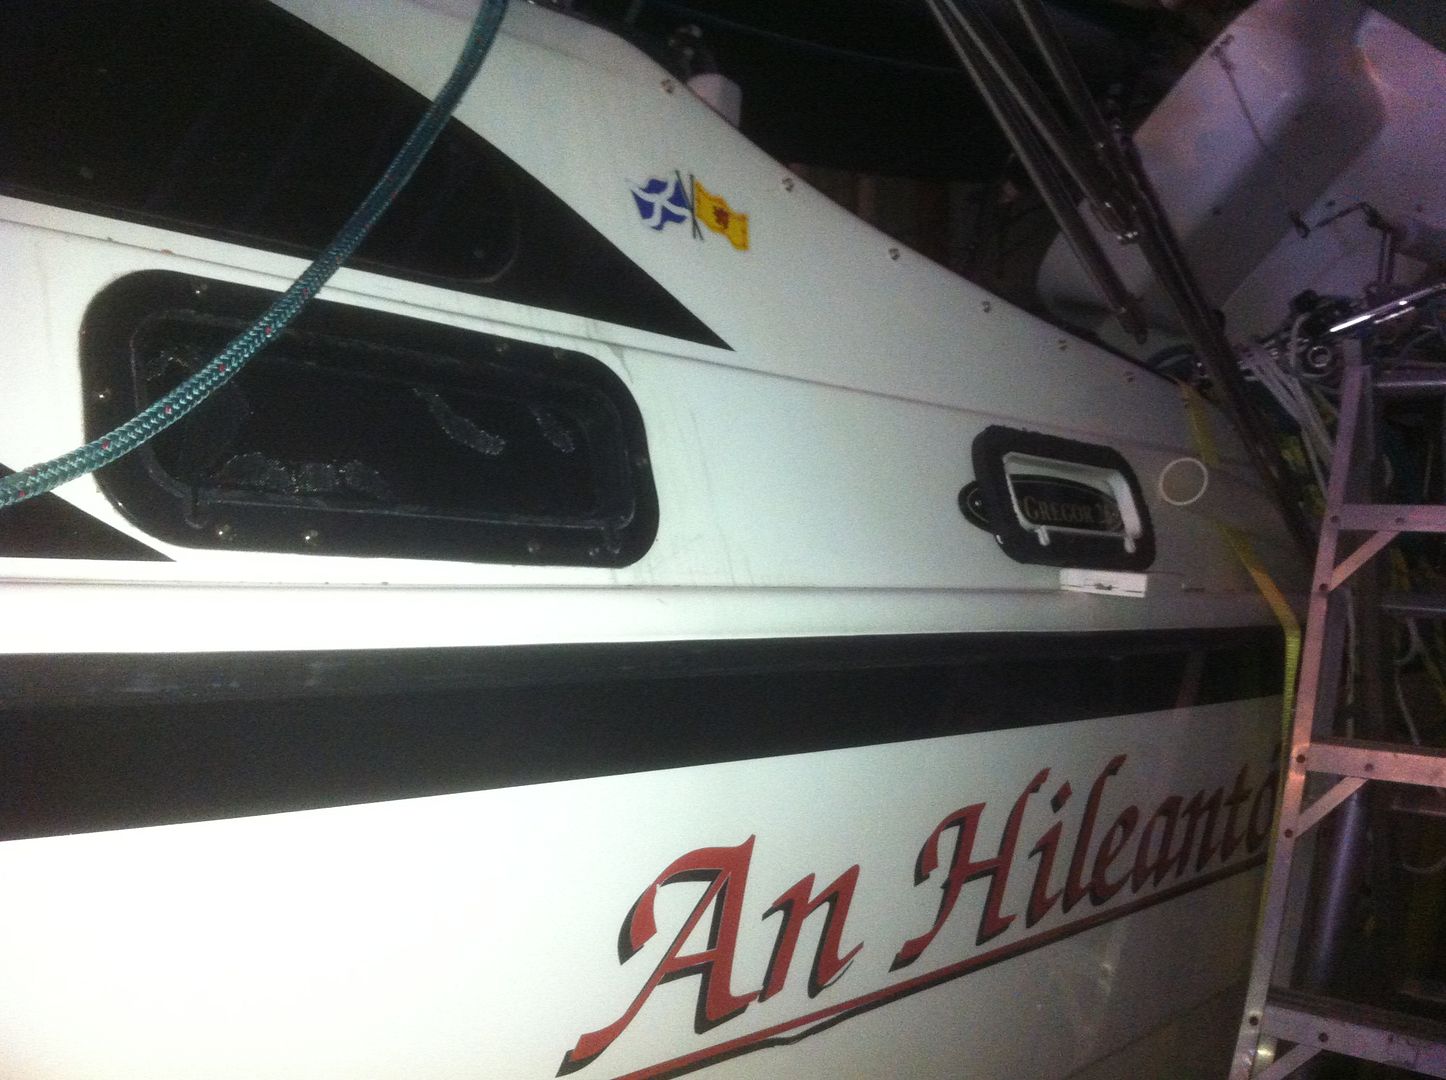
Anyway the crunch/slice/cut is about 4 inches long so can anyone advise....
Can I just use a fiberglass filler or will it need to cut a hole out?
If filler, what type do I need?
I'm pretty good at most jobs but is this job best left to a pro?
Is this an opportunity to enhance the Mac?.... ie. Cut hole out over the top and install air vents, port holes etc, etc?

Image
User avatar
Ixneigh
Admiral
Posts: 2462
Joined: Thu Sep 09, 2010 11:00 am
Sailboat: MacGregor 26M
Location: Key largo Florida

Re: Crunch!!!

Post by Ixneigh »

Hmmm. In my opinion...as always of course.
If it was me I would sand a 1 foot diameter area around that break, down to the fiberglass. Easy enough with a drill sander attachment. Cut 6 circles out of 8 once fiberglass cloth and make each one 2 in larger in diameter then the next. The smallest should just cover the damage. Use a quality polyester resin and carefully apply the patches.
Once its dry, sand the rough parts lightly and fair the area with a good marine putty. Not bondo. you can try making your own with gelcoat paste thickened with finely chopped fiberglass. Apply with a plastic putty knife and try to blend the repaired area into the rest of the boat. Wet sand it smooth but don't sand away the fiberglass you added. For the finish I would go with a couple foam brushes but work quick since they deform from the chemicals in the gelcoat. You'll probably need three coats of white west marine gelcoat which seems a fair match for the white on my M. Then you'll need to wet sand out the brush marks and use polishing compound to match the glossy parts of the boat. You'll still see this repair in just the right light and angle, but it will be as strong or stronger then it was before.
If you can reach the damage from inside, you could press the rough edges of the break back in place and apply the glass on the inside. This leaves only the gouge to fill and fair on the outside. If you do this, the glass patches need only be a few inches larger then the break. Proper surface prep is a must either way.
Ix
K9Kampers
Admiral
Posts: 2441
Joined: Thu Apr 13, 2006 7:32 am
Sailboat: MacGregor 26X
Location: NH, former 26X owner

Re: Crunch!!!

Post by K9Kampers »

Neo wrote:

Image
Looks like a great opportunity for a shore-power mod! :D
User avatar
Neo
Admiral
Posts: 1093
Joined: Fri Jan 30, 2015 4:29 pm
Sailboat: MacGregor 26M
Location: Central Coast, NSW, Australia

Re: Crunch!!!

Post by Neo »

Ixneigh wrote:I would sand a 1 foot diameter area around that break, down to the fiberglass.
Thanks Ix .... But a 1 foot diameter?.... does it have to be that big?

I just checked... I can't get access it on the inside and have now discovered it cracked the internal panel too :(
K9Kampers wrote:Looks like a great opportunity for a shore-power mod! :D
Nice try K9 but limited access on the inside.
I don't mind putting something on starboard and port side too ..... More ideas are most welcome 8)

All the best
Neo

Image
Bluenote
Just Enlisted
Posts: 20
Joined: Mon Jan 13, 2014 6:12 pm
Sailboat: Other
Location: Fernie, B.C. Canada

Re: Crunch!!!

Post by Bluenote »

I would clean it up with a small grinder or dremel tool from the outside. Rough up a few inches around it with some 100 grit. Cut up some glass cloth mixed with poly resin and trowel it on after masking off the prepped area. Sand that with 200 grit, then finish with white gelcoat. Sand lightly with the 200, then wet sand with 600 and 1000. A quick polish with compound and it will be hard to see. If you over sand you will need to gelcoat a second time. Do a bit of research as it is fairly easy. I prefer the " wax paper and squeegee" method for the gelcoat...
Bluenote
User avatar
yukonbob
Admiral
Posts: 1918
Joined: Mon Feb 14, 2011 6:54 pm
Sailboat: Other
Location: Whitehorse Yukon

Re: Crunch!!!

Post by yukonbob »

I'm with Ix but don't take the 1x1 too literally. Prep down to within 1.5- 2" of the black stripe and up to the fg grip on the gunwhale, then back approx 12" or until you get close to something again. This is a great excuse to buy a good orbital sander :wink: and I'd use a proper thickening agent rather than chopped glass.
User avatar
Ixneigh
Admiral
Posts: 2462
Joined: Thu Sep 09, 2010 11:00 am
Sailboat: MacGregor 26M
Location: Key largo Florida

Re: Crunch!!!

Post by Ixneigh »

The reason for the larger area is so the repair will be less visible. If you only glass the small area around The repair you will have a bump or high spot visible. It will need a lot of putty to fair in back into the surface. And putty tends to crack if applied too thickly. Like Yukon suggested this is not a hard and fast in that it Must Be 12 inches in diameter. But you want a large overlap on the last application of fiberglass cloth.

The pros would grind out the damage and feather the edges so new glass would lay in, and be almost even with the old surface. Thats a lot of grinding. My method is an in between. Good and strong, passible cosmetically.
A sanding disc drill attachment works very well. Its light. Takes time but does the job. A sanding block with wet or dry 3m paper is all you'll need for the finish work.
Ix
K9Kampers
Admiral
Posts: 2441
Joined: Thu Apr 13, 2006 7:32 am
Sailboat: MacGregor 26X
Location: NH, former 26X owner

Re: Crunch!!!

Post by K9Kampers »

Stock and custom graphic stickers / stripes can camouflage less than perfect repaired areas.
User avatar
Highlander
Admiral
Posts: 5995
Joined: Wed Sep 21, 2005 8:25 pm
Sailboat: MacGregor 26M
Location: Maccutter26M 2008 75HP Merc. 4/S Victoria BC. Can. ' An Hileanto'ir III '
Contact:

Re: Crunch!!!

Post by Highlander »

well u could repair it & install decals on that area where I have mine & no I did not have a repair there :P
http://i844.photobucket.com/albums/ab1/ ... a18822.jpg

or u could install opening ports like these beckson,s i install 4x14"
http://i844.photobucket.com/albums/ab1/ ... 56b385.jpg

http://i844.photobucket.com/albums/ab1/ ... 606758.jpg

Now u could install a 8" round opening port there or a 6" round closed port
http://www.beckson.com/ports.html

or a install 4" screw out white deck plates with clear lens
http://www.beckson.com/screwout.html

J 8)
User avatar
Neo
Admiral
Posts: 1093
Joined: Fri Jan 30, 2015 4:29 pm
Sailboat: MacGregor 26M
Location: Central Coast, NSW, Australia

Re: Crunch!!!

Post by Neo »

Thanks for all the suggestions gents.

I spent a lot of time on eBay last night and today I've ordered a surface (and subsurface) mount horn which is only just about big enough to cover the impact. I'm guessing this will also protrude through the inner panel which might give me the opportunity to hole cut and cover that too. But will have to cross that bridge when I come to it :P

Will let you guys know how I go :)

Marinco H Horn Phase II
Image
User avatar
Highlander
Admiral
Posts: 5995
Joined: Wed Sep 21, 2005 8:25 pm
Sailboat: MacGregor 26M
Location: Maccutter26M 2008 75HP Merc. 4/S Victoria BC. Can. ' An Hileanto'ir III '
Contact:

Re: Crunch!!!

Post by Highlander »

Yep I bought one of them yrs ago want to mount it on the bow or on the front of the mast or mast base where it will b heard better just never got around to it :(
To cover any interior holes u can buy these screw on deck plates in the exact same tan colour as ur interior liner I bought them in 6-8-10"
http://i235.photobucket.com/albums/ee20 ... 0044-1.jpg

great for covering up holes like these
http://i844.photobucket.com/albums/ab1/ ... 10/016.jpg

here,s one I cut the center out of for my dorade box vents
http://i844.photobucket.com/albums/ab1/ ... 145f98.jpg

this eventually
http://i844.photobucket.com/albums/ab1/ ... cx0vek.jpg

became this once the ss vent closures went on sale
http://i844.photobucket.com/albums/ab1/ ... hc9bvl.jpg

anyway they match the liner & r great for access points inside the boat

J 8)
Retcoastie
Captain
Posts: 673
Joined: Sat Sep 16, 2006 7:00 am
Sailboat: MacGregor 26X
Location: Gray Hawk, Kentucky 2002 X "Last Flight"

Re: Crunch!!!

Post by Retcoastie »

I don't want to start a verbal war and disagreeing with such a notable and experienced sailor as Ixneigh is questionable. But, in researching a similar repair on a stink pot, I found different information. In fairness, the repair was eventually done professionally.

Ixneigh wrote
But you want a large overlap on the last application of fiberglass cloth.
My research and the repair shop both said the largest piece of fiberglass should be the first piece applied and as the hole was filled, add smaller pieces as needed. The reasoning was to get as much contact as possible between the new material and the old as soon as possible to get better overall adhesion. Then, as the hole filled and became smaller, smaller patches were applied to fill the remaining hole. So, the last piece of fiberglass applied would be the smallest.

Ken
User avatar
Herschel
Admiral
Posts: 1487
Joined: Wed Sep 28, 2005 4:22 pm
Sailboat: MacGregor 26X
Location: Orlando, Florida
Contact:

Re: Crunch!!!

Post by Herschel »

I just scanned my "Sailboat Hull and Deck Repair" book by Don Casey. He makes the point that, if you are going to paint the surface or place something over the repair, he would recommend epoxy resin to get a better bond. And, he recommends starting with the smaller mat/cloth pieces and moving to the larger as you work your way outboard.
Retcoastie
Captain
Posts: 673
Joined: Sat Sep 16, 2006 7:00 am
Sailboat: MacGregor 26X
Location: Gray Hawk, Kentucky 2002 X "Last Flight"

Re: Crunch!!!

Post by Retcoastie »

You could be right. I don't have the advantage of your book. The online site for Don Casey at boatus, http://www.boatus.com/boattech/casey/fi ... repair.asp states,
Fabric

Cut sufficient fiberglass fabric to fit the hole. Unless you have reason to follow a different schedule, begin with two layers of 1 1/2-ounce mat, then alternate mat and 6-ounce cloth. The number of laminates will be determined by the thickness of the hull; you will roughly need one layer for every 1/32 inch. Cut the first layer of mat the full size of the ground depression, then cut subsequent pieces about an inch smaller. This order of largest piece first, then progressively smaller pieces is how you are going to apply the new fabric. We do it this counterintuitive way, particularly with polyester resin, because it maximizes the area of the secondary bond, the adhesion of the new cloth to the old laminate.
Perhaps it is the resin. Here he speaks, "particularly with polyester resin," and in your book apparently "epoxy" resin. Maybe there is a difference. Maybe it is why they make Fords and Chevrolets.
User avatar
yukonbob
Admiral
Posts: 1918
Joined: Mon Feb 14, 2011 6:54 pm
Sailboat: Other
Location: Whitehorse Yukon

Re: Crunch!!!

Post by yukonbob »

Retcoastie wrote:You could be right. I don't have the advantage of your book. The online site for Don Casey at boatus, http://www.boatus.com/boattech/casey/fi ... repair.asp states,
Fabric

Cut sufficient fiberglass fabric to fit the hole. Unless you have reason to follow a different schedule, begin with two layers of 1 1/2-ounce mat, then alternate mat and 6-ounce cloth. The number of laminates will be determined by the thickness of the hull; you will roughly need one layer for every 1/32 inch. Cut the first layer of mat the full size of the ground depression, then cut subsequent pieces about an inch smaller. This order of largest piece first, then progressively smaller pieces is how you are going to apply the new fabric. We do it this counterintuitive way, particularly with polyester resin, because it maximizes the area of the secondary bond, the adhesion of the new cloth to the old laminate.
Perhaps it is the resin. Here he speaks, "particularly with polyester resin," and in your book apparently "epoxy" resin. Maybe there is a difference. Maybe it is why they make Fords and Chevrolets.
The biggest issue doing it larger to smaller is getting all the voids out without bagging it. Above the waterline not so big of a deal but would never consider it below. You'll also run into more issues with removing folds from your first larger piece as you try to conform it to the inside of what is essentially a bowl (if you've ever tried this you'll know what I'm talking about). You'd end up removing any of the benefits of the larger adhesion of the first layer, or have to buil up a larger area in order to fair it down for a good finish. I think the other issue with this approach is if the first layer looses its bond or is subject to water intrusion all subsequent layers are compromised as well. This also brings up the issue of water intrusion and a water path directly to the core material (not with Macs of course) or to the interior as you only have one layer protecting from water intrusion. For purely cosmetic application polyester or vinylester will do, but anywhere below the waterline or structural integrity is a concern epoxy should be used hands down. Unless you're very proficient with FRP and have specialized equipment I would avoid the above mentioned application to avoid a much harder longer repair than nessecary.
Post Reply