

Anyone know what the '434' number refers to? Just above the serial number?
(and having seen that a thru-hull transducer costs $300 I'll probably stick with the transom one I already have, and figure out some kind of cover for it!)
So I just bought a Mac X....
-
Russ

- Admiral
- Posts: 8299
- Joined: Thu Oct 11, 2007 12:01 pm
- Sailboat: MacGregor 26M
- Location: Bozeman, Montana "Luna Azul" 2008 M 70hp Suzi
Re: So I just bought a Mac X....
That's interesting. I've never heard of transducers being damaged this way. I don't like putting holes in the bottom of my boat. Maybe paint the top white so it doesn't get hot.Drifter wrote: ↑Wed Oct 14, 2020 12:32 am Both my previous boats, with multiple fishfinders, have had problems with transom-mounted transducers failing after being cooked by the sun when the boat is on the trailer. So I'm reluctant to just throw yet another expensive transducer on yet another transom, just to watch it melt under the equator sun (I live about 70 miles from the actual equator line). I might see if it's possible to get hold of a through-hull transducer for the brand-new Garmin I have, and use that existing thru-hull, since it's already there.
Perspex covers are not stock that I'm aware of. Clever idea to give a view inside, but I would replace. My
--Russ
-
Drifter
- First Officer
- Posts: 332
- Joined: Wed Nov 24, 2010 3:56 am
- Sailboat: MacGregor 26X
- Location: Borneo
Re: So I just bought a Mac X....
Yeah I'm going to have to hunt down a perspex supplier anyway so I might try replacing with the same see-thru stuff but much thicker, as the stuff they've used is pretty wobbly.
I've used plywood in my old boat. It's the normal choice, though it does take a lot of prep to keep it waterproof and long-lasting.
I have a friend who is a carpenter. I might see if I can get some quality veneer or something and make them lovely, not that you can really see them most of the time!
I've used plywood in my old boat. It's the normal choice, though it does take a lot of prep to keep it waterproof and long-lasting.
I have a friend who is a carpenter. I might see if I can get some quality veneer or something and make them lovely, not that you can really see them most of the time!
-
chipveres
- Engineer
- Posts: 170
- Joined: Sat Aug 11, 2012 12:53 pm
- Sailboat: MacGregor 22
- Location: Dania, FL
Re: So I just bought a Mac X....
Congratulations on your new ship. The front windows look like they leaked and the owner was too lazy to remove and re-bed them. Fix these or not depending on your tolerance for mess. Please check the anchor windlass very carefully. Make sure that it is firmly braced and that the electrical wires are of adequate size. Otherwise the windlass could be more trouble than is is worth.
Chip
s/v Sand Dollar
Chip
s/v Sand Dollar
-
Drifter
- First Officer
- Posts: 332
- Joined: Wed Nov 24, 2010 3:56 am
- Sailboat: MacGregor 26X
- Location: Borneo
Re: So I just bought a Mac X....
Today I sanded down the hull below the waterline. Was pleased to get pretty much everything done in an hour, though not the centerboard or inside the valve area.
(Stupid) question and I'm sure it's in the manual somewhere but where is the control... lever? String? For lowering the centerboard? OK found it in the manual, says at the starboard rear of the cabin... on the pic it says it's on the mast support? Well I guess i'll find it. I need to lower it to clear all the barnacles off it.
Regarding the windlass, I'll remove it if I can, as it's ugly as heck. Earlier someone helpfully posted a pic showing the balance point and weight distribution of the 26X, but while moving this one around to get it on the trailer it seemed quite nose-heavy. I think the owner has placed the battery up front, plus that heavy windlass.
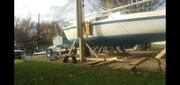
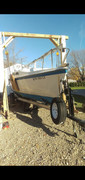
Back to the hull, my other boat (the 23ft speedboat, which I haven't sold yet) took 3 long horrid days of grinding to sort out the barnacles, blisters and general nastiness. With this it was pretty much a case of just rubbing the sander over it and it's all come up pretty smooth. Not smooth-smooth but very little in the way of gouges, chips, blisters or anything. It's 90% ready for a coat of anti-fouling already, though I really want to sort out the trailer first. Then perhaps I can move it back and forth while painting.
Sort what with the trailer, you may ask? Well when I got this one I thought it looked too short and so extended the tongue, by having a 20ft section cut in half. One half used immediately to get it from the docks, the other half sent to be galvanized. Well the galvanized one is done and I've already collected it. Now I need to figure out how to prop the trailer up securely enough to risk removing the tongue with the boat already on it... But I guess first I should paint the tongue with oxide paint...
I can see this is going to be a long project, this boat!
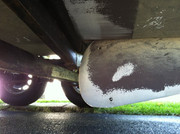
One bit of great news, while sanding down the hull I didn't see any sign of the thru-hull transducer? So I'm guessing it must be an "in hull" type? I really am too busy with client work to even climb back in and take a proper look. I'm pleased there's not a hole in the hull, though the toilet does have one. Actually there are 2 holes, right next to each other. I'll have to take a peep and see why?
Question - just above the rear ballast valve there's a little round hole, about the size of my finger. What is that?
(Bonus) question - next to that rear ballast valve there is a metal rod, connected to the steering thingy. I think it's some kind of electrical earth? Or not?

As an aside, I found the under-hull ballast valve, in a box. No rod. I've already ordered another one. I was surprised how small it is. For some reason I was thinking it was about a foot long but it's a dinky little thing you can fit in the palm of your hand. So what is it that normally breaks on these; the rod snaps off?
(Stupid) question and I'm sure it's in the manual somewhere but where is the control... lever? String? For lowering the centerboard? OK found it in the manual, says at the starboard rear of the cabin... on the pic it says it's on the mast support? Well I guess i'll find it. I need to lower it to clear all the barnacles off it.
Regarding the windlass, I'll remove it if I can, as it's ugly as heck. Earlier someone helpfully posted a pic showing the balance point and weight distribution of the 26X, but while moving this one around to get it on the trailer it seemed quite nose-heavy. I think the owner has placed the battery up front, plus that heavy windlass.
Back to the hull, my other boat (the 23ft speedboat, which I haven't sold yet) took 3 long horrid days of grinding to sort out the barnacles, blisters and general nastiness. With this it was pretty much a case of just rubbing the sander over it and it's all come up pretty smooth. Not smooth-smooth but very little in the way of gouges, chips, blisters or anything. It's 90% ready for a coat of anti-fouling already, though I really want to sort out the trailer first. Then perhaps I can move it back and forth while painting.
Sort what with the trailer, you may ask? Well when I got this one I thought it looked too short and so extended the tongue, by having a 20ft section cut in half. One half used immediately to get it from the docks, the other half sent to be galvanized. Well the galvanized one is done and I've already collected it. Now I need to figure out how to prop the trailer up securely enough to risk removing the tongue with the boat already on it... But I guess first I should paint the tongue with oxide paint...
I can see this is going to be a long project, this boat!
One bit of great news, while sanding down the hull I didn't see any sign of the thru-hull transducer? So I'm guessing it must be an "in hull" type? I really am too busy with client work to even climb back in and take a proper look. I'm pleased there's not a hole in the hull, though the toilet does have one. Actually there are 2 holes, right next to each other. I'll have to take a peep and see why?
Question - just above the rear ballast valve there's a little round hole, about the size of my finger. What is that?
(Bonus) question - next to that rear ballast valve there is a metal rod, connected to the steering thingy. I think it's some kind of electrical earth? Or not?
As an aside, I found the under-hull ballast valve, in a box. No rod. I've already ordered another one. I was surprised how small it is. For some reason I was thinking it was about a foot long but it's a dinky little thing you can fit in the palm of your hand. So what is it that normally breaks on these; the rod snaps off?
-
svscott
- First Officer
- Posts: 269
- Joined: Fri Aug 12, 2016 8:35 pm
- Sailboat: MacGregor 26D
- Location: Erie PA
Re: So I just bought a Mac X....
My responses are after each paragraph/question. I have only had the 26X for a month so I'm still learning but I've had a 26D for 15 years.
(Stupid) question and I'm sure it's in the manual somewhere but where is the control... lever? String? For lowering the centerboard? OK found it in the manual, says at the starboard rear of the cabin... on the pic it says it's on the mast support? Well I guess i'll find it. I need to lower it to clear all the barnacles off it.
----The centerboard cable runs through the mast support and exits the deck just behind the mast plate. On mine, the cable turns towards the starboard side over a little metal rod and is spliced onto a control rope. I think the trailer bunk is under the centerboard and won't allow you to lower it while on the trailer.
Regarding the windlass, I'll remove it if I can, as it's ugly as heck. Earlier someone helpfully posted a pic showing the balance point and weight distribution of the 26X, but while moving this one around to get it on the trailer it seemed quite nose-heavy. I think the owner has placed the battery up front, plus that heavy windlass.
---- You should have at least a 200-300 pounds of tongue weight, to avoid the trailer wagging behind your vehicle at towing speeds. I can barely lift the tongue of the trailer off the ground without someone standing on the stern ladder. I haven't weighed the tongue of the trailer for my boats but I consider myself stronger than average and they're pretty dang heavy.
Sort what with the trailer, you may ask? Well when I got this one I thought it looked too short and so extended the tongue, by having a 20ft section cut in half. One half used immediately to get it from the docks, the other half sent to be galvanized. Well the galvanized one is done and I've already collected it. Now I need to figure out how to prop the trailer up securely enough to risk removing the tongue with the boat already on it... But I guess first I should paint the tongue with oxide paint...
---- I'm not an expert on painting vs not painting galvanized steel but most of the time, I see raw galvanized on trailers. Maybe it's just because once it's painted, I cannot tell they're galvanized. I do know that these trailer tongues have a habit of riding from inside to outside, residual when subjected to saltwater. Regarding lifting/moving the boat around while on the trailer, I custom fit my 1987 26D to a 2010 26M trailer a few years ago. Starting with the trailer tires parked up on 6" high 2x12 ramps, I lowered the tongue as far as I could then made a 2x8 cradle to slide under the stern. You can then jack up the tongue of the trailer and insert blocks under the bow to get it fully off the trailer... I actually built a hoist for the bow using (3)10' long 6x6 posts and 2 chain hoists with a long heavy duty strap under the boat to make it so I could pull the trailer out and back the new one under.
I can see this is going to be a long project, this boat!
---- Boats are a never ending project! That's half the fun for me.
One bit of great news, while sanding down the hull I didn't see any sign of the thru-hull transducer? So I'm guessing it must be an "in hull" type? I really am too busy with client work to even climb back in and take a proper look. I'm pleased there's not a hole in the hull, though the toilet does have one. Actually there are 2 holes, right next to each other. I'll have to take a peep and see why?
---- my 26X has the transducer epoxied to the inside glass above the ballast tank. I don't love that, because the ballast tank must be full for the depth gauge to work. I don't have any holes below the waterline except for a large RV style waste gate at the stern to show ballast water in. There are 2 sink drain holes, one on each side just above the waterline.
Question - just above the rear ballast valve there's a little round hole, about the size of my finger. What is that?
--- if it's a 1" diameter hole, this should be a air vent to allow water in/out faster. You'll want a rubber bung to fill this hole so you don't spill your ballast water into the bilge.
(Bonus) question - next to that rear ballast valve there is a metal rod, connected to the steering thingy. I think it's some kind of electrical earth? Or not?
---- I'm not quite sure what's going on here...do you have a picture?
As an aside, I found the under-hull ballast valve, in a box. No rod. I've already ordered another one. I was surprised how small it is. For some reason I was thinking it was about a foot long but it's a dinky little thing you can fit in the palm of your hand. So what is it that normally breaks on these; the rod snaps off?
---- I don't know if this is relevant to your 26X but my 26D ballast fill valve is under the companionway steps and has a threaded rod with a ~3" round metal plate/rubber gasket under the hull and a large wing nut on top. My 3" metal plate was corroding away from where it was welded to the threaded rod. I bought a new one and inserted it back into place, pushing it up from the bottom of the boat.
1987 26D - Three Hour Tour; 1998 26X - to be named
-
Tomfoolery

- Admiral
- Posts: 6135
- Joined: Tue Jul 05, 2011 7:42 am
- Sailboat: MacGregor 26X
- Location: Rochester, NY '99X BF50 'Tomfoolery'
Re: So I just bought a Mac X....
The OEM trailer will prevent the CB from coming down UNLESS you hit the Mac Bump® too hard with the CB line a bit loose. And you won't be able to get it back up without dropping the hanger.
I've since added a small carpeted bunk in front of that middle bunk, right in the middle, mounted to a short piece of angle iron, in case the skipper decides to do something stupid. Again.
Tom
Be seeing you . . .
Be seeing you . . .
-
Drifter
- First Officer
- Posts: 332
- Joined: Wed Nov 24, 2010 3:56 am
- Sailboat: MacGregor 26X
- Location: Borneo
Re: So I just bought a Mac X....
My trailer is not OEM 
I'll take some photos while it's not raining... (now monsoon season here)
I still can't see where the center board is controlled from? Could someone please post a photo, showing the location (not a close-up)?
As it takes some time to upload each photo here, and even my old phone has images too big, here's a dropbox folder link to the pics:
https://www.dropbox.com/sh/mfkupxdvb4of ... aqjBa?dl=0
As I type this it is still uploading more images. There's about 70 I think.
Let me try uploading the ballast valve one directly... I'll re-size it...
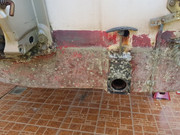
You can see by the handle there is a little hole. What is it?
Next to this valve is a metal rod. I presume this is an earth, an electrical negative or way for the engine to avoid corrosion? If so should I scrub the paint off it?
If you go to the folder and look at the pics it seems the owner has fitted 2 batteries, one at the back, inside the bed area (??) inside a plastic box. Plus another one near the bow, by the table seat. It has a 'battery charger'? So presumably wires are going to the engine's alternator?
I'm really not keen on this layout, and the wiring is an absolute mess (seems to be a common theme! My 3rd boat, and the 3rd wiring... I can't think of a polite word, so we'll stick with "absolute mess").
The windlass does work, has a big red button on the side and is apparently wired directly because it spins when you press the button. How the heck you're supposed to reverse it, I have no idea? From inside the cabin it looks like maybe only 2 bolts holding it on, but from outside looks like 4?
I have a funky anchor Never seen such a design locally. The rope seems good; I've thrown it overboard and will untangle and check every inch but it seems OK.
The anchor locker is tiny? Well, very shallow. Looks original. Do y'all use very thin anchor rope or something?
The steering pedestal seems to have home-made perspex sides that unscrew. I may consider making some beautiful wooden ones - or painting these, as they look a bit.. meh.
I still have no idea where the boom control thing is meant to go. Today I'll try getting rid of that horrible box thing.
First I best have a shower and head off to town to find some beefy axle stands. The home-made hoist is impressive but I'm hoping to get away with a couple of stands
I'll take some photos while it's not raining... (now monsoon season here)
I still can't see where the center board is controlled from? Could someone please post a photo, showing the location (not a close-up)?
As it takes some time to upload each photo here, and even my old phone has images too big, here's a dropbox folder link to the pics:
https://www.dropbox.com/sh/mfkupxdvb4of ... aqjBa?dl=0
As I type this it is still uploading more images. There's about 70 I think.
Let me try uploading the ballast valve one directly... I'll re-size it...
You can see by the handle there is a little hole. What is it?
Next to this valve is a metal rod. I presume this is an earth, an electrical negative or way for the engine to avoid corrosion? If so should I scrub the paint off it?
If you go to the folder and look at the pics it seems the owner has fitted 2 batteries, one at the back, inside the bed area (??) inside a plastic box. Plus another one near the bow, by the table seat. It has a 'battery charger'? So presumably wires are going to the engine's alternator?
I'm really not keen on this layout, and the wiring is an absolute mess (seems to be a common theme! My 3rd boat, and the 3rd wiring... I can't think of a polite word, so we'll stick with "absolute mess").
The windlass does work, has a big red button on the side and is apparently wired directly because it spins when you press the button. How the heck you're supposed to reverse it, I have no idea? From inside the cabin it looks like maybe only 2 bolts holding it on, but from outside looks like 4?
I have a funky anchor
The anchor locker is tiny? Well, very shallow. Looks original. Do y'all use very thin anchor rope or something?
The steering pedestal seems to have home-made perspex sides that unscrew. I may consider making some beautiful wooden ones - or painting these, as they look a bit.. meh.
I still have no idea where the boom control thing is meant to go. Today I'll try getting rid of that horrible box thing.
First I best have a shower and head off to town to find some beefy axle stands. The home-made hoist is impressive but I'm hoping to get away with a couple of stands
You do not have the required permissions to view the files attached to this post.
-
svscott
- First Officer
- Posts: 269
- Joined: Fri Aug 12, 2016 8:35 pm
- Sailboat: MacGregor 26D
- Location: Erie PA
Re: So I just bought a Mac X....
There is so much going on with your boat that's been changed or modified. I'm all for a project boat, but you've really got your hands full!
I have no clue what that rod is to the right of your ballast valve. What does it attach to?
The little hole above your ballast valve T handle looks like a drain hole... maybe for the motor well? My boat does not have this hole.
The anchor locker is too small to fit any of my anchors. Maybe I'll cut and modify the fiberglass to make the locker usable. I've seen the type of anchor in your pics but only on small fishing boats or canoes. It may hold ok but I'm not sure I'd trust it. Until I come up with a better option, I stashed my Fortress FX7 anchor, 6' of 1/4" chain, and 75' of nylon rode in the head. I'll eventually be changing the 6' of chain to 25' and will change the 75' of nylon to at least 150' of 1/2" nylon rope. Most places I'll anchor are at least 20' to 30' deep and if I ever want to anchor out and fish on Lake Erie, it'll be in water at least 50' deep so even 180' of anchor line probably isn't enough.
The pic of your secondary ballast valve at the companionway step shows the threaded rod/big wing nut but it's missing a round plate that should be welded onto the bottom end of the threaded rod. Newer X's don't have this threaded rod fill valve at all and just use the stern valve and the rubber bung to let air in or out
Your outboard should have an alternator with wire to charge batteries while running. All of Macgregor's factory wiring started out pretty messy and unprofessional from the factory.
Your port side helm station cover looks cracked. Making a cover out of painted or epoxy sealed plywood, or new plexiglass would be my suggestion. I'll be replacing all of my gray acrylic including windows and helm covers this winter. As for the gnarly box on top of the pedestal, I'd for sure remove that. The mainsheet (boom control) should attach to a metal loop at the front top of your helm pedestal.
To lift the boat off your trailer, you don't need the hoist like I built... I needed to remove the stock trailer and slide in another trailer then custom build bunks in exactly the right place. If you do like I said and park the trailer on small ramps, build a stern cradle, and jack up the trailer tongue enough that you can insert wood cribbing under the bow then let the trailer jack back down, it'll get the boat fully off your trailer. This will work for doing the barrier coat and bottom painting too.
For your centerboard control line, it's the 1/8" wire cable that's spliced to the rope and runs from the mast base plate over to the turning block at the front right corner of your siding hatch and continues down the starboard side of your sliding hatch. The rope should terminate at a cam cleat immediately to the right of the companionway.
1987 26D - Three Hour Tour; 1998 26X - to be named
-
Tomfoolery
- Admiral
- Posts: 6135
- Joined: Tue Jul 05, 2011 7:42 am
- Sailboat: MacGregor 26X
- Location: Rochester, NY '99X BF50 'Tomfoolery'
Re: So I just bought a Mac X....
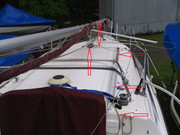
The centerboard line comes up through the compression post in the cabin, exits through the little hole in the mast base plate (or tabernacle), turns starboard across the front of the sliding hatch in the full open position, then turns 90 degrees to the stern, right along the hatch track. There's a cam cleat for it just to starboard of the winch. See photo.
The anchor locker is indeed tiny, but it will fit a small Danforth or the 4 lb aluminium Fortress. That Fortress, which I have, when set to the steeper "mud" fluke angle of 45 degrees, will hold the Queen Mary in a blow. OK, so maybe not quite that much, but I've had to 'drive over' it to break it free in mud conditions. Fortress anchors are amazing for the conditions they're intended, which is sand or mud.
Other styles are better suited to other bottoms, especially the Mantus and Rocna types, which are superior all-around anchors, as is the Spade anchor. The big downside to them is that they aren't folding, and won't remotely fit in the anchor locker. Folks have retrofitted anchor rollers and/or storage pipes or other means of securing a better anchor than the cheap Danforth knock-offs most of these boats came with.
Tom
Be seeing you . . .
Be seeing you . . .
-
Drifter
- First Officer
- Posts: 332
- Joined: Wed Nov 24, 2010 3:56 am
- Sailboat: MacGregor 26X
- Location: Borneo
Re: So I just bought a Mac X....
Interesting about the anchor, as I have a Fortress style for my old boat, which I hardly ever used, as I thought it was too light. A quick look on Youtube suggests it's actually pretty good
Ah, so the board control is outside the cabin! I was hunting around inside and peering at the mast support inside! Will have another look tomorrow, cheers!
Ah, so the board control is outside the cabin! I was hunting around inside and peering at the mast support inside! Will have another look tomorrow, cheers!
-
Drifter
- First Officer
- Posts: 332
- Joined: Wed Nov 24, 2010 3:56 am
- Sailboat: MacGregor 26X
- Location: Borneo
Re: So I just bought a Mac X....
Yep, there's a rope going to a wire outside. It's so tight you can pluck a tune with it, but the board itself is sticking down a little bit still.
Is that normal? It's not supposed to retract right inside its slot?
I kept saying the perspex hatch covers were too weak; today managed to put my knee right through one! Happily it was underneath the front bunk cushion, so no injury. On the bright side, I found some engine spares in there!
I have a new impeller, some spark plugs, a few other bits, also a used rudder controller. I guess he broke one, got a new pair and kept this one as a spare?
I already bought a service-kit for the BF50A, including an impeller, but it's nice to have some extra spares
Have also found the original 3 blade prop. Not sure how to change it - there's a castle nut with a clip. So I remove the clip, find a socket the same size as the nut... but how to stop it turning the whole shaft etc? I've never changed a prop before I'll try looking on Youtube...
The admiral had her first visit inside today. We were both soon drenched in sweat, but she seems to like it (the Mac, not the sweating bit).
I haven't opened the front hatch yet. Had a quick go today; it didn't seem to open when I thought it would. I suspect PO has actually sealed the thing shut? Will have another go later, as it was getting dark and I don't want mosquitoes in there anyway.
Question - The stainless steel tubing for the life-lines has brackets which have rusted away completely. Any idea where I could find some stainless steel replacements? I'm not even sure what you would call those things?
Today more fun and giggles with the trailer.... I mentioned I had the tongue extended, by having a 20ft section of steel turned into 2 new tongues, one for immediate use, one to be sent for galvanizing? Well the galvanized one was ready the other day, managed to collect it with my truck, this morning tried fitting it...
Scary to have the boat and trailer dangling on a 3 axle stands...
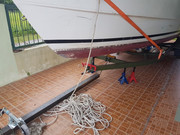
But got it on... and the holes don't line up
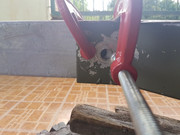
The same company did both tongues, at the same time, from the same piece of metal, using the same original as a template, so how can it be that this one doesn't fit?
Then I noticed the state of the other, non-galvanized one I just took off...
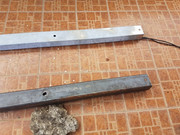
Judging from that butchered hole they knew, full well, that it could not possibly line up - but they sent it off to be galvanized anyway, at my expense, plus the cost of the truck to and from the galvanizing place? Knowing i'd have to re-drill it, ruining the whole point of galvanization?
There's a lot of love about Malaysia but people like this, with this kind of mind-set, is why it remains a 3rd world country. In Japan they organized getting the boat out of the water, into a container and shipped it here. The local people took 2 or 3 hours getting it out of the container and the local "engineering company" can't drill a hole straight? Not to mention the trailer being too small in the first place... and don't get me started on ROC numbers...
Yeah, it's going to be quite a project, and HUGE frustrations, road-blocks, delays, hassles and annoyances buying and getting it here, and onto a trailer. Not an experience I'd like to repeat - but as I just said to my Admiral, it's finally here, in my garden. It's my Macgregor, which makes it the best Macgregor in the world.
The world!
Is that normal? It's not supposed to retract right inside its slot?
I kept saying the perspex hatch covers were too weak; today managed to put my knee right through one! Happily it was underneath the front bunk cushion, so no injury. On the bright side, I found some engine spares in there!
I have a new impeller, some spark plugs, a few other bits, also a used rudder controller. I guess he broke one, got a new pair and kept this one as a spare?
I already bought a service-kit for the BF50A, including an impeller, but it's nice to have some extra spares
Have also found the original 3 blade prop. Not sure how to change it - there's a castle nut with a clip. So I remove the clip, find a socket the same size as the nut... but how to stop it turning the whole shaft etc? I've never changed a prop before
The admiral had her first visit inside today. We were both soon drenched in sweat, but she seems to like it (the Mac, not the sweating bit).
I haven't opened the front hatch yet. Had a quick go today; it didn't seem to open when I thought it would. I suspect PO has actually sealed the thing shut? Will have another go later, as it was getting dark and I don't want mosquitoes in there anyway.
Question - The stainless steel tubing for the life-lines has brackets which have rusted away completely. Any idea where I could find some stainless steel replacements? I'm not even sure what you would call those things?
Today more fun and giggles with the trailer.... I mentioned I had the tongue extended, by having a 20ft section of steel turned into 2 new tongues, one for immediate use, one to be sent for galvanizing? Well the galvanized one was ready the other day, managed to collect it with my truck, this morning tried fitting it...
Scary to have the boat and trailer dangling on a 3 axle stands...
But got it on... and the holes don't line up
The same company did both tongues, at the same time, from the same piece of metal, using the same original as a template, so how can it be that this one doesn't fit?
Then I noticed the state of the other, non-galvanized one I just took off...
Judging from that butchered hole they knew, full well, that it could not possibly line up - but they sent it off to be galvanized anyway, at my expense, plus the cost of the truck to and from the galvanizing place? Knowing i'd have to re-drill it, ruining the whole point of galvanization?
There's a lot of love about Malaysia but people like this, with this kind of mind-set, is why it remains a 3rd world country. In Japan they organized getting the boat out of the water, into a container and shipped it here. The local people took 2 or 3 hours getting it out of the container and the local "engineering company" can't drill a hole straight? Not to mention the trailer being too small in the first place... and don't get me started on ROC numbers...
Yeah, it's going to be quite a project, and HUGE frustrations, road-blocks, delays, hassles and annoyances buying and getting it here, and onto a trailer. Not an experience I'd like to repeat - but as I just said to my Admiral, it's finally here, in my garden. It's my Macgregor, which makes it the best Macgregor in the world.
The world!
-
svscott
- First Officer
- Posts: 269
- Joined: Fri Aug 12, 2016 8:35 pm
- Sailboat: MacGregor 26D
- Location: Erie PA
Re: So I just bought a Mac X....
It seems like you're making decent progress, even with the frustrations.
Edited to add that your centerboard cable should not need to be pulled excessively tight to retract your board all the way into its slot. You may need to drop the centerboard and make sure there isn't anything lodged in the centerboard trunk. I believe to remove the centerboard that it's just a couple bolts inside the boat at the base of the mast compression post.
The interior storage hatch covers should be made of 3/8 plywood, not acrylic. 1/4" or thicker polycarbonate would be a safe alternate, as it'll hold up to being knelt on and won't hold moisture or rot.
For the prop, once you remove the cotter pin from the castle nut, maybe put the motor in gear so the prop has the motor's compression to offer the resistance to keep the prop from free spinning, then if needed, give your ratchet a couple light taps with a mallet to break it free. My little 1999 nissan 5 hp prop nut came loose without any struggle or difficulty last year when I installed the high thrust prop. You may want a spare castle nut to go with that spare prop.
On your front hatch. It's possible they sealed it shut with silicone. Aside from the lock bolt in the inside front center that needs to be backed way out to release the hatch, my hatch has a prop rod on the port side with a set screw that will hold it up. Could yours have a set screw locked down and holding it closed?
Rather than redrilling the galvanized tongue. Can you weld the trailer's hole closed and redrill it to fit the new tongue? I've never seen a removable trailer tongue with a through bolt like that.
I'm not sure what brackets are rusted of on your lifelines. If it's the tiny little life line attachment loops at the end, you new ones should be able to be fabricated and welded on or maybe drill the tube and install through bolted eye bolts? Blue Water Yachts probably carries new stainless replacement lifeline parts.
1987 26D - Three Hour Tour; 1998 26X - to be named
-
Drifter
- First Officer
- Posts: 332
- Joined: Wed Nov 24, 2010 3:56 am
- Sailboat: MacGregor 26X
- Location: Borneo
Re: So I just bought a Mac X....
Well I asked BWY is they carried those rusty bits and they told me they are non-standard, just some stuff from a hardware store, which is why they were so rusty.
I've removed them completely, leaving just the life-line stanchions.
I suspect maybe the previous owner was using the messy, rusty... mess as somewhere to connect the boom controls? I am definitely missing a rounded hoop thing that I see on other Mac's steering binnacle.
I don't see that hoop on the BWY site.
Does it have name, so I know what to look for?
Regarding the storage hatches, I've cut some 5mm plywood (6mm for the bed, which is one I broke by kneeling on it). I tried kneeling and sitting on them, zero bending. Later I will stain and then varnish or epoxy them.
Must say I'm pleased with how clean the interior is coming up. Had a bash with some cream cleaner and almost all marks and stains vanish. Only some deeper gouges and areas that have been repainted retain any marks.
I really need to investigate the wiring soon, though I have no idea where to even begin!
-
Tomfoolery
- Admiral
- Posts: 6135
- Joined: Tue Jul 05, 2011 7:42 am
- Sailboat: MacGregor 26X
- Location: Rochester, NY '99X BF50 'Tomfoolery'
Re: So I just bought a Mac X....
Helm or binnacle guard.
I bought it from BWY, and it's a great addition. Brings the bottom fiddle block of the main sheet system up higher, above my instruments, and gives me something to hang on to when it's rough.
http://shop.bwyachts.com/product-p/6303-1x0.htm
Tom
Be seeing you . . .
Be seeing you . . .