Page 3 of 4
Re: Cushion replacement Part II
Posted: Thu Jan 28, 2021 5:25 am
by Inquisitor
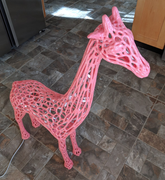
I wish I had artistic talent. It's simply a 3D Print from Thingiverse:
https://www.thingiverse.com/thing:1878627. And the person that uploaded it just used a computer technique (free ware) called Voronoi to make it lattice like. I don't know where the original came from, but likely, it was a 3D scan of a real giraffe that someone else did. I simply scaled it up in a CAD program (4' tall) and split it up into pieces to fit on my printer. Split and cleaning up the CAD model (about 10 hours). Printed the models using Pink ABS filament (about 100 hours). Fused them together and painted it with acetone thinned ABS (10 hours). Added a couple of strings of while LED Christmas tree lights on the inside.
To show-off a little more... for my buddy, who sent his daughters to Clemson and is a rabid Clemson fan now.
Re: Cushion replacement Part II
Posted: Thu Jan 28, 2021 5:28 am
by Inquisitor
Starscream wrote: ↑Wed Jan 27, 2021 10:27 am
Inquisitor wrote: ↑Wed Jan 27, 2021 8:43 am
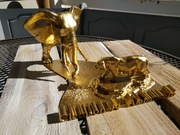
Looking closer, I found this attachment on it and a piece of real leather in it. I know this attachment was never there growing up... any clue what it might be?][/url]
Looks like your granny was keeping her antique set of medieval torture instruments with her sewing machine,or maybe she was a dentist on the side? Or maybe a veterinarian?
No idea about ANY of those bits!!!!
But yes, a score indeed. They don't make 'em like that any more.
The box of implements... you think they are for the 1920's sewing machine instead of the 1950's one???
Re: Cushion replacement Part II
Posted: Thu Jan 28, 2021 6:17 am
by Russ
Inquisitor wrote: ↑Thu Jan 28, 2021 5:25 am
I wish I had artistic talent. It's simply a 3D Print from Thingiverse:
https://www.thingiverse.com/thing:1878627. And the person that uploaded it just used a computer technique (free ware) called Voronoi to make it lattice like. I don't know where the original came from, but likely, it was a 3D scan of a real giraffe that someone else did. I simply scaled it up in a CAD program (4' tall) and split it up into pieces to fit on my printer. Split and cleaning up the CAD model (about 10 hours). Printed the models using Pink ABS filament (about 100 hours). Fused them together and painted it with acetone thinned ABS (10 hours). Added a couple of strings of while LED Christmas tree lights on the inside.
To show-off a little more... for my buddy, who sent his daughters to Clemson and is a rabid Clemson fan now.
Alright, that is the most impressive thing I've seen in a while. Best dad award surely earned.
Re: Cushion replacement Part II
Posted: Thu Jan 28, 2021 6:55 am
by Jimmyt
Inquisitor,
That is stunning work! Thanks for sharing it!
Re: Cushion replacement Part II
Posted: Thu Jan 28, 2021 7:05 am
by Inquisitor
The MacGregor Sailboat Forum, where you can find out anything about anything:
Now, with expertise on TuTu's and pink Giraffes.

We rock!
Re: Cushion replacement Part II
Posted: Thu Jan 28, 2021 7:15 am
by Jimmyt
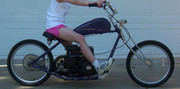
Yeah, now that I see it in writing, not feeling as good about it...

Can I get my man card back for the scooter I built them?
Re: Cushion replacement Part II
Posted: Thu Jan 28, 2021 7:32 am
by Inquisitor
Jimmyt wrote: ↑Thu Jan 28, 2021 7:15 am
Yeah, now that I see it in writing, not feeling as good about it...
Can I get my man card back for the scooter I built them?
Oh hull yeah! You put every other Dad on the block to shame... no doubt. In spades... ah, I mean clubs.
Re: Cushion replacement Part II
Posted: Sat May 22, 2021 11:07 am
by Starscream
Cleaning the original cockpit cushions with magic-eraser, treating with 303 protectant, and new foam was one of my all-time fave mods. It makes the cockpit look soooo much better.

Adding the velcroed-on flap for boarding was also a good idea.
Re: Cushion replacement Part II
Posted: Sat May 22, 2021 12:45 pm
by Jimmyt
Wow. That looks great!
Re: Cushion replacement Part II
Posted: Mon Jul 15, 2024 6:11 am
by Starscream
Posting for my own future reference... when starting to connect the zipper boxing to the side boxing, stand looking at the back of the zipper boxing, and connect the side boxing on the LEFT of the zipper panel from that perspective. Because you're supposed to start sewing the zipper panel to the top panel first and this is the only way to get it on the correct side of the sewing machine arm.
Just remade a cusion, and read my own notes on this thread, and of course they weren't clear and I had to rip the seam. Other than than, I still got it.
Oh, and if you make cushions, I can't recommend the cushion-wrap-film enough. I removed a cockpit cushion foam last week to add a strip of velcro to the cushion and after several years of being outside and damp all summer, there wasn't a single trace of mold and the foam still looked brand new inside its plastic wrapper. Same for the cabin cushion I replaced...foam was still pristine.
https://jtsoutdoorfabrics.com/cushion_wrap_film
Re: Cushion replacement Part II
Posted: Mon Dec 29, 2025 10:34 am
by Starscream
Santa brought us a walking-foot sewing machine this year. It's a StitchForce from JTs Outdoor Fabrics in Ontario, and it's at $699 Cdn right now, plus tax and shipment. By far the lowest price for a machine like this that I've ever seen.
If anyone's interested I can do a review of it. It's good but needs some accessories added on, which raise the price a bit. The documentation that it comes with is bad, but there are videos online that help immensely. It easily handles B138 UV marine thread with a size 21 needle.
I started the next cushion project: finally replacing the original cockpit cushion vinyl. I bought 5 yards of economy marine vinyl and will make a practice set using the foam that I replaced a few years ago. If things go well I'll splurge on some good stuff and maybe put the economy covers in the classifieds here.
The plastic-silk-wrap stuff that I used to wrap the foam did a great job of keeping the foam 100% mold free and looking like new.
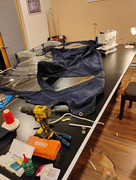
Before I start the cushions, I'm using the StitchForce to do a full repair of the enclosure canvas. The vinyl windows I replaced a few years ago were damaged by the 303 Fabric Guard that I used to protect the fabric, and were no longer usable as windows. The dodger is in the worst shape of all the canvas pieces, because of the way it gets stretched around the aluminum support structure. So, patches inside and out, and new windows, full wash in the garage sink and soaking with more Fabric Guard... but with the windows removed if course.
No ping pong in the Bear Hunt house for the next few days:
Re: Cushion replacement Part II
Posted: Tue Dec 30, 2025 6:10 am
by Russ
Wow, sounds like quite the project. You will master a new skill set and save a bundle of money DIY.
Post more pics of progress.
Re: Cushion replacement Part II
Posted: Wed Dec 31, 2025 1:59 pm
by Starscream
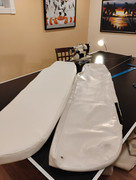
Cockpit cushions are coming along nicely. There's a surprising amount of thinking and planning
Added a flap to cover the ykk zipper and protect it from water runoff.
Each cushion gets better. The problem is the foam: a few years ago I cut it with a knife and the cuts aren't clean, so the edges of the cushions aren't totally crisp.
Re: Cushion replacement Part II
Posted: Sun Jan 04, 2026 3:15 pm
by Starscream
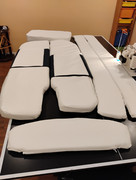
Almost done: just missing the snaps. Need access to the boat for that step.
Project cost was just under 200 cdn excluding the foam, which was re-used.
The vinyl is economy 30k double-rub material. I feel like I'm good enough to buy the premium 100k double-rub material next year and not make a mess of it. The cushions aren't perfect but I more or less know why and what to do about it next time.
I made the captain's cushion an inch and a half taller, and a bit more comfortable, by adding another layer of leftover foam. Just a bit more visibility will be nice.
I made two "boarding covers" out of sunbrella and a layer of the Marine vinyl and velcro-ed them to the cushions. We aren't a remove-your-shoes boat so they help with the dirt and footprints.
Re: Cushion replacement Part II
Posted: Wed Jan 28, 2026 10:19 am
by OverEasy
Hi StarScream!
That is really impressive!
Great work!
Best Regards
Over Easy
