Page 2 of 3
Re: Restoration of hurricane damaged '99 26x
Posted: Thu Jun 24, 2021 5:07 am
by SlowSL
krum wrote: ↑Wed Jun 23, 2021 3:22 pm
Have you considered using a circular 3-4 inch hatch plate through the side of the anchor locker, one per side. If I cant convince my wife to put her hand into the hole, I'll need to use the 4 incher so my forearms get thru. Spent some time at home depot trying out different sizes. Got some funny looks but a guys got to do what a guys got to do.
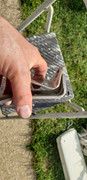
No, never thought about a hatch plate. Home depot sells them? Are they marine/rv hatches, or are they used in a different industry? I have small hands, I don't think 3" would cut it, 4" might work. That is a good idea though, would probably work, but it may be tough getting the foam out. Centrally located, it would be about 10" from the access to the nuts. Worst case for me, if the bolts pull out at some point, I'll just cut a couple more little access holes, put nuts on the underside, and fiberglass over the access holes. I'm just going to fiberglass over all of the access holes once I know there is no water intrusion from the pulpit mount. Patching all 4 holes is an easy 20 minute job, I'm not too worried about making it look nice in the locker.
Re: Restoration of hurricane damaged '99 26x
Posted: Thu Jun 24, 2021 6:11 am
by SlowSL
Last night I laid a 2nd, thicker coat of gelcoat everywhere needed. I noticed my last coating ended up a little too dark, was way obvious once it dried. This time, I just left it pure white, it's so hard for me to get the color matched correctly. If I'm not too aggressive with the sanding (I usually am), I should be done with the gelcoat, except maybe a couple touch ups. I'll try to re-mount the bow pulpit in the next day or two. One thing I noticed, last night I placed the pulpit on the bow to look at the fit. The feet had bent up in some places, in the area where there is no mounting hole. The tube welded to it is at such an angle that I couldn't get anything in there to try to bend it back down flat. If I bolt it down as is, the edge of the feet will dig right into the deck, so I plan on cutting some aluminum pucks/spacers to go between the pulpit feet and deck so that there is a nice, flat contact surface that's not going to ruin the deck.
I also ran the motor control wiring, battery to motor wires, and shift cables last night, that was fun. I'll fabricate new rudder brackets today, the ones that came on the boat were pretty mangled. I'm going with thicker material this time.
Re: Restoration of hurricane damaged '99 26x
Posted: Thu Jun 24, 2021 7:17 am
by Be Free
You can get the hatch plates in rectangular shapes as well if that would work better.
I can't believe the progress you have made on those repairs. Great job.
Re: Restoration of hurricane damaged '99 26x
Posted: Thu Jun 24, 2021 9:58 am
by krum
my bad..... I was using the pvc pipe as a substitute for the circular hatch covers. On my x I'm only a couple inches from the front mount. I was actually originally looking to place the cir. hatch midpoint in the anchor well. Seeing all that foam had me looking for an alternate. Now, whats so hard about removing the foam with a hacksaw or sheetrock saw. The fun part is refilling it up with empty pop bottles to regain buoyancy. Easy peezy. I ordered the hatch covers on line, sorry for the misunderstanding.
Re: Restoration of hurricane damaged '99 26x
Posted: Mon Jun 28, 2021 6:32 am
by SlowSL
Finally had a break from the rain yesterday. It's been raining/storming for the last week, and a high chance of rain every day for the next 10 days in the forecast, ugh.
The motor and all connections are now complete, just need to mount the control box.
Made new heavier duty rudder brackets. The oem ones are 10ga (.135"), I made these out of 7ga. (.179"). The brackets were all mangled. After straightening them out, I figured they'd just end up bending again, on top of being fatigued from bending so much.

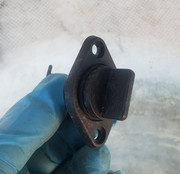
The ballast valve had broken, so I took a guess on the replacement part. There were several from the same manufacturer that looked very similar. I didn't get a direct replacement, but it will work. I think the only difference is the outlet must fit a larger diameter tube than the oem one. Since we don't connect to this end with anything, doesn't really matter, it's just a larger diameter outlet flange, I don't see a problem with it. I had to replace the mounting bolts though, they were not stainless. Turns out these valves are very popular on RV's for the waste dump, so they are cheap and available.
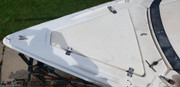
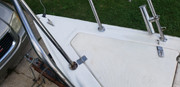
And finally, the bow is coming together. I didn't worry so much about matching the gelcoat this time, as I've already applied several coats, and it was becoming quite time consuming, and didn't know how many more coats it would take before I got everything correct. For the pulpit mounts, that was quite the trick. I spent a good amount of time trying to straighten everything out as best as I could. A couple of the feet had actually twisted and rotated to some small degree from when it hit the dock. While it's not obvious by eye, when you are trying to line up three bolts, x2 feet, it became quite the task, all while trying to get it installed before the sealant cured. Luckily I was barely able to muscle them through and was able to get washers/nuts underneath. I marked, drilled and tapped the forward mount holes, as discussed earlier. The aluminum plate had been installed earlier in the repair, that's not going anywhere! Seems to be a really strong connection. Just need to install the two cleats, fairlead, and navigation light and I'm ready to try to salvage the rub rail. One thing I overlooked was that one of the hinges for the anchor locker falls right in the repaired area. There was no backer directly under where those fasteners belong, and I didn't end up cutting an access hole for that area in the anchor locker. I'm not even sure if I put some wood under there. Knowing that the fiberglass was extra thick in that entire area, I just drilled and tapped the holes. I then mixed up some fiberglass resin and gooped a little into the holes and tightened them down, seems to be pretty strong, I don't think they will rip out without some catastrophic force on the locker lid.
I think for the rub rail, I'll stick with the Loctite PL which I've used to seal the pulpit and the hardware at the stern. It seems to be pretty good stuff, and people compare it to 4200. I'll start by gooping up the bow area pretty good, then drawing the rubrail around, keeping it underneath the lip, and clamp it at the stern somewhere to keep some good tension on it. I noticed the p.o. used about 3" lengths of adhesive spaced with about 6-8" between, both at the rub rail seam, and along where the rail sits on top of the flange. It took a lot of work to get it off, and I'm surprised the rub rail didn't rip, so there shouldn't be any problems keeping the rubrail in place and not going crazy with the adhesive. I think I'll seal completely at the seam where the two shells come together, make sure all of the fasteners are sealed, and then use a similar glue pattern to keep it held on. Once it's on, I'll make sure I lay a nice sealing bead along the top where the rubrail edge is against the boat, so there is no water intrusion from the top.
Re: Restoration of hurricane damaged '99 26x
Posted: Mon Jun 28, 2021 7:38 am
by Be Free
That is some beautiful work. I can't believe that's the same bow you posted when you started this project.
Now if you could just find out what they used to texture the non-skid areas you could completely hide that hinge repair.
Re: Restoration of hurricane damaged '99 26x
Posted: Mon Jun 28, 2021 7:47 am
by SlowSL
Be Free wrote: ↑Mon Jun 28, 2021 7:38 am
That is some beautiful work. I can't believe that's the same bow you posted when you started this project.
Now if you could just find out what they used to texture the non-skid areas you could completely hide that hinge repair.
Thanks! I actually thought about 3d printing that texture pattern as a thin, cemi-circle, or complete circle that I could roll down onto the gelcoat, but for such a small area, I didn't think the added effort was worth it. I'll probably end up eating those words some day if I end up slipping on the untextured area.
Re: Restoration of hurricane damaged '99 26x
Posted: Mon Jul 12, 2021 10:58 am
by SlowSL
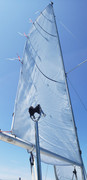
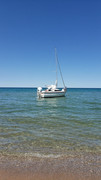
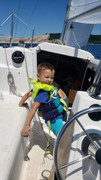
Finally! Our 1st trip to Lake Michigan was full of surprises, motor problems, shredded tire, burned up 4th gear clutch pack in the truck, cold weather, no dock at the launch (that wasn't fun to figure out how to load/unload everyone, and keep the boat off the rocks), etc., but we managed to sail around for the good part of a day with some sun and checked out Sleeping Bear Dunes from the water. I'm very happy with the way the boat handled, no real surprises other than the swing keel getting stuck in both positions for a while, and forgetting to lock the motor, kicking up in reverse and taking a small chunk out of the rudder, oops. Other than that, was smooth sailing. I want to thank everyone on this forum, as well as the Facebook groups for all of the help with my questions, you guys are awesome. We are excited to plan our next trip, and will certainly be a little more prepared.


Re: Restoration of hurricane damaged '99 26x
Posted: Mon Jul 12, 2021 11:05 am
by pitchpolehobie
Sorry you had to deal with so much but from the looks of the pictures it was a great experience! I think most of us had to do some "rehab" on our used boats to get them in ship shape... Since then its mostly been cosmetic stuff and smooth sailing!
Those trailers.....

Re: Restoration of hurricane damaged '99 26x
Posted: Mon Jul 12, 2021 11:52 am
by Be Free
Congratulations on getting back on the water! After what you've already done fixing that rudder is going to be a piece of cake.
Re: Restoration of hurricane damaged '99 26x
Posted: Mon Jul 12, 2021 12:00 pm
by SlowSL
Be Free wrote: ↑Mon Jul 12, 2021 11:52 am
Congratulations on getting back on the water! After what you've already done fixing that rudder is going to be a piece of cake.
Exactly why I shrugged it off as a learning experience, haha. It was really shallow, up near shore, I just cleated them up a few inches out of the water, not even sure why I didn't bring them up all the way.... oh well, now I know.
Re: Restoration of hurricane damaged '99 26x
Posted: Tue Jul 13, 2021 5:41 am
by Russ
Amazing!
What a transformation.
Glad to see you got out on the water.
Re: Restoration of hurricane damaged '99 26x
Posted: Tue Jul 13, 2021 11:13 am
by OverEasy
Wow!!!

What a great job on all the repairs!!!
Everything looks GREAT

!!!
You have done a remarkable job right out of the gate in a remarkably short timeframe!
You should be rightfully proud of what you have accomplished.
Everything looks fantastic!
Glad you got out on the water and are starting to enjoy your vessel.
As you well know you can fix just about anything on your Mac!
Minor snaffle stuff is a part of life.
Boat are a case of “mind over matter, if you don’t mind it doesn’t matter”.
Great job!
Have fun!


Re: Restoration of hurricane damaged '99 26x
Posted: Sat Apr 16, 2022 12:58 pm
by OverEasy
Hi SlowSL!
Great job!
Your documentation is spot on for others to understand your problem/solution/process to resolve the issue faced.
Just excellent!
One of the things that caught my eye were the drain plugs
The PO had installed semi-flush drain plugs in the aft end of the hull bottom, just outside both sides of the ballast tank.
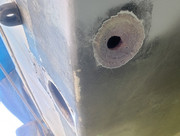
Given this is an enclosed cabin vessel with a self draining cockpit the need to have two bottom mounted through hull drain plugs amazes me. The placement on the actual bottom hull of the stern is doubly troubling as the surface mounted plastic fittings used could have very easily come in contact with debris or sea bottom/sandbar and have been shorn off unknowingly. Never mind just simply forgetting to put them in! You can’t even do a look over the edge visual check ( unless you have a snorkel or a really long neck


If the PO was concerned with water accumulation in those pockets it would have made more sense to install a pair of auto bilge pumps and a high up overboard thru-hull drain(s). (We have made allowance in our refitting of Over Easy to do just that as part of our pre-emptive bilge pump system. We have the three primary bilges amidship already installed. We also added propositioned vacuum lines to make it easy to clear out any minor residual or accumulating (condensation generally) moisture. Our DC Electrical Control Panel already has the bilge pump control switches installed and wires run to the DC Electrical terminal box. The same type of vacuum lines will be added to those aft bilge areas.
)
Really glad you went through the effort to remove and glass in those holes!
Those were a high risk feature that provided marginal benefit.
Best Regards
Over Easy


fudt
Re: Restoration of hurricane damaged '99 26x
Posted: Wed Jul 20, 2022 1:45 am
by DownSouth
krum wrote: ↑Mon Jun 21, 2021 4:18 pm
I was planning to replace my bow pulpit on my '01 26x, I didn't realize there was so much foam underneath the pulpit mounting area, looks like I'll have to rethink my approach. For not having done this before it looks great.
Karl
I accessed all the nuts for the pulpit by removing the foam blocks through the inspection hatch fairly easily then put the blocks back in.
DownSouth
 !!!
!!!

