

As part of shoring up the new teakwood drain floor I will need to glass in some wood structure that will span from the hull to the ballast tank below your feet. What wood should I think of using? Have thought of pressure treated pine but have thought probably not a good idea as I ve seen it expand and warp. Any help would be awesome! Thanks!
A Shower Project in the 26X (Formerly titled “Proper wood to glass in”)
-
FittsFly

- Deckhand
- Posts: 34
- Joined: Sun Jun 30, 2024 2:54 pm
- Sailboat: MacGregor 26X
- Location: Roswell NM
A Shower Project in the 26X (Formerly titled “Proper wood to glass in”)
I will be starting a new Mod over the winter with the installation of a shower, Ill be sending pics of my progress if anybody's interested. Included in the project is the removal of the sink and related fiberglass to make the floor area larger in my  . I'm familiar with working with fiberglass but anyway my Question is:
As part of shoring up the new teakwood drain floor I will need to glass in some wood structure that will span from the hull to the ballast tank below your feet. What wood should I think of using? Have thought of pressure treated pine but have thought probably not a good idea as I ve seen it expand and warp. Any help would be awesome! Thanks!
As part of shoring up the new teakwood drain floor I will need to glass in some wood structure that will span from the hull to the ballast tank below your feet. What wood should I think of using? Have thought of pressure treated pine but have thought probably not a good idea as I ve seen it expand and warp. Any help would be awesome! Thanks!
-
OverEasy
- Admiral
- Posts: 2873
- Joined: Mon Sep 28, 2020 11:16 am
- Sailboat: MacGregor 26X
- Location: NH & SC
Re: A Shower Project in the 26X (Formerly titled “Proper wood to glass in”)
Hi FittsFly!
Wow! What a neat project!
Having an inboard (vs. in-cockpit) shower will be a great mod to accomplish!
For anything boat, especially in potentially damp/wet locations I’d definitely agree with you that any Pressure Treated Pine isn’t gonna work well.
My personal preference nowadays is to avoid any wood at all if possible and utilize PVC board. While it’s not a perfect solution to every project it does work well, won’t swell, won’t rot, is water proof, readily available from a variety of sources, easy to work with normal woodworking tools, and relatively inexpensive. It comes in a variety of dimensional lumber sizes as well as in sheet form of a variety of thicknesses. It also cleans up nicely too!
While it’s not as stiff as wood one can generally acknowledge that and design in the stiffness needed with appropriate PVC Board rib supporting structure.
I’ve made several modifications with PVC Board like our galley mod, transducer tank mod, our stern mounted push-in/pull-out transducer mount, our new DC electrical controls box, along with several other non-boat wet location projects that have done really well over time and exposure over all sorts of New England and Southern climate conditions.
Generally I’ve used Stainless Steel wood screws and clear PVC plumbing glue. I’ve sealed the cut edges of PVC Boards by simply “painting” the edges with a couple thin coats of the PVC glue and allowing it to fully cure between coats (which is relatively quick).
If I really wanted to use wood for an application like a shower I’d choose mahogany marine grade plywood or teak boards. I’d be hesitant to use cedar as it tends to dry out and split even with TLC.
Structural caulk and stuff like 3M 5200 and 4200 adhere well to PVC Board and last.
There is always more than one way to get the job done… another is to make it out of fiberglass which is also valid but that’s for you to decide if it’s worth the extra work, costs & time.
Anyway, that’s a suggestion.
Your boat, Your rules!
Best Regards,
Over Easy
-
rsvpasap

- First Officer
- Posts: 241
- Joined: Fri Dec 13, 2013 2:05 pm
- Sailboat: MacGregor 26X
- Location: Seattle, WA
Re: A Shower Project in the 26X (Formerly titled “Proper wood to glass in”)
For the task you are describing, Coosa would be better than marine plywood. It's stronger and provides more structural support. It is also lighter and more water resistant. It's just as easy or easier than marine plywood to shape and fair. It is somewhat more expensive. I included a photo of a 4' x 4' x 1" sheet I recently purchased to be used when installing a windlass.
I installed a hot shower with drain in my 26x about 10 years ago. The drain in the floor of the aft corner is connected to an Attwood sump box in the bilge located 2 or 3 feet aft of the head. I'm 6'3, the admiral is 5'10". We have a Nature's Head, which is tall, requiring one to sit up taller, thus requiring less floor space for your legs and feet. We've used this arrangement hundreds of times. Very simple modifications like installing a small handle on the inside of the head door to allow you to pull it closed from the inside proved useful.
Tried a variety of different ways for providing hot water. The most dependable was a Whale Pumps 12v 300w 3 gallon water heater. # WHAS360EW. This makes 3 gallons of 140F water and using a thermocouper mixing valve provides six or seven gallons of 105F temperature of water. I put a ball valve in line to limit the flow to .75 gallons per minute, allowing two people to have more than enough time to take a comfortable shower.
If it's just one person, it's probably more energy efficient to just put some hot water in a pressure sprayer or to use a small bucket with a USB rechargeable hand sprayer.
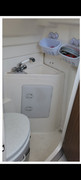
-
FittsFly
- Deckhand
- Posts: 34
- Joined: Sun Jun 30, 2024 2:54 pm
- Sailboat: MacGregor 26X
- Location: Roswell NM
Re: A Shower Project in the 26X (Formerly titled “Proper wood to glass in”)
Very cool guys! Thanks for the input! I will definetely look into the Coosa, Ive never heard of it. so a little more detail on my plan: I will be removing all fiberglass from just in front of the toilet where the glass curves downward about an inch or so then aft to the sink and all fiberglass related to the corner sink to give me more foot room. So the Coosa (probably something like an 1-1/4"x 3" stud if you will) would reshore up the front of the toilet where I removed the floor and also create a frame that is flush with the ballast tank all around the perimeter under the floor I just removed (I think this gives me another 3/4" head room in the shower  ) . All of this Coosa framing will have to be glassed to the hull and sides of the ballast tank to attach the coosa to the boat, Then being a plumber by trade I will line that whole area with Vinyl shower pan liner to become the sump with a low profile bilge pump sitting on the vinyl. then I will construct the teak would flooring slats on a frame that ultimately would just drop in to the shower floor and rest on the coosa framing to create the floor of the shower. The shower water would simply rain thru the Teak slats to the vinyl below and get pumped out. When the weekend is over I could simply pull up the teakwood and wipe down the vinyl ready for the next trip. Anyway thats the plan .
Oh I almost forgot! The next step will be to fiberglass a new wall where the sink got removed. thats the part I'm not looking forward too!!
If anybody else has removed the sink corner glass let me know how you replaced it.
Oh I almost forgot! The next step will be to fiberglass a new wall where the sink got removed. thats the part I'm not looking forward too!!
If anybody else has removed the sink corner glass let me know how you replaced it.
-
Russ

- Admiral
- Posts: 8299
- Joined: Thu Oct 11, 2007 12:01 pm
- Sailboat: MacGregor 26M
- Location: Bozeman, Montana "Luna Azul" 2008 M 70hp Suzi
Re: A Shower Project in the 26X (Formerly titled “Proper wood to glass in”)
Your plan sounds ambitious and exciting.
I wish the head was like the and it was possible to attempt such a mod.
Please document your progress with photos and post your progress here so others can learn.
I wish the
Please document your progress with photos and post your progress here so others can learn.
--Russ
-
OverEasy
- Admiral
- Posts: 2873
- Joined: Mon Sep 28, 2020 11:16 am
- Sailboat: MacGregor 26X
- Location: NH & SC
Re: A Shower Project in the 26X (Formerly titled “Proper wood to glass in”)
Hi All!
For those not familiar with Coosa Board here is a link to the manufacturer web site that goes into the details of this interesting material and applications…
https://coosacomposites.com/
Best Regards
Over Easy
For those not familiar with Coosa Board here is a link to the manufacturer web site that goes into the details of this interesting material and applications…
https://coosacomposites.com/
Best Regards
Over Easy
-
FittsFly
- Deckhand
- Posts: 34
- Joined: Sun Jun 30, 2024 2:54 pm
- Sailboat: MacGregor 26X
- Location: Roswell NM
Re: A Shower Project in the 26X (Formerly titled “Proper wood to glass in”)
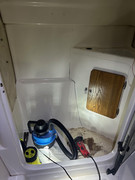
Well I've started! Removal of sink and beginnings of shower project in my "x" have begun. Pics below.
Beginning cuts with oscillating tool with diamond blade.
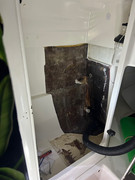
Committed now! sink cut out.
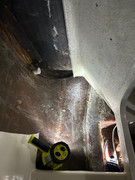
Floor just in front of toilet removed.
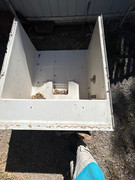
Yay! my new tub for the X
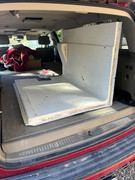
New Corner cut out of Fiberglass tub unit and headed home to work on it.
Initial fitting of new glass panel. Need to get floor installed before final trimming and glassing in of walls. Stay tuned
Beginning cuts with oscillating tool with diamond blade.
Committed now! sink cut out.
Floor just in front of toilet removed.
Yay! my new tub for the X
New Corner cut out of Fiberglass tub unit and headed home to work on it.
Initial fitting of new glass panel. Need to get floor installed before final trimming and glassing in of walls. Stay tuned
-
Jimmyt

- Admiral
- Posts: 3402
- Joined: Sat Jul 18, 2015 9:52 am
- Sailboat: MacGregor 26M
- Location: Mobile AL 2013 26M, 60 Etec
Re: A Shower Project in the 26X (Formerly titled “Proper wood to glass in”)
Great project! Looking forward to seeing it come together. Thanks for sharing!
I like coosa board for your application. Be very careful with it when working with it, though. In fact, wearing leather gloves might be appropriate. There can be very sharp places while you’re cutting it. A respirator and dust collection should be used, too.
A buddy of mine built an entire boat out of it, and fiberglassed it. Frames, bottom, deck, sides, all coosa. Great material as discussed above.
Jimmyt
P-Cub-Boo
2013 26M, Etec 60, roller Genoa, roller main
Cruising Waters: Mobile Bay, Western Shore, Fowl River
P-Cub-Boo
2013 26M, Etec 60, roller Genoa, roller main
Cruising Waters: Mobile Bay, Western Shore, Fowl River
-
Russ
- Admiral
- Posts: 8299
- Joined: Thu Oct 11, 2007 12:01 pm
- Sailboat: MacGregor 26M
- Location: Bozeman, Montana "Luna Azul" 2008 M 70hp Suzi
Re: A Shower Project in the 26X (Formerly titled “Proper wood to glass in”)
Nice project. I envy owners for the head location, seems ideal compared to the
This also allows for this kind of modification which is virtually impossible for the M.
Please keep posting your progress.
This also allows for this kind of modification which is virtually impossible for the M.
Please keep posting your progress.
--Russ
-
kmclemore

- Site Admin
- Posts: 6255
- Joined: Sun Feb 08, 2004 9:24 am
- Sailboat: MacGregor 26X
- Location: Ambler, PA -- MACX2018A898 w/ Suzuki DF60AV -- 78 BW Harpoon 4.6 -- 2018 Tahoe 550TF w/ 150 Merc
Re: A Shower Project in the 26X (Formerly titled “Proper wood to glass in”)
NOTE: Title changed per request of the OP, FittsFly.
Kevin McLemore
Forum Admin
Kevin McLemore
Forum Admin
- Kevin McLemore, Mac Site Admin
-
FittsFly
- Deckhand
- Posts: 34
- Joined: Sun Jun 30, 2024 2:54 pm
- Sailboat: MacGregor 26X
- Location: Roswell NM
Re: A Shower Project in the 26X (Formerly titled “Proper wood to glass in”)
Thanks Kevin for editing the title for me.
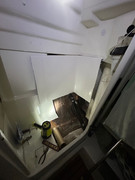
Dont get a lot of time to work on the shower but my goal is to have it done by spring, so heres the latest progress photos!
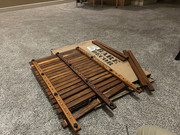
Yay, My Teak wood has arrived! This company was great to work with on getting the correct size.
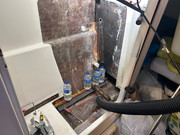
Laying the first piece of Coosa board and glassing it in to the Hull.
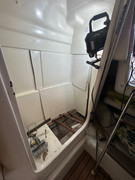
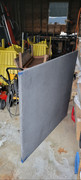
Almost the final"fitting" of the two fiberglass shower "corners" before joining them both together and to the existing fiberglass.

This is my experiment of the "Joint" that will join the two fibeglass panels that ive cut to fit together and to the existing fiberglass, consists of laying them overlapped over each other about 1.5 inches with one layer of resin and glass between, a couple stainless steel screws to hold them, another couple layers of glass, then a layer of thin would to create the dimention of the joint (1.5") then a couple more layers of glass, Fairing compound to smooth the whole thing, sanding, Gelcoat, sanding, gelcoat, sanding again with progreesive grits up to 1200 grit, then polishing!
Dont get a lot of time to work on the shower but my goal is to have it done by spring, so heres the latest progress photos!
Yay, My Teak wood has arrived! This company was great to work with on getting the correct size.
Laying the first piece of Coosa board and glassing it in to the Hull.
Almost the final"fitting" of the two fiberglass shower "corners" before joining them both together and to the existing fiberglass.
This is my experiment of the "Joint" that will join the two fibeglass panels that ive cut to fit together and to the existing fiberglass, consists of laying them overlapped over each other about 1.5 inches with one layer of resin and glass between, a couple stainless steel screws to hold them, another couple layers of glass, then a layer of thin would to create the dimention of the joint (1.5") then a couple more layers of glass, Fairing compound to smooth the whole thing, sanding, Gelcoat, sanding, gelcoat, sanding again with progreesive grits up to 1200 grit, then polishing!
-
NiceAft

- Admiral
- Posts: 6698
- Joined: Tue Feb 01, 2005 7:28 pm
- Sailboat: MacGregor 26M
- Location: Upper Dublin,PA, USA: 2005M 50hp.Honda4strk.,1979 Phantom Sport Sailboat, 9'Achilles 6HP Merc 4strk
Re: A Shower Project in the 26X (Formerly titled “Proper wood to glass in”)
I wish I understood all the process's in your project (I don’t ), but you do, and that’s all that matters. Very much looking forward to finished work.
Ray ~~_/)~~
-
kmclemore
- Site Admin
- Posts: 6255
- Joined: Sun Feb 08, 2004 9:24 am
- Sailboat: MacGregor 26X
- Location: Ambler, PA -- MACX2018A898 w/ Suzuki DF60AV -- 78 BW Harpoon 4.6 -- 2018 Tahoe 550TF w/ 150 Merc
Re: A Shower Project in the 26X (Formerly titled “Proper wood to glass in”)
Do be careful when cutting and sanding the teak… the dust is very toxic (actually, it’s even suspected of causing adenocarcinoma), so a good mask is definitely in order.
- Kevin McLemore, Mac Site Admin