


hello all
I have to renew the rub rail actually.
But: I do not like the original rub rail. Reason: It is so small, it can not withstand anything.
Does anyone put a much stronger rub rail?
Does anyone know the exact drawing and dimensions how it looks under the rub rail? So maybe I could find something suitable.
Thanks...
Rub rail...

-
rsvpasap

- First Officer
- Posts: 241
- Joined: Fri Dec 13, 2013 2:05 pm
- Sailboat: MacGregor 26X
- Location: Seattle, WA
Re: Rub rail...
I uploaded a detailed post about changing the rub rail on a 2002 26x a couple of years ago. Unfortunately, the photos no longer work. So I'm going to upload the text again (below) with some of the photos. viewtopic.php?p=371459#p371459
"Changing the rub rail on my 2002 26X. It was not difficult, but it was time consuming. I did it by myself and it took 10 to 12 hours (five or six hours per day over 2 days).
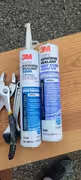
1. I bought the kit from Blue Water Yachts which contained 50 feet of rub rail, two end caps for the stern, three tubes of 3M 5200 and one tube of 3M 4000. I would advise having an additional tube of 3M 4000 on hand for sealing around the top edge. I ultimately used one and a half tubes of 4000 sealant.
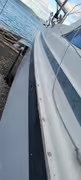
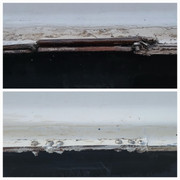
2. The rub rail pulls off the boat very easily after removing the end caps and six screws that hold the rail in place at the stern. Removing the rub rail exposes the seam where the top and bottom molds of the boat are bolted together.
3. My deck joint seam was damaged for about six or eight inches around midship on the starboard side. I cleaned the damaged area thoroughly and used six bolts to reseal the seam (two original screws in new holes and four additional screws.) I also applied 5200 to the patched area.
4. The most time-consuming step of replacing the rub rail was removing the old 5200 that remains around the perimeter of the boat from the prior installation. I used a variety of tools including utility blades, sand paper, wire brushes and in a few spots, a Dremel with a sandpaper attachment.
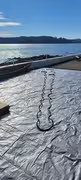
5. The new rub rail has to be stretched in order to fit securely. I wrapped it around the boat and used a short piece of rope tied to either end which I attached to wire rope whinch. I used another short piece of rope to attach the other end of the winch to a pole that holds a small hoist at the seawall. The winch could be attached to a tree or a very secure fence post.
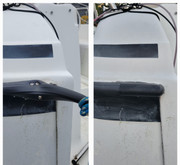
6. The rub rail should then be gradually stretched and put in place around the boat seam. I applied 5200 inside the rail a few feet at a time and then positioned the rail onto the boat. Be sure to have a gallon of denatured alcohol and some rags on hand to clean up the excess adhesive.
7. The ends of the rail need to be trimmed and attached to the stern with screws. I used the six screws, three on each side, that were originally there with the prior rub rail. When the job was complete, I had about two or three feet of rub rail leftover.
8. Finally, I used the 3M 4000 to make a bead around the perimeter of the boat securing the top edge of the rub rail to the fiberglass.
9. I applied a fairly copious amount of 3M 4000 right on the nose of the bow because that seemed to me to be the most likely spot for future leaks.
10. For me, this was the first step of a very large refit (painting the boat top and bottom, changing outboards, installing new batteries, a hard dodger, etc ). It all went according to plan and the weather was cooperative."


"Changing the rub rail on my 2002 26X. It was not difficult, but it was time consuming. I did it by myself and it took 10 to 12 hours (five or six hours per day over 2 days).
1. I bought the kit from Blue Water Yachts which contained 50 feet of rub rail, two end caps for the stern, three tubes of 3M 5200 and one tube of 3M 4000. I would advise having an additional tube of 3M 4000 on hand for sealing around the top edge. I ultimately used one and a half tubes of 4000 sealant.
2. The rub rail pulls off the boat very easily after removing the end caps and six screws that hold the rail in place at the stern. Removing the rub rail exposes the seam where the top and bottom molds of the boat are bolted together.
3. My deck joint seam was damaged for about six or eight inches around midship on the starboard side. I cleaned the damaged area thoroughly and used six bolts to reseal the seam (two original screws in new holes and four additional screws.) I also applied 5200 to the patched area.
4. The most time-consuming step of replacing the rub rail was removing the old 5200 that remains around the perimeter of the boat from the prior installation. I used a variety of tools including utility blades, sand paper, wire brushes and in a few spots, a Dremel with a sandpaper attachment.
5. The new rub rail has to be stretched in order to fit securely. I wrapped it around the boat and used a short piece of rope tied to either end which I attached to wire rope whinch. I used another short piece of rope to attach the other end of the winch to a pole that holds a small hoist at the seawall. The winch could be attached to a tree or a very secure fence post.
6. The rub rail should then be gradually stretched and put in place around the boat seam. I applied 5200 inside the rail a few feet at a time and then positioned the rail onto the boat. Be sure to have a gallon of denatured alcohol and some rags on hand to clean up the excess adhesive.
7. The ends of the rail need to be trimmed and attached to the stern with screws. I used the six screws, three on each side, that were originally there with the prior rub rail. When the job was complete, I had about two or three feet of rub rail leftover.
8. Finally, I used the 3M 4000 to make a bead around the perimeter of the boat securing the top edge of the rub rail to the fiberglass.
9. I applied a fairly copious amount of 3M 4000 right on the nose of the bow because that seemed to me to be the most likely spot for future leaks.
10. For me, this was the first step of a very large refit (painting the boat top and bottom, changing outboards, installing new batteries, a hard dodger, etc ). It all went according to plan and the weather was cooperative."
-
kmclemore

- Site Admin
- Posts: 6255
- Joined: Sun Feb 08, 2004 9:24 am
- Sailboat: MacGregor 26X
- Location: Ambler, PA -- MACX2018A898 w/ Suzuki DF60AV -- 78 BW Harpoon 4.6 -- 2018 Tahoe 550TF w/ 150 Merc
Re: Rub rail...
Excellent post!
I would add a few comments…
— There are several products that will help immensely in removing 5200, and the best amongst them is DeBond. It’s been critically reviewed to work better than other products, and although it doesn’t make the stuff just fall off, it does make the job considerably easier, saving many hours of frustrating scraping.
Product: https://debondcorporation.com/marine-formula/#product
Review of a range of removers: https://www.practical-sailor.com/boat-m ... ng-3m-5200
— I especially like that you chose 3M 4000 instead of 4200 for the sealing. 4200 is a great product, and has better adhesion properties than 4000, but the UV resistance of 4000 far exceeds 4200, and that’s your real issue with a sealant in a marine environment.
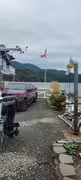
— Do this on a warm day, and allow the rub rail to get warm in the sun before fitting it (as shown in your photo). It will make it much more stretchy and flexible, and thus easier to fit.
I would add a few comments…
— There are several products that will help immensely in removing 5200, and the best amongst them is DeBond. It’s been critically reviewed to work better than other products, and although it doesn’t make the stuff just fall off, it does make the job considerably easier, saving many hours of frustrating scraping.
Product: https://debondcorporation.com/marine-formula/#product
Review of a range of removers: https://www.practical-sailor.com/boat-m ... ng-3m-5200
— I especially like that you chose 3M 4000 instead of 4200 for the sealing. 4200 is a great product, and has better adhesion properties than 4000, but the UV resistance of 4000 far exceeds 4200, and that’s your real issue with a sealant in a marine environment.
— Do this on a warm day, and allow the rub rail to get warm in the sun before fitting it (as shown in your photo). It will make it much more stretchy and flexible, and thus easier to fit.
- Kevin McLemore, Mac Site Admin
-
Be Free

- Admiral
- Posts: 1889
- Joined: Fri Nov 23, 2012 6:08 pm
- Sailboat: MacGregor 26X
- Location: Steinhatchee, FL
Re: Rub rail...
Did anyone else find it ironic that the video showed a come-along stretching the new rub rail several feet over its original length on a boat named "No - Stress"?
Bill
2001 26X Simple Interest
Honda BF40D
"If I were in a hurry I would not have bought a sailboat." Me
2001 26X Simple Interest
Honda BF40D
"If I were in a hurry I would not have bought a sailboat." Me