Courageous Mod 4: Electrical Upgrades!

A forum for discussing boat or trailer repairs or modifications that you have made or are considering.
Post Reply
User avatar
fredthorne
Deckhand
Posts: 26
Joined: Sun Aug 27, 2023 9:14 am
Sailboat: MacGregor 26X
Location: Coupeville, WA

Courageous Mod 4: Electrical Upgrades!

Post by fredthorne »

So we’ve completed our principal electrical updates for Courageous. We started with just one 12-volt battery, a 1-2/Both Switch (she came with no #2 battery), and the OEM switch panel. Following a conversation with Todd of BWY, we added:

- A second, house battery
- A house battery on/off switch
- Linked battery 2 to the #2 setting of the 1-2/Both switch
- A negative/ground bus bar (the negative post on battery 1 was beginning to resemble my childhood home’s living room electrical outlet on Christmas Eve!)
- A pair of battery monitors (See Courageous Mod 3)
- A battery isolator (for minding the charging of batteries while underway)
- A fuse panel for my lighting and other add-ons
- LED tape lighting inside the lip of the battery compartment opening. It’s impossible to overstate how helpful that little upgrade was—especially since I’m prone to losing washers and nuts down there, followed by much cursing. By taping LED lighting around the underside edge of the compartment opening, your hands never create shadows and you can actually SEE what you’re doing.
- A ‘smart’ 20 amp, two battery charger (10 amps/battery)
- A pair of 115-volt outlets (one 20 amp outlet inside the battery compartment for the charger, one outside the battery compartment in the galley)
- 30-amp marine wire connecting to our new starboard shore-power inlet (it took two weeks for me to summon the courage to drill a 3” hole in my boat!)
- A pair of stainless steel hinges to the battery compartment/seat panel, facilitating straightforward access.

Please forgive my pride in this complex (for me) upgrade—it was a fair amount of work! And a grateful ‘hat tip’ to Todd of Blue Water Yachts. We’re blessed to live (relatively) nearby BWY. He was more patient and generous with his time than I deserve in thinking through our planned electrical upgrades.

Fred

Mac26X ‘Courageous’
Coupeville, WA USA
Image
You do not have the required permissions to view the files attached to this post.
User avatar
fredthorne
Deckhand
Posts: 26
Joined: Sun Aug 27, 2023 9:14 am
Sailboat: MacGregor 26X
Location: Coupeville, WA

Re: Courageous Mod 4: Electrical Upgrades!

Post by fredthorne »

A few more photos…
Image

Image

Image
C Buchs
Captain
Posts: 605
Joined: Thu Apr 23, 2015 6:49 pm
Sailboat: MacGregor 26X
Location: Camas, WA 98607

Re: Courageous Mod 4: Electrical Upgrades!

Post by C Buchs »

I like your setup. That looks like a good charger and I really like the issolator. Where is your second battery mounted?

Jeff
User avatar
fredthorne
Deckhand
Posts: 26
Joined: Sun Aug 27, 2023 9:14 am
Sailboat: MacGregor 26X
Location: Coupeville, WA

Re: Courageous Mod 4: Electrical Upgrades!

Post by fredthorne »

Thanks, Jeff. The second battery mount is under the starboard v-berth in the bow. I’ve convinced myself a prior owner had two batteries and at some point removed one or both. An unmounted battery box and strap were left aboard along with long 4 gauge black and red cables running back to the battery compartment. So I just mounted the battery box and strapped my new battery in. Voila!

It will be nice to have my Keurig along while berthed, and not have to string a 115-volt cord through or around a hatch.

Cheers.

Fred
User avatar
Russ
Admiral
Posts: 8301
Joined: Thu Oct 11, 2007 12:01 pm
Sailboat: MacGregor 26M
Location: Bozeman, Montana "Luna Azul" 2008 M 70hp Suzi

Re: Courageous Mod 4: Electrical Upgrades!

Post by Russ »

Nice work.

Installing second (house) battery in the v-berth is probably a good place as long as it's anchored down. Lots of pounding from waves up there. My boat needs more weight forward.

I've not installed AC power on a boat, however is this Romex and wire nuts? I don't think this is the recommended method of binding. Why not put them inside the box and use the screws on the GFI? Nice 20a GFI.

Image
--Russ
User avatar
Stickinthemud57
Captain
Posts: 786
Joined: Thu Nov 12, 2020 7:50 am
Sailboat: MacGregor 26S
Location: Grapevine, Texas
Contact:

Re: Courageous Mod 4: Electrical Upgrades!

Post by Stickinthemud57 »

I installed a Noco 2-battery charger and have been very happy with it. Not the same model as yours, but they offer a lot of different products, so finding the right fit for one's set-up should not be too hard.
The key to inner peace is to admit you have a problem and leave it at that.
User avatar
mac n cheese
Chief Steward
Posts: 99
Joined: Thu Sep 15, 2016 10:52 am
Sailboat: MacGregor 26X
Location: Calgary, Alberta, 1997 MacGregor 26X, BF50D

Re: Courageous Mod 4: Electrical Upgrades!

Post by mac n cheese »

fredthorne wrote: Mon Mar 25, 2024 1:55 pm A few more photos…


Image
That is a busy negative battery post with all those connectors. For what its worth I would have a negative bus bar such as a 250 amp Blue Sea 2127 with qty 4 5/16" studs.

Image
User avatar
Be Free
Admiral
Posts: 1891
Joined: Fri Nov 23, 2012 6:08 pm
Sailboat: MacGregor 26X
Location: Steinhatchee, FL

Re: Courageous Mod 4: Electrical Upgrades!

Post by Be Free »

Russ wrote: Tue Mar 26, 2024 6:37 am Nice work.

Installing second (house) battery in the v-berth is probably a good place as long as it's anchored down. Lots of pounding from waves up there. My boat needs more weight forward.

I've not installed AC power on a boat, however is this Romex and wire nuts? I don't think this is the recommended method of binding. Why not put them inside the box and use the screws on the GFI? Nice 20a GFI.
Congratulations on a great job. That is a lot of work. I wasn't going to say anything but since Russ has mentioned it....
  • Romex (NM cable) is not approved for wet locations.
  • Wiring on boats should be stranded, not solid. I can't tell but NM cable is usually solid.
  • Wire nuts have no place on a boat (IMO).
  • ABYC limits battery posts to a maximum of 4 connections.
That said, what you have is not glaringly dangerous and in the end it is up to you to decide how you set up your boat. ABYC standards are voluntary and you don't have a legal requirement to follow them but they are generally a good idea. I've been known to use wire nuts ("temporarily") on my boat, and I've certainly put Romex in non-approved locations without problems.
Bill
2001 26X Simple Interest
Honda BF40D
"If I were in a hurry I would not have bought a sailboat." Me
OverEasy
Admiral
Posts: 2873
Joined: Mon Sep 28, 2020 11:16 am
Sailboat: MacGregor 26X
Location: NH & SC

Re: Courageous Mod 4: Electrical Upgrades!

Post by OverEasy »

Hi Fredthorn!

Congratulations of your work.

If I might make a couple of suggestions to make your system a bit safer… I agree with BeFree… this is not to say anything other than there are ways to improve and make a system safer, more durable and easier to use.

Boats should be considered somewhat moist locations as condensation and potential water intrusion can be expected in the normal course of operations.

With that in mind here are a couple things to consider/reconsider for your safety and future enjoyment:
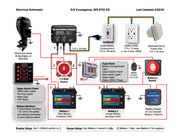
- It’s a standard safety requirement that AC electrical system components be within their own dedicated enclosure, not out in the open.
>>> accidentally crossing or contact of an AC terminal isn’t something one want to happen and efforts taken to avoid those potential issues
- AC circuits should be physically separated from DC circuits in separate enclosures.
>>> accidental crossing of an AC circuit voltage into a DC circuit can not only damage equipment but cause personal harm and injury.
- Lead-Acid batteries give off hydrogen and oxygen gas when being charged which in the confined space of a battery compartment with active electrical components could prove hazardous.
>>> General practice is to keep active electrical components like battery chargers and AC outlets outside of and away from batteries.
>>> Good practice is to provide positive ventilation of battery compartments
- Lead-Acid batteries also have the potential to give off corrosive acidic fumes that may damage/compromise active electrical components such as chargers and outlets. The acidic vapor corrosion byproducts are conductive and may lead to bridged or short circuits contributing to possible damage or overheating.
>>> Good practice is to have separated compartments for batteries and electrical components.
>>> Good practice is to provide positive ventilation of battery compartments
>>> Good practice is to provide positive ventilation or open area for electrical components that may generate heat such as may be the case for a battery charger
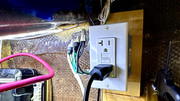
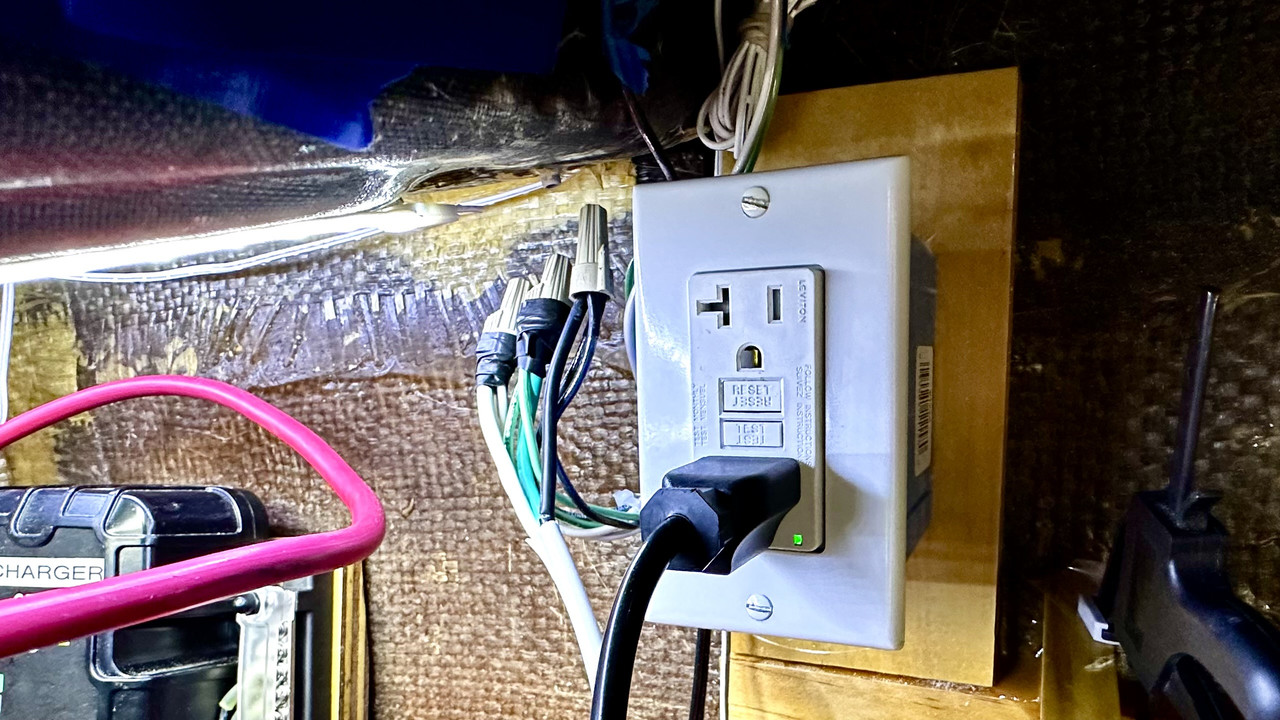
- It’s not to electrical standards to pigtail a lead to an outlet as shown in the photo.
>>> While the electrical taping is of good intention it appears to be only on the ground and common and not the ‘hot’ lead.
Note: There are wire nuts specifically designed for ‘damp’ locations that have a ‘built in’ water barrier of dielectric grease and a pseudo diaphragm to hold that material in place.
Image
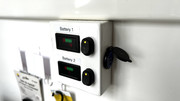
- Standard practice is to have battery isolation switches in readily accessible locations without the need to remove/reposition ancillary materials that could block access to those switches or to have such isolation devices outside of normal view or access.
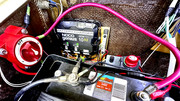
- Standard practice is to incorporate some type of direct current limiting device such as a fuse or non-automatic resettable breaker in the immediate vicinity of positive battery terminal to preclude a dead short … this is particularly important when a paired set of battery leads are run from where the battery is to where the primary interface/isolation is located (such as when one battery is under a fwd berth and the leads run aft to the other battery and isolator by the companionway.

I see that you did utilize covered distribution strips which is great!
I can also see that there do not appear to be any directly open AC electrical terminal in the photos.
The battery buckets are a good aspect to contain and/or manage any battery fluid leakage.

I am concerned about the battery terminal block with several lead terminations. That can be problematic for a couple of reasons… it would be better to take a primary lead to a separate distribution terminal strip or bus bar. Multiple leads to a common post tends to loosen over time and degrades the electrical contact which increases resistance and terminal heating.

All of the things mentioned are done so out of concern and professional experience.
They are also things that can be accomplished without much duress or effort and provide you with a safer and reliable boat for your use and enjoyment.

Best Regards,
Over Easy 8) 8)
Post Reply