

Trailer/wheelservice instructions?
-
dlandersson

- Admiral
- Posts: 4943
- Joined: Fri Aug 27, 2010 10:00 am
- Sailboat: MacGregor 26X
- Location: Michigan City
Trailer/wheelservice instructions?
Anyoone have or know the link for detailed instructions (includng tools) to for trailers/wheels. I'm especially interested in checking/repacking/replacing the wheel bearings if needed. 
-
Be Free

- Admiral
- Posts: 1895
- Joined: Fri Nov 23, 2012 6:08 pm
- Sailboat: MacGregor 26X
- Location: Steinhatchee, FL
Re: Trailer/wheelservice instructions?
I can't recommend a link, but I've done it dozens of times on multiple trailers/vehicles. I'm actually going to be doing this later today. I'll update if I find something I've missed.
You can do this with the boat on the trailer.
You are going to need bearing grease, bearings, cotter pins, and oil seals. Even if you think you are going to be able to reuse your bearings it is a good idea to have a full set on the shelf. They don't go bad and you will be glad you have them on hand if you find you need them.
Remove the bearing buddy/hub cap covering the axle nut by tapping gently around the edge with a soft mallet (or piece of 2x4). It is held in by friction only. If you deform it too much it may be hard to reinstall or may fall out. Be gentle but firm with it and it will come out.
If you are just servicing the hub you don't have to take the wheel off the hub. If you think you may need a new hub you will have to remove the wheel so you should loosen the lug nuts while the tire is still on the ground. I find it easier to service the hub while it is attached to the wheel.
Block the tire(s) on the opposite side and jack up the trailer. Spin the tire(s) and listen. If you hear a quiet "swish" as the wheel turns freely be happy. If you hear rumbling or metal-on-metal sounds you probably waited too long to service your hubs. You may have a little more work to do but don't despair. Everything is fixable and it's usually not expensive.
Remove the cotter pin and discard it. You should always use a new cotter pin. In an emergency you can reuse it but that pin is actually the only thing that keeps your wheel from falling off. You don't want it to fall out because you've bent it one time too many.
The axle nut should be finger tight. Unscrew it about half way. Pull the wheel and hub toward you until it comes up against the nut. This will slide the large flat washer and the outer bearing out onto the spindle where you can reach it.
Remove the nut, washer, and spindle. I usually have a pan of solvent (gasoline) on hand to clean the parts I'm going to reuse so I just drop the nut and washer in the pan. If you heard rumbling or metal-on-metal (above) the bearing may be bad. Look at the rollers for cracks, pitting, rust, or anything missing. Basically, if it does not look pretty much perfect go ahead and replace it. They are not expensive.
Some people clean the bearing in solvent before repacking, some trust the new grease to press out the old grease and any contaminants. I'm in the "clean it" camp. Just make sure that the solvent has completely dried before putting in the new grease.
Put the axle nut back on the spindle. Pull the wheel (and hub) toward you until you feel the nut touch the rear bearing. Give it a good yank. The rear bearing and oil seal should come out of the hub and remain on the spindle.
Examine the rear bearing. Clean or discard as appropriate. Discard the oil seal.
Clean the bearing surfaces on the inside of the hub. If you have pitting or damage you should replace your hub. If it is minimal you can probably get another season out of it but plan on replacing it at the next service interval. Hubs cost more than bearings, but they are still not expensive.
Clean the spindle and look for any pitting, rust, or damage of any kind. If you have significant damage you need to replace the spindles. This is expensive. If there are minor problems you can dress the spindle with emery paper. It should be clean, smooth, and shiny.
You can repack the bearings by hand or with a bearing packer. If you use a bearing packer, just follow the instructions that came with it.
Packing by hand: This is very messy. Have rags or paper towels handy to wipe grease. Put about a tablespoon of grease in the palm of your left hand. The amount is not important, you will learn how much with practice. Press the grease into the bottom (large side) of the bearing by pressing it into your palm until you see new grease coming out of the top of the bearing. It is sort of like the bearing is taking small bites out of the edge of the grease in your hand. Turn the bearing and repeat until you have new grease coming out of the whole top of the bearing. Wipe off the excess grease and set the bearing aside. Repeat until all bearings are packed.
The hub is rebuilt from the back to the front. Position the hub on a flat surface with the rear facing up. Put the rear bearing in the hub. Pack a little grease around the edges just to keep it from moving while you put the grease seal in. Put a little bit of grease on the seal and the mating surface on the hub. Position the grease seal on the rear of the hub. You will be able to set it in just enough to get it straight but you will have to press it in the rest of the way. It is imperative that it be straight. If you bend or deform it you will have to replace it.
You can use a soft mallet to tap the seal into place but I prefer to use a short length of 2x4. It needs to be just a little larger than the hub, 1' or a little shorter is fine. Turn the 2x4 on edge and position it across the oil seal. Lightly tap it. If everything is straight the oil seal will move slightly into the hub. Rotate the 2x4 90 degrees and give it another light tap. If it's still straight rotate 45 degrees and tap, then 90 degrees and tap. When the seal is 50 percent or more into the hub (and still straight) you can turn the 2x4 flat over the entire seal and give it a good whack right in the middle. That should move it the rest of the way in and be flush with the edge of the hub.
Slide the hub on the spindle as far as you can. Don't force it. Install the outer bearing (a little grease to hold it in place), then the washer, then the nut. The hub is held to the spindle with a taper lock. As you tighten down the nut it will lightly lock the hub to the spindle at the proper location. The taper of the spindle and hub along with the thickness of the bearings have all been calculated to work together. You want to tighten the nut until it is snug and you don't feel any side-to-side motion between the hub and the spindle. Snug, not tight. Back off the nut until the hole in the end of the spindle lines up with one of the slots in the nut. That is going to happen with just a small turn. It has to be backed off even if the hole lines up while it it snug.
Optional (depends on your hub and cap): Some hubs have a zirk fitting. Some hub caps have a zirk fitting. If you don't have one or the other, fill the hub between the two bearings with grease. I don't think you get any lubrication from it, but it will keep water coming from one side from easily moving to the bearing on the opposite side.
Insert the cotter pin and bend the ends in opposite directions around the nut.
Replace the hub cap (or bearing buddy). The process is similar to the oil seal. If you have a hub cap put a glob of grease on top of the nut and some more in the cap. It's mostly to slow down water. Add a little grease to the mating surfaces, line it up as straight as possible, and lightly tap with a soft mallet or 2x4. I usually find this to be the most frustrating part of the process.
If you have zirk fittings on the hub or bearing buddy use them to fill (do not overfill) the hub with grease. Since this will be under slight pressure it will help to lubricate the bearings as the old grease leaks out.
That's what I can give you from memory. I'll update if I find I've missed anything.
Bill
2001 26X Simple Interest
Honda BF40D
"If I were in a hurry I would not have bought a sailboat." Me
2001 26X Simple Interest
Honda BF40D
"If I were in a hurry I would not have bought a sailboat." Me
-
Tomfoolery

- Admiral
- Posts: 6135
- Joined: Tue Jul 05, 2011 7:42 am
- Sailboat: MacGregor 26X
- Location: Rochester, NY '99X BF50 'Tomfoolery'
Re: Trailer/wheelservice instructions?
The only thing I would add addresses the two bolded items above. New seals should be double-lipped. Standard single-lip seals have the lip oriented inward, to prevent oil or grease from escaping. But it won't stop water from getting in. Double-lipped seals have one lip in each direction, and are necessary for boat trailers that will be submerged now and again.Be Free wrote: ↑Fri Sep 03, 2021 8:01 amYou are going to need bearing grease, bearings, cotter pins, and oil seals. Even if you think you are going to be able to reuse your bearings it is a good idea to have a full set on the shelf. They don't go bad and you will be glad you have them on hand if you find you need them.
I learned this the hard way on my 2-axle trailer, where the new axle had double-lipped seals and the original axle had single-lip seals. I was replacing the bearings on the old axle every spring. Never changed the bearings on the new axle. Come to find out, there was a difference in seals.
They can be a little tricky to install, as you have to carefully line that seal up on the fat part of the shaft and rotate the hub back and forth to make sure the out lip doesn't get pulled into the seal, but if you stick your head in there and just work it on, it'll go.
This image may not be exactly what you'd get for a wheel bearing, but it will give you an idea. And that lip on the left side faces outward, and is what you have to get onto the spindle without it folding under.
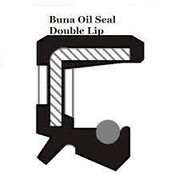
The other is use a marine grease on the hubs, one that's suitable for wheel bearings.
Tom
Be seeing you . . .
Be seeing you . . .
-
dlandersson
- Admiral
- Posts: 4943
- Joined: Fri Aug 27, 2010 10:00 am
- Sailboat: MacGregor 26X
- Location: Michigan City