

Yet Another Galley Mod
-
K9Kampers
- Admiral
- Posts: 2441
- Joined: Thu Apr 13, 2006 7:32 am
- Sailboat: MacGregor 26X
- Location: NH, former 26X owner
-
kurz

- Admiral
- Posts: 1304
- Joined: Mon Dec 06, 2010 9:07 am
- Sailboat: MacGregor 26M
- Location: Zürich, Switzerland, Europe
Re: Yet Another Galley Mod
HI JimJimmyt wrote: ↑Tue Sep 08, 2020 5:39 amkurz wrote: ↑Mon Sep 07, 2020 11:36 pm
one question to Jimmyt
maybe I will put a carpet onto the side bunks. But there will be not enough space under the galley to move over the the carpet. I put away all the cusions - to much hassle. But just nude it does not look very vell...
I don't know how it is under there, can you just use longer screws to bring the calle 1cm higher?
Maybe you can give me a pic from the slice under the galey?
thanks kurzs
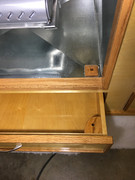
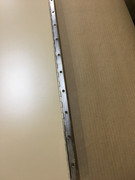
The slides raise the galley slightly above the deck. You could add a few fender washers to give a tad more space if needed. The stock galley only has 3 slides, so the inboard rear corner drags on the side bunk. The tightest clearance on mine is at the edge of the removable covers. Clearance to fiberglass is slightly better.
Hope that helps.
Jim
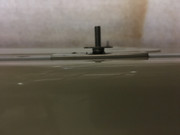
I'm back to my boat. When I look inside the galley: the screw of the slider is too short to put some washers under. The galey had definitely to be raysed with carpet under.
Are the screws welded with the slider or could I just put longer screws? If the screws was welded they had to be cut and I had to put new and longer ones.
-
Jimmyt
- Admiral
- Posts: 3402
- Joined: Sat Jul 18, 2015 9:52 am
- Sailboat: MacGregor 26M
- Location: Mobile AL 2013 26M, 60 Etec
Re: Yet Another Galley Mod
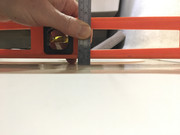
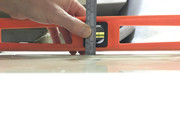
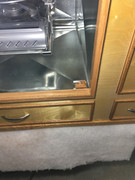
The studs (screws) are welded or riveted to the sliders. They are 0.682" long to the top of the fender washer. The galley bottom is 0.181"; 0.185"; and 0.179" at each of the three holes. The nut needs about 0.3" to hold. So, 0.682-0.185-0.3 = 0.197".kurz wrote: ↑Sat Sep 12, 2020 2:27 am
HI Jim
I'm back to my boat. When I look inside the galley: the screw of the slider is too short to put some washers under. The galey had definitely to be raysed with carpet under.
Are the screws welded with the slider or could I just put longer screws? If the screws was welded they had to be cut and I had to put new and longer ones.
So, you have about 5mm of slack to play with - based on my galley floor thickness. If yours is different, which is likely, you could have more or less.
You could weld longer studs to the sliders with very little effort if you weld stainless.
But, check your carpet thickness and see if it will clear first. Some carpet is available at approximately 5mm thickness. Note, this 5mm clearance is ADDED to the clearance in my earlier post; around 7mm. So, you could get about 12mm gap. And, the galley would likely slide better with carpet under it anyway.
Jim
Jimmyt
P-Cub-Boo
2013 26M, Etec 60, roller Genoa, roller main
Cruising Waters: Mobile Bay, Western Shore, Fowl River
P-Cub-Boo
2013 26M, Etec 60, roller Genoa, roller main
Cruising Waters: Mobile Bay, Western Shore, Fowl River
-
Jimmyt
- Admiral
- Posts: 3402
- Joined: Sat Jul 18, 2015 9:52 am
- Sailboat: MacGregor 26M
- Location: Mobile AL 2013 26M, 60 Etec
Re: Yet Another Galley Mod
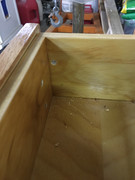
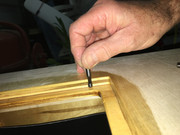
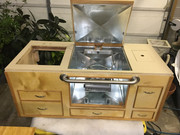
Felt almost lifelike today, so tried to do a little something on the galley. Pulled the trigger on my "pin the drawers" plan. Using an aluminum pin through the sides of the cabinet, into a hole in the side of each drawer. There will be a small oak retainer that keeps the pin from vibrating out, and limit the possibility of the pin snagging clothing.
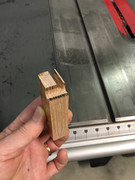
Got the pins and retainers made, and one coat of urethane on the retainers. Will probably get a few coats on before I mount them to avoid messing up the finish on the cabinet.
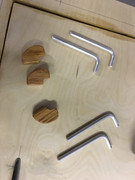
The middle drawer under the stove is pinned from the stove area, down to an oak block I added to the corner of the drawer. I haven't finished drilling the pin hole, because the glue was still wet. But, I did spot the block with the drill to see where (if) I hit it. I'll add a little escutcheon of some type to keep a spill from draining into the drawer.
Got the pins and retainers made, and one coat of urethane on the retainers. Will probably get a few coats on before I mount them to avoid messing up the finish on the cabinet.
The middle drawer under the stove is pinned from the stove area, down to an oak block I added to the corner of the drawer. I haven't finished drilling the pin hole, because the glue was still wet. But, I did spot the block with the drill to see where (if) I hit it.
Jimmyt
P-Cub-Boo
2013 26M, Etec 60, roller Genoa, roller main
Cruising Waters: Mobile Bay, Western Shore, Fowl River
P-Cub-Boo
2013 26M, Etec 60, roller Genoa, roller main
Cruising Waters: Mobile Bay, Western Shore, Fowl River
-
Jimmyt
- Admiral
- Posts: 3402
- Joined: Sat Jul 18, 2015 9:52 am
- Sailboat: MacGregor 26M
- Location: Mobile AL 2013 26M, 60 Etec
Re: Yet Another Galley Mod
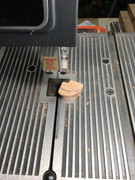
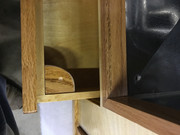
Wrapped up the drawer pins today. By wiping on the urethane, and keeping the shop AC'd, I was able to get a few coats on much quicker than I expected. A bit tedious, working on mostly finished areas, but I was careful, and it worked ok. Masked off around the retainer locations and used the dremel to remove the finish for gluing. Used the pin nailer to attach the retainers which makes gluing a lot easier - no clamping or trying to screw iddy biddy pieces with big clumsy fingers.

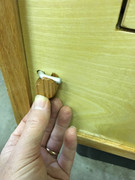
Made a small oak escutcheon for the drawer under the stove and bedded it in gray PL construction adhesive. Should give enough elevation to keep spills out of the drawer. Didn't try to make a retainer for this one. If it vibrates out, the stove drawer will be the least of my concerns.
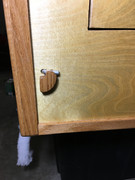
Looking back, it is a simple solution, given the drawer hardware I used. I tried (briefly) to come up with a mechanism operable from the countertop, but that got difficult due to the fact that the skin was already on the front and sides - somewhat restricting access. Could have used cable latches, but that would have gotten expensive. The front latch (drawer under trash) will be up against the cushion when the galley is in the forward position, making it a slight hassle. However, it's not something I foresee doing a lot during any one trip. We'll see. That drawer could probably go without anyway.
They positively lock the drawers in place, are individually operable, and don't clutter up the face of the galley. At anchor, I'll be able to pull the pins and open the drawers just like home.
The sticking point is how to remember to pin the drawers while underway. I'm thinking I may paint the pin handles red and put a holder in a place I can see from the helm... Of course hearing all of the stuff crashing out of the galley drawers will be a great reminder, too.
Made a small oak escutcheon for the drawer under the stove and bedded it in gray PL construction adhesive. Should give enough elevation to keep spills out of the drawer. Didn't try to make a retainer for this one. If it vibrates out, the stove drawer will be the least of my concerns.
Looking back, it is a simple solution, given the drawer hardware I used. I tried (briefly) to come up with a mechanism operable from the countertop, but that got difficult due to the fact that the skin was already on the front and sides - somewhat restricting access. Could have used cable latches, but that would have gotten expensive. The front latch (drawer under trash) will be up against the cushion when the galley is in the forward position, making it a slight hassle. However, it's not something I foresee doing a lot during any one trip. We'll see. That drawer could probably go without anyway.
They positively lock the drawers in place, are individually operable, and don't clutter up the face of the galley. At anchor, I'll be able to pull the pins and open the drawers just like home.
The sticking point is how to remember to pin the drawers while underway. I'm thinking I may paint the pin handles red and put a holder in a place I can see from the helm...
Jimmyt
P-Cub-Boo
2013 26M, Etec 60, roller Genoa, roller main
Cruising Waters: Mobile Bay, Western Shore, Fowl River
P-Cub-Boo
2013 26M, Etec 60, roller Genoa, roller main
Cruising Waters: Mobile Bay, Western Shore, Fowl River
-
kurz
- Admiral
- Posts: 1304
- Joined: Mon Dec 06, 2010 9:07 am
- Sailboat: MacGregor 26M
- Location: Zürich, Switzerland, Europe
Re: Yet Another Galley Mod
Great work!
When your are finished could you weight it without the stove? Would be interesting!
When your are finished could you weight it without the stove? Would be interesting!
-
Russ

- Admiral
- Posts: 8303
- Joined: Thu Oct 11, 2007 12:01 pm
- Sailboat: MacGregor 26M
- Location: Bozeman, Montana "Luna Azul" 2008 M 70hp Suzi
Re: Yet Another Galley Mod
For a guy who says he's not a cabinet maker you sure do fine work.
--Russ
-
Jimmyt
- Admiral
- Posts: 3402
- Joined: Sat Jul 18, 2015 9:52 am
- Sailboat: MacGregor 26M
- Location: Mobile AL 2013 26M, 60 Etec
Re: Yet Another Galley Mod
Thanks for the kind words Kurz and Russ!
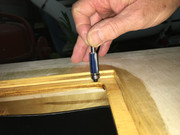
I'm interested in the weight, too, so I'll figure out something to get the weight number. I predict under 200lbs, with a significant part of the weight due to the sink and drawer hardware. A thin stamped stainless sink would have looked nice and cut the sink weight in half. Nylon drawer slides or rollers under wood rails would probably have knocked off another 10 lbs. Using thinner plywood skin on the front and sides would have saved several pounds as well. I don't think the deck could be thinner. Even at 1/2" thick, I'm going to have trouble with the laminate. The flush trim bit I have needs about 5/8 depth, so 1/2" is presenting a problem. Typical residential deck is 3/4" and sometimes 2 layers of 3/4" if you don't use solid surface or stone. So I was pushing the lower limit with 1/2" and hoping the framing will keep the flex down.
Hunkering down for hurricane Sally this morning. Getting all of the loose stuff off the front porch, deck, and out of the yard. Current prediction here is steady at 30, gusts to 71 mph. Possibly 24" of rain. The track has been constantly shifting, so who knows whether we'll get the edge or what? Seems best to get somewhat ready.
I have friends that build and repair fine furniture, so I know where I am in skill level. The galley is coming along nicely, and I'm very happy with it. It's exceptional at 10 ft, and a good solid "C" up close. One of my buddies came over to play music the other day, and he was impressed with the stove gimbal. (Not only can he play the strings off a flat top, he plays mandolin as well ). Fortunately, none of them weld, so I have one skill that I can feel adequate with (although the aluminum welding is still sketchy).
Most importantly, I've really enjoyed putting it together. Can't wait to get it in the boat, and cook my first meal with it. Of course, I'll have to wash my first dish afterward..... Wonder if it's too late to add a dishwasher?
I'm interested in the weight, too, so I'll figure out something to get the weight number. I predict under 200lbs, with a significant part of the weight due to the sink and drawer hardware. A thin stamped stainless sink would have looked nice and cut the sink weight in half. Nylon drawer slides or rollers under wood rails would probably have knocked off another 10 lbs. Using thinner plywood skin on the front and sides would have saved several pounds as well. I don't think the deck could be thinner. Even at 1/2" thick, I'm going to have trouble with the laminate. The flush trim bit I have needs about 5/8 depth, so 1/2" is presenting a problem. Typical residential deck is 3/4" and sometimes 2 layers of 3/4" if you don't use solid surface or stone. So I was pushing the lower limit with 1/2" and hoping the framing will keep the flex down.
Hunkering down for hurricane Sally this morning. Getting all of the loose stuff off the front porch, deck, and out of the yard. Current prediction here is steady at 30, gusts to 71 mph. Possibly 24" of rain. The track has been constantly shifting, so who knows whether we'll get the edge or what? Seems best to get somewhat ready.
I have friends that build and repair fine furniture, so I know where I am in skill level. The galley is coming along nicely, and I'm very happy with it. It's exceptional at 10 ft, and a good solid "C" up close. One of my buddies came over to play music the other day, and he was impressed with the stove gimbal. (Not only can he play the strings off a flat top, he plays mandolin as well
Most importantly, I've really enjoyed putting it together. Can't wait to get it in the boat, and cook my first meal with it. Of course, I'll have to wash my first dish afterward....
Jimmyt
P-Cub-Boo
2013 26M, Etec 60, roller Genoa, roller main
Cruising Waters: Mobile Bay, Western Shore, Fowl River
P-Cub-Boo
2013 26M, Etec 60, roller Genoa, roller main
Cruising Waters: Mobile Bay, Western Shore, Fowl River
-
Jimmyt
- Admiral
- Posts: 3402
- Joined: Sat Jul 18, 2015 9:52 am
- Sailboat: MacGregor 26M
- Location: Mobile AL 2013 26M, 60 Etec
Re: Yet Another Galley Mod
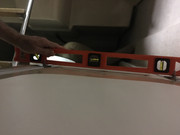
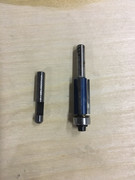
Found a different flush trim router bit that requires much less working room. Took a tiny bit of prep time out to run to the store and get one (they only had 2 in stock). It doesn't use a bearing, so will be a bit more prone to burning wood and finish, but at least it won't be dragging the bearing retaining bolt along the top edge of the heat shield or the inside of my trash hatch area. Now that there is a solution to that problem, I may be able to attach the top deck. That would be a nice alternative to getting weather updates, watching it rain, and waiting for hurricane Sally to turn in the driveway...
Jimmyt
P-Cub-Boo
2013 26M, Etec 60, roller Genoa, roller main
Cruising Waters: Mobile Bay, Western Shore, Fowl River
P-Cub-Boo
2013 26M, Etec 60, roller Genoa, roller main
Cruising Waters: Mobile Bay, Western Shore, Fowl River
-
Jimmyt
- Admiral
- Posts: 3402
- Joined: Sat Jul 18, 2015 9:52 am
- Sailboat: MacGregor 26M
- Location: Mobile AL 2013 26M, 60 Etec
Re: Yet Another Galley Mod
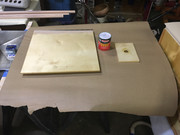
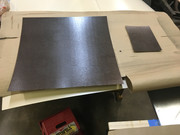
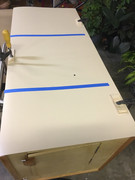
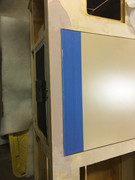
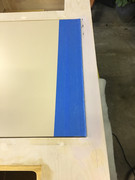
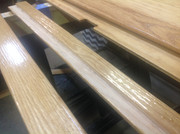
Lost a few days to debris cleanup, and waiting for the roads to get cleared and the traffic lights to be working. Still have yard debris to clean up, but it was raining. Got my Formica sheet delivered yesterday, and made it to HD and Lowes to get contact adhesive and a few other consumables. I cut my pieces to rough size, and did the stove cover and trash cover this afternoon. They came out pretty good.
Kind of shot myself in the foot with the hinge design. Should have used a more obtrusive method that I could connect after applying the laminate. Certainly has increased the entertainment level. Next, I'll have to make at least a partial cutout for the stove cover so I can pre-fit it to the hinge. Then, I'll attach the deck and screw the stove cover hinge down. Then, grind down the screw heads,etc and apply a skim coat of filler to get a flat surface. Then, I'll have to carefully slip the laminate over the stove door and stick the edge along the hinge first, while making sure my edge gap stays straight for the small rectangle I have to pre-cut... should be entertaining. The one thing about contact adhesive; no second chances.
Kind of shot myself in the foot with the hinge design. Should have used a more obtrusive method that I could connect after applying the laminate. Certainly has increased the entertainment level. Next, I'll have to make at least a partial cutout for the stove cover so I can pre-fit it to the hinge. Then, I'll attach the deck and screw the stove cover hinge down. Then, grind down the screw heads,etc and apply a skim coat of filler to get a flat surface. Then, I'll have to carefully slip the laminate over the stove door and stick the edge along the hinge first, while making sure my edge gap stays straight for the small rectangle I have to pre-cut... should be entertaining.
Jimmyt
P-Cub-Boo
2013 26M, Etec 60, roller Genoa, roller main
Cruising Waters: Mobile Bay, Western Shore, Fowl River
P-Cub-Boo
2013 26M, Etec 60, roller Genoa, roller main
Cruising Waters: Mobile Bay, Western Shore, Fowl River
-
Jimmyt
- Admiral
- Posts: 3402
- Joined: Sat Jul 18, 2015 9:52 am
- Sailboat: MacGregor 26M
- Location: Mobile AL 2013 26M, 60 Etec
Re: Yet Another Galley Mod
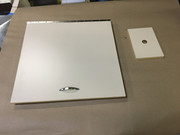
Raining again today, so got a good bit done on the galley after church live stream. Clamped the rough cut laminate to the cabinet to make the partial stove lid cut. I'm trying to get the hinge gap to a minimum, so I cut the hinge line and just enough of a hole to slip the stove lid through once it's installed. I don't want to have to align the entire lid opening while I'm laying up contact cement... so, I'll cut the rest of the opening after the laminate is glued to the deck. Surprisingly, I made sure I could get the router in close enough to the lid to finish the cut.
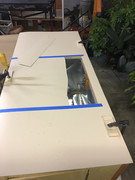
Once that's done, I installed the door, ground down the high spots, screw heads, hinge,etc, and smeared some filler.
Then, glue up the whole mess and spend the 20 minute drying time figuring out how to make the placement.
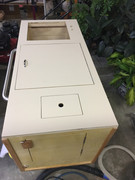
The Admiral graciously offered to help (could not have done it without her), and we got it stuck. We were only off a smidge, and it will be covered by the fiddle. So, I'm gonna call it a win. Pleased with the hinge fit, and the stove lid gaps came out fair, also. All the rest was easy, thankfully.
Now, it can go together for the final time. I hope.
Once that's done, I installed the door, ground down the high spots, screw heads, hinge,etc, and smeared some filler.
Then, glue up the whole mess and spend the 20 minute drying time figuring out how to make the placement.
The Admiral graciously offered to help (could not have done it without her), and we got it stuck. We were only off a smidge, and it will be covered by the fiddle. So, I'm gonna call it a win. Pleased with the hinge fit, and the stove lid gaps came out fair, also. All the rest was easy, thankfully.
Now, it can go together for the final time. I hope.
Jimmyt
P-Cub-Boo
2013 26M, Etec 60, roller Genoa, roller main
Cruising Waters: Mobile Bay, Western Shore, Fowl River
P-Cub-Boo
2013 26M, Etec 60, roller Genoa, roller main
Cruising Waters: Mobile Bay, Western Shore, Fowl River
-
Russ
- Admiral
- Posts: 8303
- Joined: Thu Oct 11, 2007 12:01 pm
- Sailboat: MacGregor 26M
- Location: Bozeman, Montana "Luna Azul" 2008 M 70hp Suzi
Re: Yet Another Galley Mod
I absolutely love your skills here. It's a piece of art and so functional. Can't wait to see the final product.
--Russ
-
Jimmyt
- Admiral
- Posts: 3402
- Joined: Sat Jul 18, 2015 9:52 am
- Sailboat: MacGregor 26M
- Location: Mobile AL 2013 26M, 60 Etec
Re: Yet Another Galley Mod
Thanks Russ! You are very kind!
I can see the light at the end of the tunnel now. Just have the fiddles to complete before I can toss it in. I'm a bit anxious to see it in the boat myself.
Jimmyt
P-Cub-Boo
2013 26M, Etec 60, roller Genoa, roller main
Cruising Waters: Mobile Bay, Western Shore, Fowl River
P-Cub-Boo
2013 26M, Etec 60, roller Genoa, roller main
Cruising Waters: Mobile Bay, Western Shore, Fowl River
-
Jimmyt
- Admiral
- Posts: 3402
- Joined: Sat Jul 18, 2015 9:52 am
- Sailboat: MacGregor 26M
- Location: Mobile AL 2013 26M, 60 Etec
Re: Yet Another Galley Mod
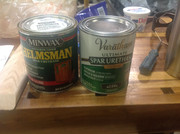
Well, yesterday was, evidently, the first day everyone decided to venture out after the hurricane. Traffic was absurd for Mobile Al. Lowes is the only place nearby that I can get Minwax Helmsman spar urethane, and I tried for two hours to get there - at two different Lowes. Then, I let my temper get the better of me and went to HD and bought the Varathane spar urethane. I've used it before. While it is a decent product, it doesn't fit my temperament.  On the plus side, it goes on thick, fills the grain almost immediately, on the minus side, the drying time is super long compared to minwax. The instructions say to recoat in 4 hours, if dry and hard. It wasn't after almost 6 hours, and I wanted to get the second coat on before bed.... so...
Anyway, it's been about 12 hours and it's still sticky. It laid flat on the horizontal surfaces, and sagged on any other surfaces. Gloss is good.
It will be fine, but it will take a bit longer and require more patience. Don't know when it will be hard enough to sand off the sags.
Center board was facing down during drying and has a bad case of droops...
Jimmyt
P-Cub-Boo
2013 26M, Etec 60, roller Genoa, roller main
Cruising Waters: Mobile Bay, Western Shore, Fowl River
P-Cub-Boo
2013 26M, Etec 60, roller Genoa, roller main
Cruising Waters: Mobile Bay, Western Shore, Fowl River