

what size of wheel do you have on your x? im thinking of getting the s1 do i need a larger wheel?Retcoastie wrote:I put an S1 on my 02 X and it works GREAT.
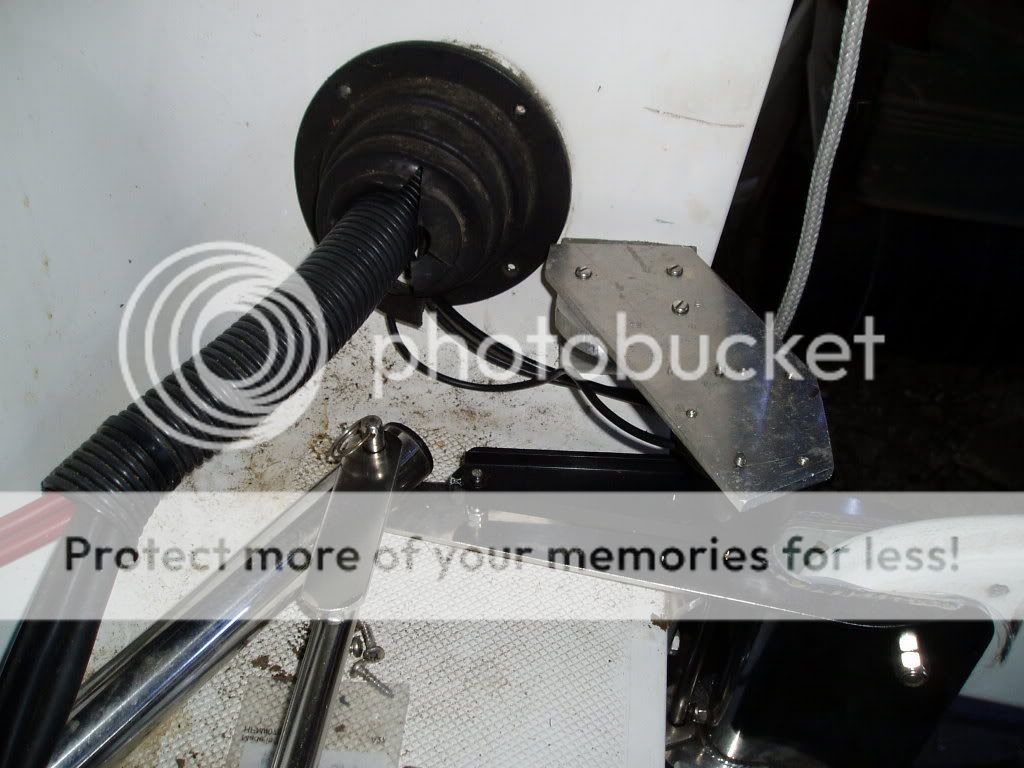
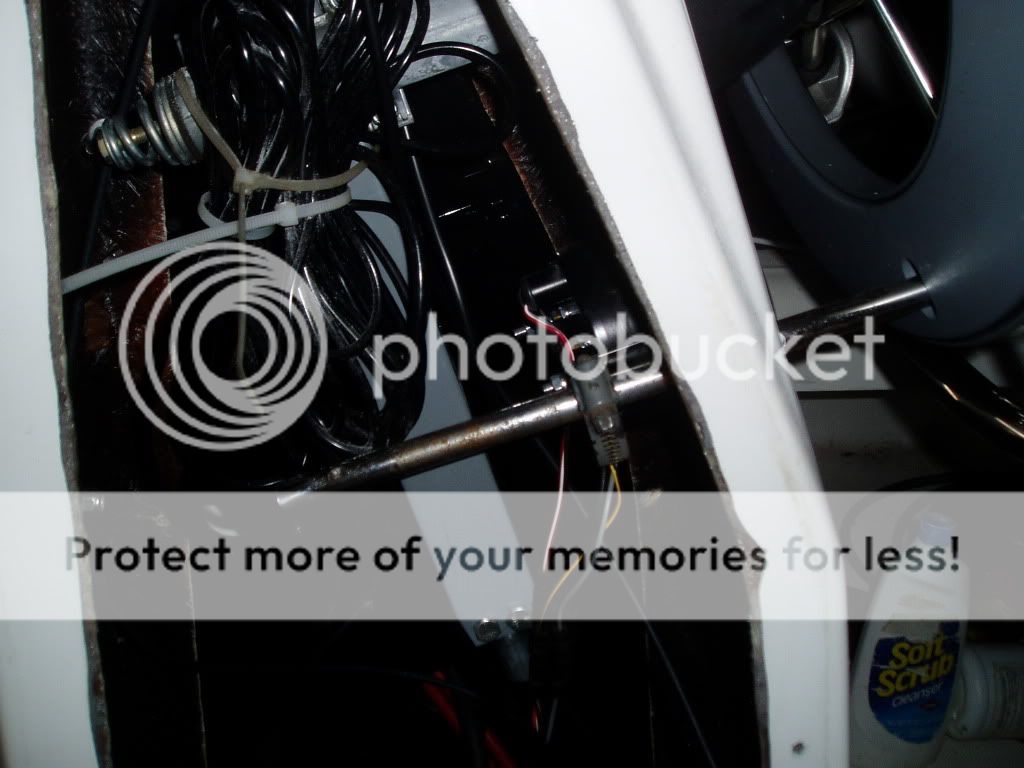
I had to make another bracket for the rudder sensor. I inverted it and centered it directly over the starboard rudder pivot point, out of the way and fairly protected.
Raymarine S1 Wheel Pilot installation photos *many photos*
-
bastonjock

- Admiral
- Posts: 1161
- Joined: Fri May 25, 2007 10:41 pm
- Location: Lincolnshire United Kingdom Mac 26X
Re: Raymarine S1 Wheel Pilot on an X
-
delevi

- Admiral
- Posts: 2184
- Joined: Fri May 06, 2005 1:03 am
- Location: San Francisco Catalina 380, former 26M owner
- Contact:
Re: Raymarine S1 Wheel Pilot installation photos *many photos*
It isn't really a qeustions of "need." You can use the stock wheel and all will work just fine. However, a 20" wheel just feels much better (to me) even without the AP. The ample clearance of the larger wheel from the drive unit is just a very nice "to-have."do i need a larger wheel?
-
Matt19020

- Captain
- Posts: 576
- Joined: Sat Jul 15, 2006 1:29 pm
- Sailboat: MacGregor 26M
- Location: Middle River, Chesapeake Bay MD...2007 MacM Suzuki DF70 4-Stroke ..... "My Time"
- Contact:
Re: Raymarine S1 Wheel Pilot installation photos *many photos*
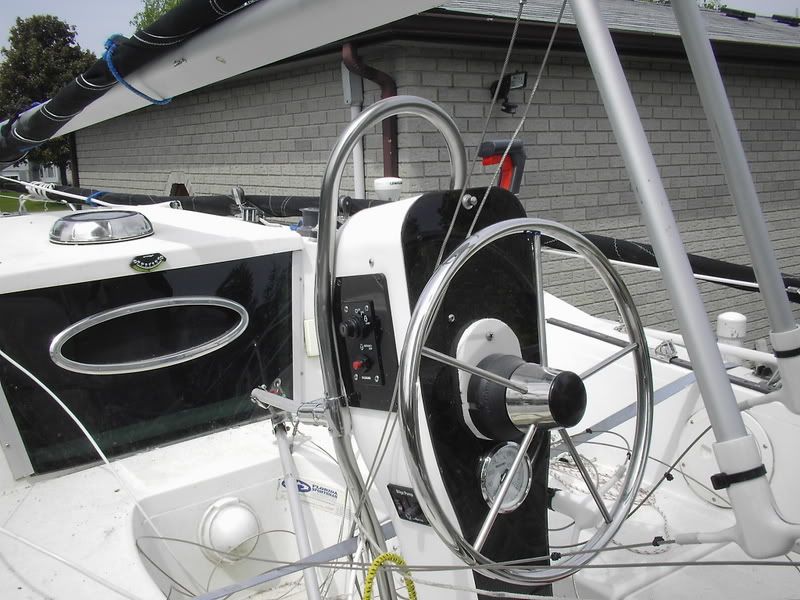
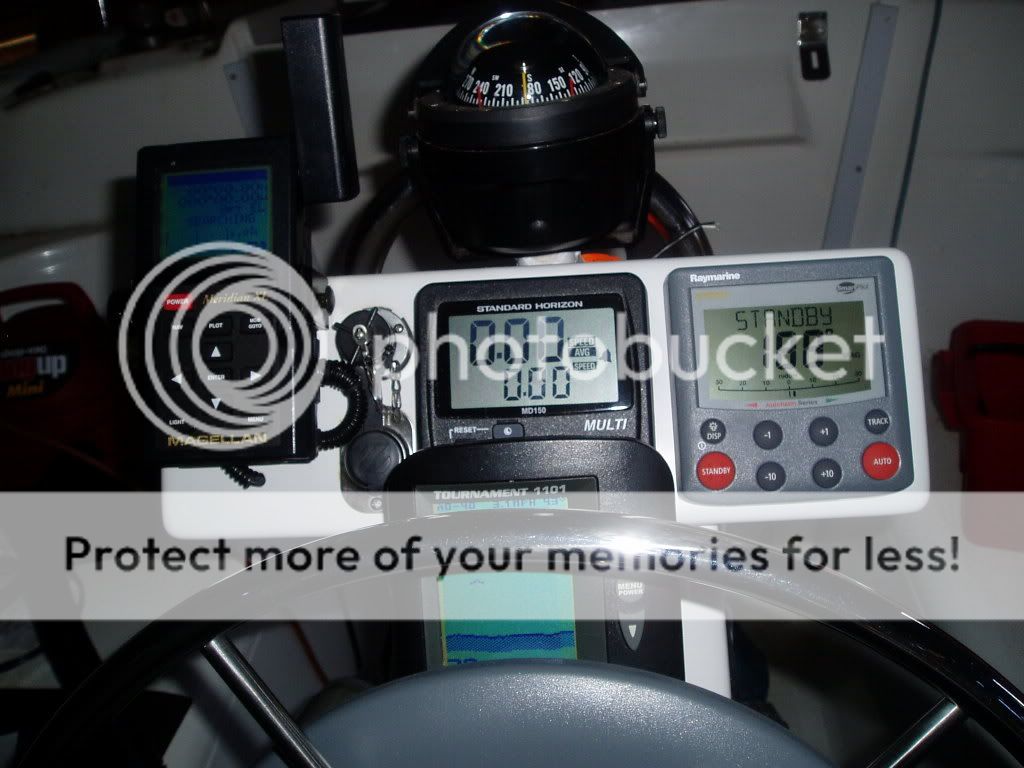
I just finished my install (almost). I can not figure out where locate my controller . My console is very full
(old picture, before install)
I ordered a Navpod to consolidate some of the instumentation however I believe it will be a little larger then I want but they did not offer much in the size I needed. I am still waiting on delivery.
(old picture, before install)
I ordered a Navpod to consolidate some of the instumentation however I believe it will be a little larger then I want but they did not offer much in the size I needed. I am still waiting on delivery.
-
c130king

- Admiral
- Posts: 2730
- Joined: Sun Nov 05, 2006 5:30 pm
- Sailboat: MacGregor 26M
- Location: Wiggins, MS --- '05 26M "König" w/ 40hp Merc
- Contact:
Re: Raymarine S1 Wheel Pilot installation photos *many photos*
Matt,
Could you live without your compass? You will have heading on your GPS and your S1 controller. My set-up looks very similar to yours. I will be taking off my compass and putting the controller right in front of the GPS.
Jim
Could you live without your compass? You will have heading on your GPS and your S1 controller. My set-up looks very similar to yours. I will be taking off my compass and putting the controller right in front of the GPS.
Jim
-
David Mellon

- Captain
- Posts: 507
- Joined: Tue Mar 14, 2006 12:16 pm
- Sailboat: MacGregor 26M
- Location: Anaheim, CA-Yamphibian, Yamaha 70, MACM1376C606
Re: Raymarine S1 Wheel Pilot installation photos *many photos*
I am going to need to relocate my compass to the bulkhead, there just isn't room atop my pedestal for the chartplotter, S1 controller and compass. Do I need to put it on the starboard side to avoid interference from the circuit breaker? It seems it would be easier to wire it if I put it on the port side. Also, I wonder if it will be usefull that far from the wheel. On the other hand maybe I need to put the S1 controller somewhere else? Maybe the port side of the pedestal or low on the front mounted on a wedge so I can see it? The rest of the install seems doable but cramming all this equipment on the pedestal has me stymied.
-
Matt19020
- Captain
- Posts: 576
- Joined: Sat Jul 15, 2006 1:29 pm
- Sailboat: MacGregor 26M
- Location: Middle River, Chesapeake Bay MD...2007 MacM Suzuki DF70 4-Stroke ..... "My Time"
- Contact:
Re: Raymarine S1 Wheel Pilot installation photos *many photos*
Jim, That is what I was going to do. I can get by without the compass because it is in the GPS. I had thought about getting a small bulkhead mount type
( http://www.ritchienavigation.com/catalo ... 2F268E72FD )
to mount in the Navpod but I do not particularly like the look of them. I will decide at a later date. My first plan was to get a single Navpod forthe controller head. Then I came up with the bright idea that if I was going to get the Navpod, cosmetically it was going to look best to put GPS, auto pilot and any other gadget like compass or future guage in one unit. My big problem was it is 10.5 inchs wide by 12 inches high. My current configuration is abpout 7.5" X 10". We will see......
-
Highlander
- Admiral
- Posts: 5995
- Joined: Wed Sep 21, 2005 8:25 pm
- Sailboat: MacGregor 26M
- Location: Maccutter26M 2008 75HP Merc. 4/S Victoria BC. Can. ' An Hileanto'ir III '
- Contact:
Re: Raymarine S1 Wheel Pilot installation photos *many photos*
I have one of these compasses& may install it here 
http://i78.photobucket.com/albums/j95/m ... 010036.jpg
http://i78.photobucket.com/albums/j95/m ... 010035.jpg
or here as in my in the center of the entrance hatchway here it has its white protective cover on it
http://i78.photobucket.com/albums/j95/m ... 010003.jpg
J
http://i78.photobucket.com/albums/j95/m ... 010036.jpg
http://i78.photobucket.com/albums/j95/m ... 010035.jpg
or here as in my
http://i78.photobucket.com/albums/j95/m ... 010003.jpg
J
-
Divecoz

- Admiral
- Posts: 3803
- Joined: Sat Oct 16, 2004 2:54 pm
- Sailboat: MacGregor 26M
- Location: PORT CHARLOTTE FLORIDA 05 M Mercury 50 H.P. Big Foot Bill at Boats 4 Sail is my Hero
Re: Raymarine S1 Wheel Pilot installation photos *many photos*
Highlander:
On the other side of THAT compass is the factory installed "fuse" panel. unless they have changed the location from 05
Prices for S 1 by Raymarine I just found a " sale " price of $739 from a dealer. Is this a deal or just hype?
is the New Sport 5 worth the extra $600?
On the other side of THAT compass is the factory installed "fuse" panel. unless they have changed the location from 05
Prices for S 1 by Raymarine I just found a " sale " price of $739 from a dealer. Is this a deal or just hype?
is the New Sport 5 worth the extra $600?
-
Retcoastie
- Captain
- Posts: 673
- Joined: Sat Sep 16, 2006 7:00 am
- Sailboat: MacGregor 26X
- Location: Gray Hawk, Kentucky 2002 X "Last Flight"
Re: Raymarine S1 Wheel Pilot installation photos *many photos*
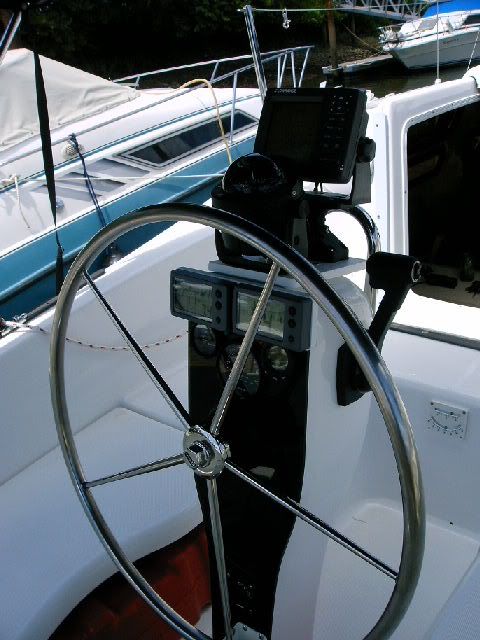
I use the 18" wheel. The PO had bought it but not installed it.
http://i344.photobucket.com/albums/p359 ... 210143.jpg
The wheel.
http://i344.photobucket.com/albums/p359 ... 210142.jpg
The rudder sensor.
http://i344.photobucket.com/albums/p359 ... 280002.jpg
The pedestal.
http://i344.photobucket.com/albums/p359 ... 210143.jpg
The wheel.
http://i344.photobucket.com/albums/p359 ... 210142.jpg
The rudder sensor.
http://i344.photobucket.com/albums/p359 ... 280002.jpg
The pedestal.
-
c130king
- Admiral
- Posts: 2730
- Joined: Sun Nov 05, 2006 5:30 pm
- Sailboat: MacGregor 26M
- Location: Wiggins, MS --- '05 26M "König" w/ 40hp Merc
- Contact:
Re: Raymarine S1 Wheel Pilot installation photos *many photos*
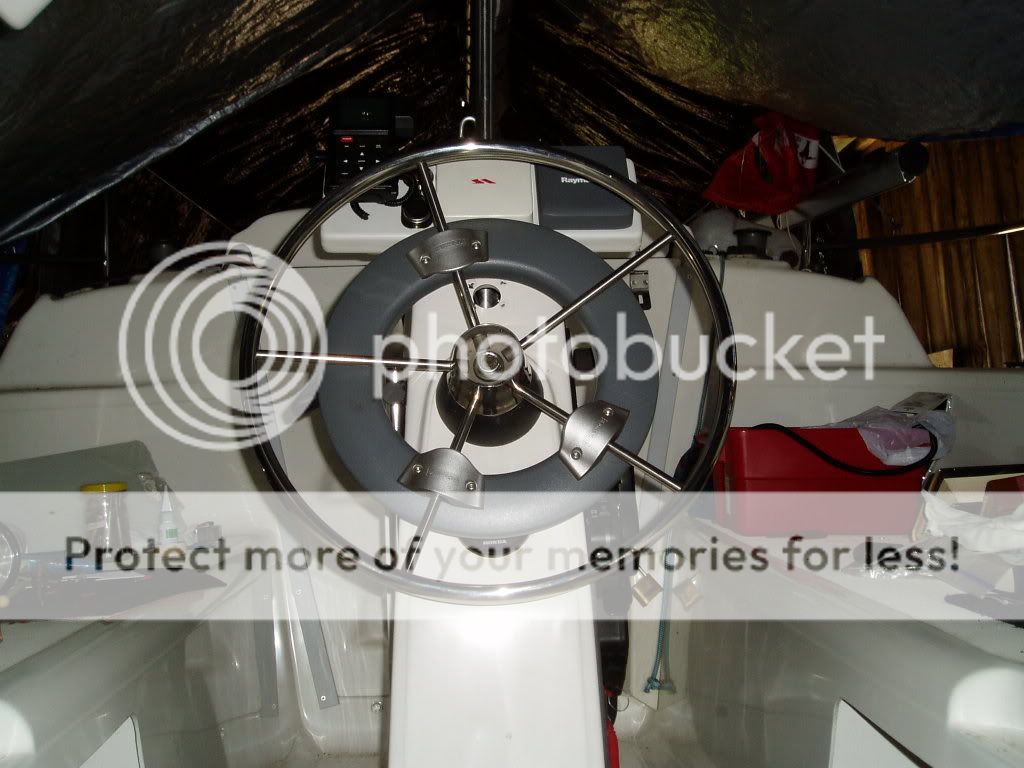
I like the look of that 18" wheel. I have ordered one...but it has been 2 weeks and still no delivery from KH Marine. Jeff said they were on back order. No rush...won't be able to get to it until this Summer or later anyway.
I will mount the controller on the pedastal top. Actually, I have a cutting board mounted on top of my pedastal (2 bolts...only 2 holes + plus a small hole for the wires) and to this pedastal board I have affixed my GPS mount and a compass. I will remove the compass and put the controller in front of the GPS. But I will make an inclined base/ramp so that the controller is "sitting up" some (maybe about 15-20 degrees is my guess) but not to interfere with the view of the GPS.
ON EDIT: Found this picture. I might be able to squeeze the controller in there between the compass and GPS.

I still have to figure out where I will make the hole for the cable going to the drive motor...I am thinking starboard side on the bottom of the pedastal. I might be able to run the line to the controller through the same hole I use for the GPS power cable...but I might drill another small hole below that inclined base/ramp and bring the wire up below the unit...out of sight that way.
As for the cable run for the motor and the controller. My thinking is they will run down inside the pedastal tube, but once it exits the tube into the rear berth area I am not quite sure how they will go from there. I think I will have to run those cables aft then under the berth towards the S1 Computer and then up to the Computer in front of the carpeted side wall. I had hoped to keep all the wires/cables out of sight behind the side panels, but the computer will be far enough aft that those wires/cables running to the Computer won't look too bad.
Can't wait to get to it.
Cheers,
Jim
I will mount the controller on the pedastal top. Actually, I have a cutting board mounted on top of my pedastal (2 bolts...only 2 holes + plus a small hole for the wires) and to this pedastal board I have affixed my GPS mount and a compass. I will remove the compass and put the controller in front of the GPS. But I will make an inclined base/ramp so that the controller is "sitting up" some (maybe about 15-20 degrees is my guess) but not to interfere with the view of the GPS.
ON EDIT: Found this picture. I might be able to squeeze the controller in there between the compass and GPS.
I still have to figure out where I will make the hole for the cable going to the drive motor...I am thinking starboard side on the bottom of the pedastal. I might be able to run the line to the controller through the same hole I use for the GPS power cable...but I might drill another small hole below that inclined base/ramp and bring the wire up below the unit...out of sight that way.
As for the cable run for the motor and the controller. My thinking is they will run down inside the pedastal tube, but once it exits the tube into the rear berth area I am not quite sure how they will go from there. I think I will have to run those cables aft then under the berth towards the S1 Computer and then up to the Computer in front of the carpeted side wall. I had hoped to keep all the wires/cables out of sight behind the side panels, but the computer will be far enough aft that those wires/cables running to the Computer won't look too bad.
Can't wait to get to it.
Cheers,
Jim
-
Matt19020
- Captain
- Posts: 576
- Joined: Sat Jul 15, 2006 1:29 pm
- Sailboat: MacGregor 26M
- Location: Middle River, Chesapeake Bay MD...2007 MacM Suzuki DF70 4-Stroke ..... "My Time"
- Contact:
Re: Raymarine S1 Wheel Pilot installation photos *many photos*
Retcoastie,
I like your instuments did you use one of the Navpod units or is that starboard?
I like your instuments did you use one of the Navpod units or is that starboard?
-
Retcoastie
- Captain
- Posts: 673
- Joined: Sat Sep 16, 2006 7:00 am
- Sailboat: MacGregor 26X
- Location: Gray Hawk, Kentucky 2002 X "Last Flight"
Re: Raymarine S1 Wheel Pilot installation photos *many photos*
Matt,
It is a navpod I got off eBay for $10. It had holes in it but they were smaller than I was going to need so it was a "no-brainer". It is attached with two bolts into the pedestal as the indents don't fit the Mac table support.
The compass is on a PVC pipe that is set in the mast support hole.
Ken
It is a navpod I got off eBay for $10. It had holes in it but they were smaller than I was going to need so it was a "no-brainer". It is attached with two bolts into the pedestal as the indents don't fit the Mac table support.
The compass is on a PVC pipe that is set in the mast support hole.
Ken
-
bastonjock
- Admiral
- Posts: 1161
- Joined: Fri May 25, 2007 10:41 pm
- Location: Lincolnshire United Kingdom Mac 26X
Re: Raymarine S1 Wheel Pilot installation photos *many photos*
Jim
i was thinking that the best place for the controller will be where my compass is,thinking about it,when a guys single handling your position for a tack will be in front of the helm,so if the controller is mounted where the compass is then al of the sheets and the controller are at hand,and it also cuts down on the amount of work if i run the cables down the port side.
i was thinking that the best place for the controller will be where my compass is,thinking about it,when a guys single handling your position for a tack will be in front of the helm,so if the controller is mounted where the compass is then al of the sheets and the controller are at hand,and it also cuts down on the amount of work if i run the cables down the port side.
-
bastonjock
- Admiral
- Posts: 1161
- Joined: Fri May 25, 2007 10:41 pm
- Location: Lincolnshire United Kingdom Mac 26X
Re: Raymarine S1 Wheel Pilot installation photos *many photos*
Redcoastie
i cant see the bracket on the helm,did you have any problems fitting it as Dave B indicated that the bracket may be the wrong sort for an X pedestal??
i cant see the bracket on the helm,did you have any problems fitting it as Dave B indicated that the bracket may be the wrong sort for an X pedestal??
-
Retcoastie
- Captain
- Posts: 673
- Joined: Sat Sep 16, 2006 7:00 am
- Sailboat: MacGregor 26X
- Location: Gray Hawk, Kentucky 2002 X "Last Flight"
Re: Raymarine S1 Wheel Pilot installation photos *many photos*
I didn't use a bracket. On the Wheel photo at the bottom of the drive wheel you can just see the bottom of the tack. I looked at it and thought it was in there pretty solid. I drill a hole right next to the port bracket holding the tack and inserted a rod I had laying around. It is connected to the bracket with a worm screw clamp.Bastonjock wrote'
i cant see the bracket on the helm,did you have any problems fitting it as Dave B indicated that the bracket may be the wrong sort for an X pedestal??
http://i344.photobucket.com/albums/p359 ... 260002.jpg
and
http://i344.photobucket.com/albums/p359 ... 260001.jpg
Hope that is clear.
This also causes the drive wheel to be upside down and the release lever is on the port side rather than the starboard (Wheel pic at about 8:30). I like it that way better because the drive motor is higher and the lever release position is down. The natural reaction for me, when I want to release the drive quickly, is to slap the lever down.
Ken